1968 Starcraft Mariner V - Winter rebuild

evildocrsx

Petty Officer 1st Class
Joined
Aug 1, 2009
Messages
244
Re: 1968 Starcraft Mariner V - Winter rebuild

I'm curious as to how you're gonna foam insulate them. I don't think I have quite figured out how to foam insulate my fish boxes yet. I need some ideas and your drawings would definetely help.
 

Azonic

Petty Officer 1st Class
Joined
Aug 18, 2009
Messages
279
Re: 1968 Starcraft Mariner V - Winter rebuild

I'm curious as to how you're gonna foam insulate them. I don't think I have quite figured out how to foam insulate my fish boxes yet. I need some ideas and your drawings would definetely help.


I will see if I can draw something up tomorrow...

I plan to do a full carboard model prior to final decisions....

Those will give the best ideas
 

vegasphotoman

Lieutenant
Joined
Jul 13, 2009
Messages
1,411
Re: 1968 Starcraft Mariner V - Winter rebuild

How bout using some small coolers igloo sized(theyre insulated and sealed no leaks!)
may even come with a drain, you could alter the drain to make sure it went down to the bilge area ......????????? build em into something...mebbe fiberglass em in somehow etc

could work...:D
 

Azonic

Petty Officer 1st Class
Joined
Aug 18, 2009
Messages
279
Re: 1968 Starcraft Mariner V - Winter rebuild

I have considered this approach...

And it has great merit as a solution...

In fact, most of the ideas I am working with to make mine work were based on a few "cooler" livewell designs I have been looking at...

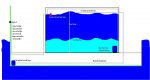
The biggest idea change I have considered is making my livewells in to a livewell under the center bench. That would allow for a bigger single tank, and room to hide a variety of things like pumps, wires, etc...

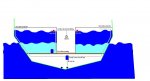
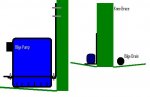
However, I want to make my livewell plumbed so I can bring in fresh water from what ever lake I am at, recurculate that water, dump and refill that water, and ultimatly not have to drain my livewell onto the deck of my boat, or have to pick up a huge cooler to drain it else where...

basically using a cooler will make it much more difficult to have a recurculating livewell as I would have to make "quick" disconnects for everything, or leave it in...

I am still open to the idea

I was also hoping to gain some fiberglass experience in building them too...
 

Azonic

Petty Officer 1st Class
Joined
Aug 18, 2009
Messages
279
Re: 1968 Starcraft Mariner V - Winter rebuild

Here are the plumbing concepts for the live wells....

One is for the dual rear livewells...
( I like this idea, good seperation of bait and catch, and balancing ballast)

The other is for the center larger single livewell...
( This gets more weight in the center of the boat, and bigger livewell)

Trying to make the system as simple as possible....

2 pumps is easier than multiple valves and reaching in the tank to switch them for various purposes..

Also allows me to run a 12v motor controller/timer to the transom livewell pump for regular circulation and airation...

Ideas?? Thoughts?

One thing to consider in the design, is the livewells can be run empty without the use of vlaves...
The lines from the pump are well above the water line, and even if the pump does not fail to a closed state, the water leve in the plumbing will not raise above the entry point, thus allowing me to run them empty till I need them...

Then I can fill them quickly with the pump when needed or empty them quickly...
 

Attachments

  • 2 wells.JPG
    2 wells.JPG
    57.1 KB · Views: 1
  • cooler livewell.JPG
    cooler livewell.JPG
    59.6 KB · Views: 1
Last edited:

Azonic

Petty Officer 1st Class
Joined
Aug 18, 2009
Messages
279
Re: 1968 Starcraft Mariner V - Winter rebuild

Here is a rough overview of the Livewell build up plan...


1: Build the initial "Inner" wall set to the shape of the boat minus 1 1/2"
This includes a full bottom 1" shorter than full inner height.
Build this out of 1/4" plywood

2: Glass in the interior portion of the well...

3: Build the "Outer" wall of the well to the exact size and shape of the boat at correct full width and height dimension... Built out of 1/4" also

4: Glass the outer skin

5: Place "Inner" Skin inside "Outer" shell, make sure to space the bottom the 1" needed for bottom insulation

6: Plumb everying inside the "void" as much as possible, drill/bore, set and seal all fittings, run pipe, attatch hinges for lids, install lights, etc....

7: Use expandable high density foam to "fill" the voids...

8: Cut foam to match level of top of "inner" skin.

9: Build and install livewell lids...

10: build padded seat/insulated cover for whole unit and install...
 

Attachments

  • Well Build.JPG
    Well Build.JPG
    24.7 KB · Views: 0

Captmills

Petty Officer 1st Class
Joined
Aug 22, 2009
Messages
374
Re: 1968 Starcraft Mariner V - Winter rebuild

Azonic, I think I mentioned in a previous post that I used a bisquit joiner on my plywood joints and used gorrilla glue then pulled it together with clamps and small blocks on either side of the joint and this worked quite well. I then glassed over the joint and it is very stable and well sealed...for your consideration. Steven
 

Azonic

Petty Officer 1st Class
Joined
Aug 18, 2009
Messages
279
Re: 1968 Starcraft Mariner V - Winter rebuild

Steven,

I am considering that option too..

A jointer and joints are inexpensive to buy...

I may do the 1/4" scarf since I will have scraps of that...

First have to determine costs of sheets...

Thanks for the suggestion....

That is one reason I started this thread...
A place to record the helpful suggestions of thinks I do not know how to do...:)
 

Azonic

Petty Officer 1st Class
Joined
Aug 18, 2009
Messages
279
Re: 1968 Starcraft Mariner V - Winter rebuild

Fishing rail...

I pulled this rail system off of another boat I had here...

After an hour or more of bending it to shape..

It now looks like it belongs on the boat.

I have not bolted it down, so as you can see it fits pretty well...


You can also see the spare wheel mount I welded on...
 

Attachments

  • 100_2465 (Small).JPG
    100_2465 (Small).JPG
    37.7 KB · Views: 0
  • 100_2468 (Small).JPG
    100_2468 (Small).JPG
    63.6 KB · Views: 0
  • 100_2467 (Small).JPG
    100_2467 (Small).JPG
    69.3 KB · Views: 0
  • 100_2466 (Small).JPG
    100_2466 (Small).JPG
    72.8 KB · Views: 0

Azonic

Petty Officer 1st Class
Joined
Aug 18, 2009
Messages
279
Knee problems

Knee problems

I am not having knee problem as the title says....

The boat is...

It looks like that previous owner over did the tightness of the knee brace bolts to the transom.

I hope you can see in the pictures, there is a crack in the knee brace due to stress....

Not sure how to fix this... or if it needs to be fixed
 

Attachments

  • 100_2469 (Small).JPG
    100_2469 (Small).JPG
    42.3 KB · Views: 1
  • 100_2470 (Small).JPG
    100_2470 (Small).JPG
    47.8 KB · Views: 1

vegasphotoman

Lieutenant
Joined
Jul 13, 2009
Messages
1,411
Re: 1968 Starcraft Mariner V - Winter rebuild

I would have someone weld it, those cracks will grow and grow, might as well since it look slike it is off already anyways

and your livewell drawing looks like a good solid design....
Cool that ya wanna work with fiberglass, after all it will be custom and cool when your done...might as well Have fun with it,

On the 2 pump idea...(fill and drain)
how about 1 Pump and a 3 way switch, FILL/OFF/DRAIN
I would think some kind of fountain pump would do the trick perhaps a "ok" to run dry type pump.

great progress your making! and your SS rails look excellent!:D
 

Azonic

Petty Officer 1st Class
Joined
Aug 18, 2009
Messages
279
Re: 1968 Starcraft Mariner V - Winter rebuild

Thanks Dude...

I love the rail...

I thought the 3 way valve through also..
first, they are $20+...
Then, it requires some interesting plumbing to get the tank to fill, recurculate, and drain...

As I figured it, it would take 2-3 3 way valves to make it work...

So in the long run, it may be a wash in $$ since I buy another pump... ??

On the live wells...

What is your vote? do the 2 in the rear? Or one single with a divider in the middle?
 

vegasphotoman

Lieutenant
Joined
Jul 13, 2009
Messages
1,411
Re: 1968 Starcraft Mariner V - Winter rebuild

after reading your plywood / expand foam idea on the livewells, how bout THIS idea

make the shape out of 2" or 3" thick foam blocks (Lowes etc) garage door type foam 2'x4' ft pieces....

anyways glue em together with white glue, then coat outside and inside with fiberglass resin and cloth...no need for the wood, once you coat it all, it will be plenty strong. drill your holes for the fittings, apply some resin to the holes to seal em up, then attach the fittings etc...should be real strong, especially if they are going inside some wood box area under a seat etc....or mebbe coat the outside with wood if they WILL be the supporting part

livewell.jpg
 

BobsGlasstream

Commander
Joined
Sep 11, 2009
Messages
2,128
Re: 1968 Starcraft Mariner V - Winter rebuild

AZonic,
For joining the ply together if you don't find the 5 X 10 I would rcommend cutting tenon on both pcs and then glueing the overlap together. You could use either a router or a table saw to cut tenons. Very simular to the scraf idea.
Bob
 

Azonic

Petty Officer 1st Class
Joined
Aug 18, 2009
Messages
279
Re: 1968 Starcraft Mariner V - Winter rebuild

I like the foam mold idea...

Simplifies a step!! Will the foam take the heat the resin puts out? If so, this could be "THE" solution.... I think I would still coat the outside in 1/4" plywood for a variety of reason....

I have settled on doing both the rear livewells. I think the concept of seperate areas for bait and catch is a good idea... (I also saw a post where someone thought their livewell dump cycles attracted more fish?!)

I think the joint is going to be either the tenon or scarf joint...
I needed a reason to by a dado blade!!

Here is a couple of pictures showing the contribution from my son..
He got the sanding blocks and orbital sander out after the engine cowling...
Looks pretty good so far. About an hour from a 13yr old...

The fiberglass looks pretty good, and any scratches that were in it were only through 1-4 of the 5 layers of paint on this thing...

He got down to the original Evinrude stickers too. I can almost make out the design and colors...

Repaint will be similar to the boat, only with a Gray, Black, White, with Red pinstripe...
(That purple has to go!)

now how do I prep the engine itself?
 

Attachments

  • 100_2488 (Small).JPG
    100_2488 (Small).JPG
    51.5 KB · Views: 0
  • 100_2489 (Small).JPG
    100_2489 (Small).JPG
    54.7 KB · Views: 0

BobsGlasstream

Commander
Joined
Sep 11, 2009
Messages
2,128
Re: 1968 Starcraft Mariner V - Winter rebuild

I think the joint is going to be either the tenon or scarf joint...
I needed a reason to by a dado blade!!
I am always looking for a reason to buy a new tool. :p
Bob
 

Azonic

Petty Officer 1st Class
Joined
Aug 18, 2009
Messages
279
Stupid question time!!

Stupid question time!!

This one has me baffled...

How do I mount my bilge pump to the aluminum boat??

The one I have has 3 places to screw/bolt the bottom of the pump to whatever you are going to mount too...

In this case, I am not screwing it to the bottom of my boat....

I guess I can make a small mounting bracket and attatch it to the transom or the knee brace?

what have you guys done?
 

ezmobee

Supreme Mariner
Joined
Mar 26, 2007
Messages
23,767
Re: Stupid question time!!

Re: Stupid question time!!

I 5200'd mine to the hull. 4200 if you ever want to get it back off again :)

fabbing some sort of bracket that attaches to the knew brace is also a good idea.
 

Azonic

Petty Officer 1st Class
Joined
Aug 18, 2009
Messages
279
Bilge Mount

Bilge Mount

Something like this??

The base of the mount is cut with a circle so the bilge pump fits down into it..
then use small stainless steel nuts and bolts to fasten the pump to the bracket. Then the bracket attaches higher up on the knee brace or up the the transom either way??
 

Attachments

  • BilgePump.JPG
    BilgePump.JPG
    13.9 KB · Views: 1

Azonic

Petty Officer 1st Class
Joined
Aug 18, 2009
Messages
279
Re: 1968 Starcraft Mariner V - Winter rebuild

Found and ordered a bilge pump timer the other day...

It is not specifically for a bilge pump but will work..

It is a timer that can be set to on/off times...

I can run the pump for 1 minute, then off for 20, and repeat... Or what ever timing sequence I want really...

That was a big part of what I was wanting to make happen...
Run that unit to a on/off switch and I should be set..

Also found the through transom bilge pump ...

Bought my new fish/depth finder too...(Santa will deliver that one!)

This weekend..
1: Clean out the hull to ready to rebuild state..
(clear, clean, and test drain passages specifically, sand and prep interior portions for paint, drill out rest of rivets)
2: get stainless hardware to mount railing...
( I will drill the holes and mount it for now, but will make a stainless steel backing plate for each mount before final install)
3: Sand the rest of the exterior specially the trim and such, to get past over spray off.
4: Buy lumber and resin to start the transom build up...
 
Top