1968 Starcraft Mariner V - Winter rebuild

ezmobee

Supreme Mariner
Joined
Mar 26, 2007
Messages
23,767
Re: 1968 Starcraft Mariner V - Winter rebuild

I'm am still throwing out my wet white foam little by little.... I am seriously considering going with pool noodles for my new flotation.
 

Azonic

Petty Officer 1st Class
Joined
Aug 18, 2009
Messages
279
Re: 1968 Starcraft Mariner V - Winter rebuild

I think I might go with 2 liter and 1 liter plastic bottles filled with floatation foam!! (I am not sure I am joking or not) :eek:

I am very confused on the floatation thing too...

I could do the blue/pink stuff cut and layed in vertically... is that expensive?

I like the purpose and ease of the mix foam... not the sticky nature and soak factor....

And all the other ideas are just a touch sketchy....

you guys help me make those decisions now while I am cleaning the boat...!
 

ezmobee

Supreme Mariner
Joined
Mar 26, 2007
Messages
23,767
Re: 1968 Starcraft Mariner V - Winter rebuild

It's all expensive. A 4x8 sheet of 1" think foam is $20. For my boat I figure no matter what route I go, it's going to cost me $100-$150.
 

Captmills

Petty Officer 1st Class
Joined
Aug 22, 2009
Messages
374
Re: 1968 Starcraft Mariner V - Winter rebuild

Hey EZ, If you have any of them noodles left over maybe you could send some his way :D Water drainage does seem to be an issue with these boats, Mine had little weep holes down the middle and it took several washings and poking with a clothes hanger to get and keep them open but I'm sure by now there is some dust clogging them up :eek: I noticed yours has a rib right down the middle so cleaning may be an issue. A good water resistant foam will be OK and of course it's aluminum...won't rust,bust or collect dust :D HMMM, where have I heard that before...:rolleyes:
 

Azonic

Petty Officer 1st Class
Joined
Aug 18, 2009
Messages
279
Re: 1968 Starcraft Mariner V - Winter rebuild

I got the area in the middle clean...
and water does flow... to a certain extent...

I was thinking about adding 2 more ribs either side of the center to support the traffic that my center console will produce??

I am thinking about bending the drain area up some in the front and back of each cross member??

Thanks for the help...
 

ezmobee

Supreme Mariner
Joined
Mar 26, 2007
Messages
23,767
Re: 1968 Starcraft Mariner V - Winter rebuild

I am thinking about bending the drain area up some in the front and back of each cross member?

Go for it, but only if you can figure out how to do without prying against the bottom.
 

Azonic

Petty Officer 1st Class
Joined
Aug 18, 2009
Messages
279
Oh..... the trailer!!

Oh..... the trailer!!

Not a movie trailer either!!

So with a 1953 trailer, I think this thing has had a few...Add ons over the years...

The axle is my fav!! looks like an old axle from a model T, chopped, shortend, and then thr drag links welded to the axle to keep her straight...

This simple fact is enough to make me abandon the ole thing...

The bunks are particle board!!

The rollers was a good idea.

The crank is good, the mount is not. It has a lot of flex. I replaced the "ski rope" with a strap before she went to the lake the first time.. also, no safety chain...

However, I can not find reasons for some of the things on this trailer...

plus, she is a 1 7/8" hitch... ouch!

I think I am going to transfer the old fenders over though...

Pics of new trailer tomorrow...
 

Attachments

  • 100_2385.jpg
    100_2385.jpg
    90.4 KB · Views: 0
  • 100_2389.jpg
    100_2389.jpg
    94.9 KB · Views: 0
  • 100_2386.jpg
    100_2386.jpg
    83.8 KB · Views: 0
  • 100_2390.jpg
    100_2390.jpg
    86.2 KB · Views: 0

Azonic

Petty Officer 1st Class
Joined
Aug 18, 2009
Messages
279
Re: 1968 Starcraft Mariner V - Winter rebuild

Go for it, but only if you can figure out how to do without prying against the bottom.


Good point.

I was thinking of using the support to pry against...?
 

Captmills

Petty Officer 1st Class
Joined
Aug 22, 2009
Messages
374
Re: 1968 Starcraft Mariner V - Winter rebuild

I think if you use 3/4 plywood you will be fine. As an old carpenter we used 3/4 on every floor system we put in a house and was quite ridgid, you can span up to four feet with tounge and groove with no sag, I used 5/8 ext. grade on my deck with bisquit joints and it is very study. Be careful if you bend your weep holes you don't want to bend or puncture the bottom of your boat. :eek:
 

motorpsykler

Petty Officer 1st Class
Joined
Aug 8, 2009
Messages
211
Re: 1968 Starcraft Mariner V - Winter rebuild

I'm not sure the exact setup of your weepholes, but if there is an edge that you can grab, a bottle opener can be used to carefully bend up the edge. An old school one like this:
standard-4-can-and-bottle-opener.jpg

Use the round end, and you might have to tweak the angle of the tab to work for you.
And I have to say, that might be the ugliest trailer I have ever seen..... I'm just sayin.:)
 

reelfishin

Captain
Joined
Mar 19, 2007
Messages
3,050
Re: 1968 Starcraft Mariner V - Winter rebuild

I don't think bending the edges will do much good, your best bet is just to clean it really well and see if they all drain then. I own 5 of those style hulls, I've never had to modify any of the drain passages.

The transom wood isn't too big a deal, you have to remove any rivets going through the wood, remove the corner caps and transom cap metal and slide the wood out the top. Fabricate a new panel with two 3/4" layers of plywood. I coat mine with epoxy and laminate them with a single layer of fiberglass in between. Pre drill all whole and coat well with epoxy as well. Seal all replacement bolts with 5200 sealer.

The pink foam insulation or pool noodles both work, I prefer the foam that the noodles are made from since I know it doesn't absorb water.
I never use pour in foam in an aluminum boat, it can block drainage, absorb water and distort the floor or hull if not done correctly.

I got lucky on my last two floor replacements, I came across several sheets of 4" thick insulation foam for free, it was an off brand of the pink stuff you see in Lowe's. The thicker foam made the job a lot easier as I didn't have to cut multi layers to fill sections with foam.

I never use thicker than 5/8" ply for the floor and I at the very least epoxy paint both sides. On mine, I coated both sides in resin and did two layers of fiberglass mat on top of 5/8" ply. This made the floor perfectly flat with no seams.
 

Azonic

Petty Officer 1st Class
Joined
Aug 18, 2009
Messages
279
Re: 1968 Starcraft Mariner V - Winter rebuild

I have decided to go with the sheet foam and skip the pour in stuff.

I have sourced some free and cheap 2" - 4" pink foam which helps make that decision for me!!

I also grabbed several giant sheets of cardboard the other day..

I am going to use that to make a model of my center console...

I can actually access enough of this to model the entire boat out in cardboard..

This may be an extra step, but it helps me see things in full scale and make changes before I commit to the expense of the wood, and get upset at a mistake in design or function...

I might be able to get the Center Console made up this weekend.

I am going to go buy the decking for the deck this weekend too.

I need to get it cut to size from my templates and back in the boat to do the rest of my design work.
With all the controls and fuel lines going under the deck, I want to know where to locate all my pipes...

Still looking for suggestions on my little kicker.. (keep or not)

I will post a picture of my floor and layout plans soon...

Thanks for the help..
 

Azonic

Petty Officer 1st Class
Joined
Aug 18, 2009
Messages
279
Re: 1968 Starcraft Mariner V - Winter rebuild

Here are the pictures of the plans..

So far, I have found the tank I want...
It is a 12 gallon with fill, vent, and fuel sending unit...
(24.50"L x 18.50"W x 7.25"H)

The drawing is as close to scale as it gets really...

Green is storage, blue is water type stuff.. :)
Cooler and or live wells...
Red is go go juice...
 

Attachments

  • Layout2.jpg
    Layout2.jpg
    31.5 KB · Views: 0

Okiebo

Seaman
Joined
Aug 5, 2009
Messages
59
Re: 1968 Starcraft Mariner V - Winter rebuild

What I planed on my keel drainage is to drill a series of extra holes thru the crossmembers(not thru the bottom of the boat tho). That should allow a lil extra drainage and not lose any structure to the braces. After I gluvit, new floor and carpet I don't plan on letting it go uncovered. One of the best investments you can make for the longevity of your boat is a cover. AND USE IT!
 

Azonic

Petty Officer 1st Class
Joined
Aug 18, 2009
Messages
279
Re: 1968 Starcraft Mariner V - Winter rebuild

There may be some merit to the idea of the additional holes for drainage.

I have to look at that one again.

I have been working late this week, and with the time change it is dark when I get home...

I did work in the shop last night on the console...

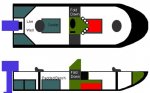
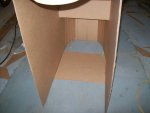
have to down load pictures still, but here is what I did...

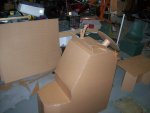
I have access to 4'x4' cardboard slip sheets.

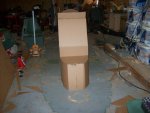
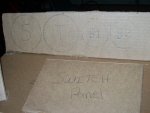
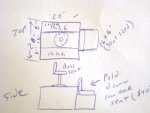
I transfered my plans for the console to the cardboard and started cutting.
A razor blade and Some hot glue later....

I found my planned console was to BIG:eek:

it was 24" wide and 43" long.

24" only left me 14" of walk space around.
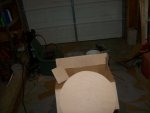
Cut down the with to 18" (just wide enough for the steering)
that worked great, however, I modeled up the fuel tank I wanted to go under the console, and now the CC is to narrow. Time to look at a different tank.

Then I noticed the console was to long. Got into the bow to much, and the curve of the bow started making space tight again..
A few cuts and glue later, and I had curved the front seat portion to match the shape of the boat, and now it fits well...

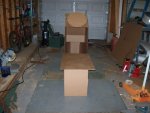
Modeled up my cooler/bench also.

Now I need to do the livewells and I will be pretty close...

Weekend work will include removing the old transom,
which means taking off the corners and rail, etc...

I hope to get the new floor cut so I can start spacing placement for controls..

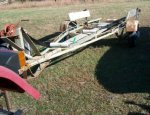
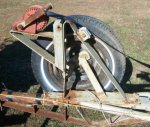
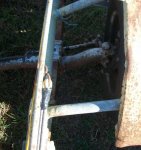
Oh, and I owe you guys pictures of the new trailer...
 

Azonic

Petty Officer 1st Class
Joined
Aug 18, 2009
Messages
279
Re: 1968 Starcraft Mariner V - Winter rebuild

Here are a batch of pictures for the console...
 

Attachments

  • 100_2410.jpg
    100_2410.jpg
    89.4 KB · Views: 0
  • 100_2399.jpg
    100_2399.jpg
    81.3 KB · Views: 0
  • 100_2402.jpg
    100_2402.jpg
    65.5 KB · Views: 0
  • 100_2395.jpg
    100_2395.jpg
    75.4 KB · Views: 0

ezmobee

Supreme Mariner
Joined
Mar 26, 2007
Messages
23,767
Re: 1968 Starcraft Mariner V - Winter rebuild

Very cool work with the prototyping!
 

Azonic

Petty Officer 1st Class
Joined
Aug 18, 2009
Messages
279
Re: 1968 Starcraft Mariner V - Winter rebuild

and a few more..

You can see the model of the cooler... Fancy!!

There is a lot of storage space in the bottom of this console also..

I am going to make the acces in 3 ways...

1: front seat will be hinged to acces smaller items.
I am thinking small tackle box, first aid, etc...
2: The angle portion of the front will hinge up...
General storage here. Snacks, jackets, phone, etc
3: Under the console access from under helm.
Larger items, life jackets, some tackle, tools, etc
 

Attachments

  • 100_2400.jpg
    100_2400.jpg
    71.5 KB · Views: 0
  • 100_2404.jpg
    100_2404.jpg
    70.3 KB · Views: 0
  • 100_2392.jpg
    100_2392.jpg
    93.3 KB · Views: 0

Azonic

Petty Officer 1st Class
Joined
Aug 18, 2009
Messages
279
Re: 1968 Starcraft Mariner V - Winter rebuild

Very cool work with the prototyping!

Thanks...

I actually have fun doing this too...

My son wants me to build him his first car this way...

if the weather is nice, I will transfer this to the boat and see if that work in all aspects before committing to plywood.
 

vegasphotoman

Lieutenant
Joined
Jul 13, 2009
Messages
1,411
Re: 1968 Starcraft Mariner V - Winter rebuild

Im with EZmobee that prototyping is cool...good idea too!

heres another layout idea...see PICS coller is skinny and long...youd have to custom make it with foam and fiberglass it in and add a drain port etc.....
the rest would all be storage...it would boost your bass seat height too...footroom for casting etc...maybye extend it all to the back where the engine bay is?

fun project you have going there........keep up the great work!
 

Attachments

  • seat1.jpg
    seat1.jpg
    68 KB · Views: 1
  • seat2.jpg
    seat2.jpg
    62.7 KB · Views: 1
Top