1988 Searay 24', hole in bottom of Boat (from bunks collapsing)

Fastrack

Petty Officer 3rd Class
Joined
Aug 8, 2011
Messages
95
Hi All,

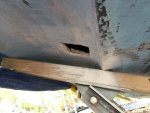
I had my Searay out last year to replace the coupler etc on my marine railway. One of bunks ripped off the supports putting a 2" angle iron through the hull. There were some words said!@#X. The photo was taken the day of, the damage has been drying on land all winter.

I completely replaced a transom and a floor in a 14' runabout 4 years ago, using Polyester resin, 1708, 6oz cloth. It's held up very well! I followed guides on here using tons of acetone, 40 grit paper etc, peanut butter (yum).

Onto the issue: IMG_5718_1024x768.JPG


Fiberglass: 18oz Biaxial with 1oz mat. It's knitted fabric. As well as 6oz e-cloth. Maybe CSM top layer as it produces a smooth surface when sanded (if using Polyester?)

I'm going to do a 12/1 taper on the outside (the hull is about 3/8" thick). So I need to go about 4.5" around the area? There's a curve to deal with as well, which will make it a little more difficult.

Lamination:
-- Boatworkstoday have the small piece in the repair area first gradually transitioning to the large piece of glass?!
-- West Systems and a few others have the large piece first gradually transitioning to the small piece?! - Is this the epoxy method vs Polyester above?

NOTE: I can get to the inside, the boat has a raised floor with a removable hatch beside the engine cover, there's a plywood bulkhead (1' by 6") running along the side which I'd have to cut into to access the hole. Is it worth the further destruction to the inside of the hull or would an "outside" repair be good enough?

However I want to make sure this is done right, I've been trying to decide between System Three Epoxy (SilverTip) and Polyester Resin.

1 gallon of Polyester is $49CAD +5 MEKP, SilverTip is $287.90 for 1.5 gallons (2:1) - 1.5 quarts is $102.70. I'm not sure 1.5 quarts would be enough?!

Is 4x the cost going to gain me much? If I go the polyester route, can I just put Interlux MicronCSC over the repair? Or would a thin coat of gelcoat be a good idea first? It doesn't matter what the repair looks like as it's under the boat. If I go the SilverTip route I can either leave the epoxy or boat it with the MicronCSC.

I understand Epoxy is an adhesive vs a mechanical bond of Polyester. For my transom repair I left the outer skin of the boat intact vs this repair we are stopping water from entering :)

Ben
 

Attachments

  • IMG_5718_1024x768.JPG
    IMG_5718_1024x768.JPG
    197 KB · Views: 2
Last edited:

Woodonglass

Supreme Mariner
Joined
Dec 29, 2009
Messages
25,929
This is how I'd do it. Cut away all remains of broken glass etc...Grind/Sand on the outside and inside with 40 grit and feather towards the hole. tape on the outside. On the inside fill the hole with PB. Lay down a layer of CSM 1" bigger than the hole. Another layer 2" larger than the hole and Then a Layer of 1808 over the CSM On the outside 1 layer CSM 1 Layer 1808 2 layers CSM. Sand and fair then paint. She'll be good as new!!! IMHO, Smallest patches always go down first.
 

Fastrack

Petty Officer 3rd Class
Joined
Aug 8, 2011
Messages
95
This is how I'd do it. Cut away all remains of broken glass etc...Grind/Sand on the outside and inside with 40 grit and feather towards the hole. tape on the outside. On the inside fill the hole with PB. Lay down a layer of CSM 1" bigger than the hole. Another layer 2" larger than the hole and Then a Layer of 1808 over the CSM On the outside 1 layer CSM 1 Layer 1808 2 layers CSM. Sand and fair then paint. She'll be good as new!!! IMHO, Smallest patches always go down first.

So your saying because it's 3/8" thick don't feather to a knife edge. Fill the remaining "hole" with PB from the inside (after tape on the outside, makes sense. After which I apply the the layers as you've suggested.

On 14' boat I did, I didn't even use cloth (I just looked at my order details from 2011! I tabbed the sides to the boat with a 8" wide 18 Double-bias 45+/- . The transom was all Biaxial 18oz w/mat and 1.5oz csm. :)

I'm assuming your saying to go with Polyester resin? I mean for me it makes sense as I know how it works. For fairing with polyester is there a product you'd recommend ? Or thickening it with Micro balloons good ?

This guy did an amazing series on fixing a hole in fiberglass, but his panel was not very thick: https://www.youtube.com/watch?v=i9hfpOCnzEs

As for the smallest patch first, it makes sense and that's how I would've done it if I didn't do any research! Boat Works today (video link above does it like this but West Systems doesn't!)

West Systems - https://www.youtube.com/watch?v=tMVCwhz_hY4 and in a write up here: http://www.westsystem.com/ss/repairi...in-fiberglass/

How much polyester resin do you think might be required for this? The company Noah Marine Supply in Toronto, sells the Unwaxed resin smallest is 1 gallon. Waxed comes in smaller volumes.

I guess I need some PVA Mould release so the unwaxed resin can cure. On the 14' boat I used Waxed resin when I knew I was doing the final layer. But in this case with fairing etc.. I can't do that.

Ben
 
Last edited:
CrazyFinn

Petty Officer 1st Class
Joined
Dec 12, 2016
Messages
357
The company Noah Marine Supply in Toronto, sells the Unwaxed resin smallest is 1 gallon. Waxed comes in smaller volumes.

I guess I need some PVA Mould release so the unwaxed resin can cure. On the 14' boat I used Waxed resin when I knew I was doing the final layer. But in this case with fairing etc.. I can't do that.

Ben

Noah's sells the little containers of air dry that you mix in with your final layer so it dries/cures properly.
 

Fastrack

Petty Officer 3rd Class
Joined
Aug 8, 2011
Messages
95
Noah's sells the little containers of air dry that you mix in with your final layer so it dries/cures properly.

Is that a better solution vs PVA Mould release? Spraying that on top seems like a very easy way for the final curing

Ben
 

CrazyFinn

Petty Officer 1st Class
Joined
Dec 12, 2016
Messages
357
No idea if it's better - I just know that I used that for my final layer of laminating in my boat since I was using unwaxed resin.
 

Woodonglass

Supreme Mariner
Joined
Dec 29, 2009
Messages
25,929
So your saying because it's 3/8" thick don't feather to a knife edge. Fill the remaining "hole" with PB from the inside (after tape on the outside, makes sense. After which I apply the the layers as you've suggested. Yes, Do the inside first. After 2 hours of curing take off the tap on the outside and do a bit of grinding If you grind into the PB filler it's A-OK, You need to kind of dish it out to allow for the layers of glass, resin and fairing.

On 14' boat I did, I didn't even use cloth (I just looked at my order details from 2011! I tabbed the sides to the boat with a 8" wide 18 Double-bias 45+/- . The transom was all Biaxial 18oz w/mat and 1.5oz csm. :)

I'm assuming your saying to go with Polyester resin? I mean for me it makes sense as I know how it works. For fairing with polyester is there a product you'd recommend ? Or thickening it with Micro balloons good ? Yes Poly resin will work Great!! You don't use Fiberglass mat with epoxy.

This guy did an amazing series on fixing a hole in fiberglass, but his panel was not very thick: https://www.youtube.com/watch?v=i9hfpOCnzEs

As for the smallest patch first, it makes sense and that's how I would've done it if I didn't do any research! Boat Works today (video link above does it like this but West Systems doesn't!) Yeah, those epoxy guys are weirdos!!!!:eek::eek::D

West Systems - https://www.youtube.com/watch?v=tMVCwhz_hY4 and in a write up here: http://www.westsystem.com/ss/repairi...in-fiberglass/

How much polyester resin do you think might be required for this? The company Noah Marine Supply in Toronto, sells the Unwaxed resin smallest is 1 gallon. Waxed comes in smaller volumes. Quart should be plenty You can use waxed resin on this patch just apply the next layer withing a few hours of the previous one.

I guess I need some PVA Mould release so the unwaxed resin can cure. On the 14' boat I used Waxed resin when I knew I was doing the final layer. But in this case with fairing etc.. I can't do that. Either way, Wax or PVA Or nothing!! Resin will cure eventually. Inside is not that critical. Outside you'll be applying Fairing material so not sure you need wax at all. I make my own fairing material with ballons and bit of cabosil and a bit of surfacing wax. Really works and sands well.

Ben


See my answers in Red Above...:D
 

Fastrack

Petty Officer 3rd Class
Joined
Aug 8, 2011
Messages
95
I went out this morning and removed the tarp (Wow these new tarps are junk, not even shedding water anymore after one winter)

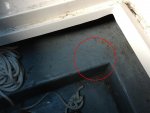
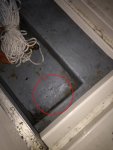
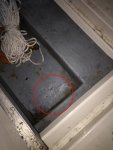
Anyway. The damaged can be accessed from the inside if I cut into the part circled in RED. I believe I can cut an access "hatch" in the top, but it won't leave a lot of room to work with. No way the floor is coming out. IMG_8477_1024x768.JPG

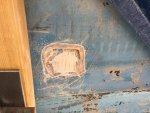
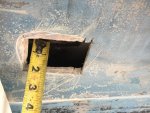
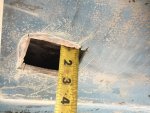
Two additional photos of the damage, I had JB Water Weld last fall as a temp fix, so I've used a dremel to get that off first. Next step is to cut out the bad area and do the tapper, part of which will go up the strake. IMG_8475_1024x768.JPG
IMG_8476_1024x768.JPG


Ben
 
Last edited:
Fastrack

Petty Officer 3rd Class
Joined
Aug 8, 2011
Messages
95
Hi all again,

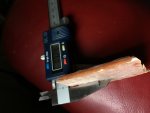
Please see my new diagram. The damage is right under this red circle. I've since cut out the damage using a dremel (so I could be more precise). And the hull is .324" thick. Looks like they used 3 layers of 1708 and a few CSM layers, pretty thick!
IMG_8497_1024x768.JPG IMG_8480_576x768.JPG

Do you still agree the above method is good? The strake is hollow so the repair could easily taper down it both on the inside and outside, once I make an access "hatch" IMG_8496_576x768.JPG


The "shelf" or the floor of the storage area is 3/4" on the outside and 1.5" on the inside above the damage. I have 5.5" until the stringer, and 4.5" forward to the bulk head?
IMG_8493_1024x768.JPG IMG_8494_1024x768.JPG


Ben
 
Last edited:
harleyman1975

Ensign
Joined
May 12, 2003
Messages
959
Best repair is going to be done like WOG said but it is going to be a bugger to access that area. If you are determined to repair it from outside only You are going to have to feather the outside back about 6 inches in all directions and then you will have to make a small patch of csm saturated with resin and then figure out a way to support it up against the hull as it cures. Wax paper works as a non stick barrier. then consecutive layers getting larger and larger until it is the thickness you desire. that will cost ya exactly .02 :rolleyes:
 

Fastrack

Petty Officer 3rd Class
Joined
Aug 8, 2011
Messages
95
Best repair is going to be done like WOG said but it is going to be a bugger to access that area. If you are determined to repair it from outside only You are going to have to feather the outside back about 6 inches in all directions and then you will have to make a small patch of csm saturated with resin and then figure out a way to support it up against the hull as it cures. Wax paper works as a non stick barrier. then consecutive layers getting larger and larger until it is the thickness you desire. that will cost ya exactly .02 :rolleyes:

Well I re-measured and cut out the bad section (post above). And the damage is in a "better location". I can just cut out the bottom of the storage area. And easily access the damaged area. The damage is 5.5" from the stringer at the left and 4.5" from the part at the bottom of the photo.
image_264232.jpg
The question is:

Do I feather/taper and go around the strake, As you can see, feathering to the right side (looking foward). I'll get to the bottom of the strake in about 3", so do I feather OVER the strake and down the other side?! If only the damage was more to the left :) You can see the busted glass in this photo, that damage is about 2", which I'll of course clean up when I cut my access hatch. IMG_8501_1024x768.JPG


Ben
 
Last edited:
harleyman1975

Ensign
Joined
May 12, 2003
Messages
959
I agree that is a tough spot to repair. maybe do half and half. half of repair on inside and half of repair on outside. on the outside I would feather it back to the edge of the strake.
 

Fastrack

Petty Officer 3rd Class
Joined
Aug 8, 2011
Messages
95
I agree that is a tough spot to repair. maybe do half and half. half of repair on inside and half of repair on outside. on the outside I would feather it back to the edge of the strake.


Yeah that's how I'm leaning at this point as well. Otherwise I'd have to "rebuild" the strake. On the inside it feels like quite a gradual curve on the strake, so I can feather down the strake.

Ben
 

Woodonglass

Supreme Mariner
Joined
Dec 29, 2009
Messages
25,929
Uhhmm how thick is your hull? Is it cored? The pic makes it look like it's a plywood cored hull If so the the repair is a bit different if my eyes are crooked let me know😜
 

Fastrack

Petty Officer 3rd Class
Joined
Aug 8, 2011
Messages
95
Uhhmm how thick is your hull? Is it cored? The pic makes it look like it's a plywood cored hull If so the the repair is a bit different if my eyes are crooked let me know😜

.323". And no Plywood. The super thick layers of glass do look like plywood though!

Just a correction from my last post. The original hull is 3 layers of Woven Roving (I had forgotten what 1708 looks like - as I used in 2011). I can clearly see the layers in the piece I cut (the photo I posted above was only to show the thickness).

I've read the Sea Ray boats were/are quite well built. I'm quite impressed in the hull thickness.

Ben
 

Woodonglass

Supreme Mariner
Joined
Dec 29, 2009
Messages
25,929
Alrighty Then!!!! If you do the repair as previously stated, you'll never know the hole was there!!!
 

Fastrack

Petty Officer 3rd Class
Joined
Aug 8, 2011
Messages
95
Alrighty Then!!!! If you do the repair as previously stated, you'll never know the hole was there!!!

Sweet man, Thanks for the help. I'll order up the supplies, but I have to wait for a bit warmer weather. It's a little chilly here still! Only 5C (41F) today.

Ben
 

Fastrack

Petty Officer 3rd Class
Joined
Aug 8, 2011
Messages
95
Hey,

It's been raining almost everyday since I ordered my supplies! Looks like I'll have a break in the rain. I finally finished all the sanding and prep work. Hardest part was sanding the grey bilge gelcoat around the hole. I can't remember what % of MEKP, I did back in 2011 for my transom rebuild.

How do you know how much MEKP to use? I know if I use too much it'll kick off too quick and will be brittle too. From the inside I'm going to lay down 1 layer of CSM and let it kick off. Remove the tape and do multiple layers to complete the inside... So a longer pot life would be nice.

According to the sheet I got with the resin it says 1.5% @ 68F (about what temp it is) has a pot life of 15 minutes and a gel time of 45 minutes.

The chart looks like this ( think they just copied this one..): snap014093.jpg


However I know it's temperature dependent. I found another website that specifies a temperature range for each %. Looks like they recommend 2% Is this a good guideline?
http://www.stickystuffsales.com/catalyst_chart.php snap014094.jpg


Small Volumes: I know I've read not to mix up less than X. I think 4oz. Is this a good idea to stick with? Looks like a 6" x 12" piece of 1708 requires about 4oz. So I don't think i'll need less anyway.

Ben
 

ondarvr

Supreme Mariner
Joined
Apr 6, 2005
Messages
11,527
The catalyst % is dependent on the exact resin, some resins have a very fast gel time and others are slow, so use the information supplied with the resin you have. Once you know how the resin responds to catalyst level and temperature you can adjust it from there, 1% is about the lower end for a reliable cure without knowing more about the exact resin.
 

Fastrack

Petty Officer 3rd Class
Joined
Aug 8, 2011
Messages
95
The catalyst % is dependent on the exact resin, some resins have a very fast gel time and others are slow, so use the information supplied with the resin you have. Once you know how the resin responds to catalyst level and temperature you can adjust it from there, 1% is about the lower end for a reliable cure without knowing more about the exact resin.

Ok the sheet that came with it suggests 1.5% at 68F. Which is what the temp is now. So I'll start with that

Ben
 
Top