Wheelchair Accessible Resto-mod

Joined
Oct 17, 2020
Messages
22
I had some posts in another thread but started this because the title makes more sense.

I have a 1984 JC Model 820 that we have disassembled and started putting back together. We are going to modify it so I can board and operate it in my big electric wheelchair. We are also converting it to electric power.

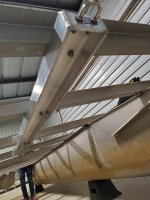
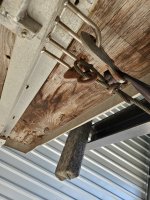
We are down to bare cross-members on the pontoons. Hopefully we can get over there and leak test the pontoons today before it snows again. The towbar was a frame made of aluminum tubing and had broken off sometime in the past. The boat was being pulled and held on the trailer by an eye through the first crossmember. We put a heavy duty towbar welded up rom 4" wide by 1/4" thick aluminum channel. See pictures. I need to replace some of the bolts holding the crossmembers to the pontoons. There are some missing and some had been replaced with improper stuff. Putting the floor on is almost in sight.

Questions
1 - the almost 40 year old transom is swollen, moldy and smells like stagnant lake water. I ordered a piece of 1-1/2" plywood to make a new one. Should I finish it with polyurethane or paint? I don't believe the original was finished.

2 - Looking ahead, I always thought the control cables ran from the console to the motor along the rail, at least on the cheap rentals i have been on. Our boat had the engine replaced so all that was changed, the engine control cables and the steering cable went straight down through the floor, along the crossmembers and into the transom. Which is the "right" way to do it or does it make any difference?
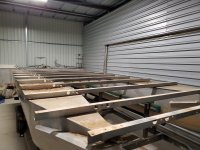
Bare aluminum.jpgBroken OEM towbar.jpgnew towbar.jpgBroken towbar and eye.jpg
Thanks -
 

alldodge

Moderator
Staff member
Joined
Mar 8, 2009
Messages
42,563
1 - the almost 40 year old transom is swollen, moldy and smells like stagnant lake water. I ordered a piece of 1-1/2" plywood to make a new one. Should I finish it with polyurethane or paint? I don't believe the original was finished.

Instead of ordering 1 1/2 I would have used 2 layers of 3/4 glued together.
So far as sealing, either wrap in fiberglass or coat with 2 layers of epoxy. Install and drill holes, then remove drill holes larger and fill with Marine-tex or other epoxy. Then re-drill holes to size

Which is the "right" way to do it or does it make any difference?
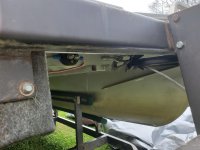
I don't see an issue with either. Most all boats run the cables down the side, but going straight down the middle wouldn't matter so long as its protected. Just my opinion

Looks like a great project
 

ahicks

Captain
Joined
Sep 16, 2013
Messages
3,957
Most 'toons are built with M brackets between the logs and the cross members, giving you a great, easy to access area to run your cable. Clearly, this is not a conventional construction. Is there a reason you don't want to run your cables through the holes already cut in the cross members?

I'm betting your 1.5" ply is laminated from thinner material, and as long as it's marine ply, I never pay much attention to sealing them. It should do well without for a LONG time....
 
Joined
Oct 17, 2020
Messages
22
Thanks for the input.
I guess I didn't think the cables would bend enough to get into the holes in the crossmembers. I will definitely check that out.

According to the company history on the JC Pontoons website, they have been building with U shaped pontoons since the beginning. They build some fancy high performance tritoons with U shaped logs today.
 

alldodge

Moderator
Staff member
Joined
Mar 8, 2009
Messages
42,563
There is a max bend radius on most cables, have check manufactures spec
The marinas near by have toons which are U shaped. They are heavier built for rental use
 

ahicks

Captain
Joined
Sep 16, 2013
Messages
3,957
I get you can't have TOO sharp a radius, so if you have to, go under/skip the first cross member and then use the rest from there back?
 
Joined
Oct 17, 2020
Messages
22
I get you can't have TOO sharp a radius, so if you have to, go under/skip the first cross member and then use the rest from there back?

I was just thinking the same thing
 

ahicks

Captain
Joined
Sep 16, 2013
Messages
3,957
There's a trick involving old fuel line I just thought of that you might be able to use. On those sharp alum. cutouts, where you are running your lines and wiring through them, you can use old fuel line sliced lengthwise to make grommets. FREE grommets that fit perfectly!

Just don't cut yourself slicing that stuff. It's not hard if you have access to a box cutter... -Al
 
Joined
Oct 17, 2020
Messages
22
Pressure testing pontoons?
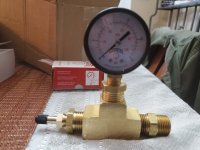
I had decided not to pressure test the pontoons because the thought of not going over 3 psi. without damaging the 'toon. I had pulled the drain plugs while the boat was sitting bow high on the trailer and nothing came out. When we took it the car wash after tear down I was following the boat on the road. It appeared a little water came out of one toon on the way and more on the way back. the plugs were out so it is possible water got in that way. The water coming out made me decide to pressure test and trying to not exceed that 3 psi led me to building the little rig pictured. The gauge is low pressure so reading 3 psi seemed easy. Yesterday we gave it a shot and started putting air inair pressure rig.jpg. The flat tops of the toon started to go back to flat with a bang. That scared us so we stopped to look, it was awful loud in the steel building! We never did get the gage up to three but never heard any leaks nor saw any by putting bubble solution on the seams.

Does anybody have comments or ideas on how to proceed or if we need to? Any thoughts or advice would be appreciated.
 

Grub54891

Admiral
Joined
Jun 17, 2012
Messages
6,142
I'd be putting a pressure regulator on that setup. Set it to zero and proceed to give it a couple pounds.
 

ahicks

Captain
Joined
Sep 16, 2013
Messages
3,957
There's a huge amount of volume within a pontoon. If you are monitoring a setup like that, going for 3psi shouldn't be much of a gamble to my way of thinking. KISS!
 
Joined
Oct 17, 2020
Messages
22
I was thinking the volume issue as well. I have a tiny craftsman "hot dog" compressor. The pontoon is many times bigger than the tank but the tank is 90 psi and the pontoon is 3. I do think we will go for it one more time.
 

alldodge

Moderator
Staff member
Joined
Mar 8, 2009
Messages
42,563
Not more then 3 and 2 would be better. At 3 its 3 psi per square inch, so 20 sq ft of surface = 2880 sq in (20x144) x 3 psi = 8640 and 2 psi = 5760
 
Joined
Oct 17, 2020
Messages
22
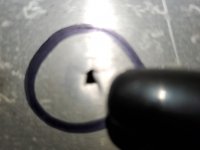
We found the hole. My little gage rig worked. It looks like the point of a nail. In the picture the black thing is the cap of a large sharpie. Next week we patch it.
 

Attachments

  • Thehole.jpg
    Thehole.jpg
    936 KB · Views: 4
Joined
Oct 17, 2020
Messages
22
Good Job!
As I mentioned earlier, we are converting the boat to an Elco electric outboard. Since the boat is relatively small and my wheelchair uses a lot of deck I have been planning to put the batteries in the seats which are going to be the Classic Pontoon seats from Pontoon Stuff. I tried to get interior dimensions of the seat base from them but I had mentioned batteries and all I got is "our pontoon seat bases aren't designed for that". So I guess their lawyers weren't going to let them answer the question.

Would someone who has these seats be willing to take a couple of pictures of the inside of the base? And some basic dimensions like length width, and height of any places big enough inside the base to put a battery? Sure would be appreciated!

John
 

Grub54891

Admiral
Joined
Jun 17, 2012
Messages
6,142
Don't know what size batterys you are using, I put a group 31 in the seat on my toon. It's in a battery box also, fits fine. I also installed vents in the seat base to vent the vapors.
 
Joined
Oct 17, 2020
Messages
22
Thanks! That is what I thought. Little vent grids should be cheap and easy to install. We just ran over to to the workshop and the old wooden seats we took off have vents of some sort in every base.
 

ahicks

Captain
Joined
Sep 16, 2013
Messages
3,957
Thanks! That is what I thought. Little vent grids should be cheap and easy to install. We just ran over to to the workshop and the old wooden seats we took off have vents of some sort in every base.
Yup. You'll be able to "re-purpose" those vents for sure!

I wanted a clean look, so my starting battery and 2 6gallon tanks are all under seats with plumbing/wiring run underneath out of sight.

I drilled drain holes in the bottom of the bases as well, as they don't come that way from the factory. Noteworthy is the fact you are likely buying Wise seats, and those same seats are available through Amazon at a reduced price, and shipped free for Prime members.....
 

Grub54891

Admiral
Joined
Jun 17, 2012
Messages
6,142
Yeah mine were wise seats with the plastic base. I drilled holes in the bottom also.
 
Top