73' mercruiser rewire

GSPLures

Chief Petty Officer
Joined
Sep 3, 2019
Messages
564
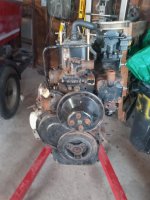
How is it going? I bought a 73' Sea Ray 180 for $400 off of a distant relative of my wife,
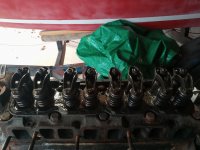
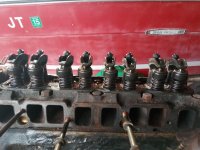
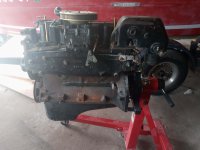
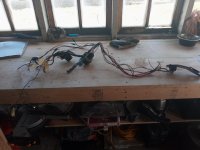
The boat was rotten which I am currently restoring(link in my signature). Before I pulled the motor I had to troubleshoot the wiring but eventually got it fired up. The wiring is a mix of original and redone which was why it took me so long to troubleshoot. None of the wiring or connectors are marine grade and they are corroded. Which is why. I am going to completely rewire the motor.

Is there anything which would list the wire gauges for the motor? I looked in the manual but did not see anything. I know I can mic a strand and then multiply by the strands to get the gauge wire used, but not sure if the redone wiring is right. Thanks
 

Scott Danforth

Grumpy Vintage Moderator still playing with boats
Staff member
Joined
Jul 23, 2011
Messages
50,234
since you are re-wiring, I would ditch the amp meter and use a volt meter.

main power from motor to key switch is 10 gauge. everything else is 16 gauge. are you updating the ignition or keeping the points. the resistor wire in the harness can be bought at napa.
 

GSPLures

Chief Petty Officer
Joined
Sep 3, 2019
Messages
564
The ignition was already switched over to a pertronix when I bought the boat. That is where the wiring from the previous owner was messed up. They moved all connections to the negative post of the coil and mixed up the plug wires and unhooked the shift interrupt switch. I switched the coil to a flamethrower and corrected the issues and she fired up after replacing the connectors at the starter.

I appreciate the advice. I do not have the schematic infront of me right now. Should I ditch the amp meter and wiring altogether (without schematic not sure if that circuit feeds anything else) and just tap my ignition switch for the voltmeter?
 

Scott Danforth

Grumpy Vintage Moderator still playing with boats
Staff member
Joined
Jul 23, 2011
Messages
50,234
The amp meter goes in line. However they are limited to how,much current they pass.

To bypass, just tie the two wires together.

Check out the stickies in the electrical forum
 

GSPLures

Chief Petty Officer
Joined
Sep 3, 2019
Messages
564
The amp meter goes in line. However they are limited to how,much current they pass.

To bypass, just tie the two wires together.

Check out the stickies in the electrical forum
Thank you I will check out the sticky
 

GSPLures

Chief Petty Officer
Joined
Sep 3, 2019
Messages
564
Here is a link to service manual one, section C (electrical) https://boatinfo.no/lib/mercruiser/manuals/mercruiser1.html#/180
I appreciate it. I have the whole service manual downloaded on my phone and computer. I have a little bit of down time at work so i looked over the schematic. I couldn't find the sticky but with a search came across a few threads.

I see there is a wire coming from battery power off the starter going through the ammeter going back out through the harness to the alternator battery terminal. Then they use that terminal off of the ammeter going to the key switch battery terminal and another to the fuse block.
So all I have to do is tie the wire coming from the starter to the wire going to the alternator behind the dash to remove the ammeter? Or do I have to add a wire on the motor side?
 

GSPLures

Chief Petty Officer
Joined
Sep 3, 2019
Messages
564
I have to correct myself, just realized I looked at the wrong schematic. The wire does not go to the starter. It runs to the 40 amp breaker then to the slave solenoid

I also just realized you answered my question before I asked it when I re-read your post. You sir are good .
 
Last edited:

GSPLures

Chief Petty Officer
Joined
Sep 3, 2019
Messages
564
Been awhile since I have updated. I finally got my garage straightened out and the motor up on my stand.

This thread is going to go a little deeper than just a rewire. I figured it will be easier on everyone to keep it all in one thread.

I pulled the starter, alternator, and the harness from the motor. I am going to also pull exhaust and valve covers to make sure everything is in order, then repaint the motor.

I ran through the harness and will be ordering the wire, connectors, gaskets, thermostat and a new exhaust shutter. I am also going to have the starter and alternator tested before reinstalling, and testing the exhaust manifold for leaks. To test the exhaust I will be pouring acetone into the water jacket which I read about on another thread on the forum.

I may replace the coupler not sure yet though as the one on the motor seems good. The rubber does not have any dry rot and the splines are not showing any wear. Is there any signs that I can look at to tell for sure if it needs to be replaced? I have attached a picture.

I also will be replacing the water pump in the out drive and the u joints. The shafts have some surface rust when I bought the boat the out drive was already off because the previous owner replaced the bell housing and installed a new gimble bearing. So I will also be cleaning the shafts up.

Is there anything else you guys recommend to check before installing the motor in the boat?
 

Attachments

  • 20210314_124802_compress12.jpg
    20210314_124802_compress12.jpg
    971.7 KB · Views: 20
  • 20210314_124813_compress79.jpg
    20210314_124813_compress79.jpg
    793.8 KB · Views: 13
  • 20210314_124823_compress35.jpg
    20210314_124823_compress35.jpg
    749.1 KB · Views: 66
  • 20210314_125206_compress0.jpg
    20210314_125206_compress0.jpg
    1 MB · Views: 12
  • 20210314_125215_compress0.jpg
    20210314_125215_compress0.jpg
    1 MB · Views: 12
  • 20210314_125229_compress49.jpg
    20210314_125229_compress49.jpg
    1.1 MB · Views: 12
  • 20210314_131133_compress69.jpg
    20210314_131133_compress69.jpg
    756.5 KB · Views: 17
  • 20210314_145758_compress67.jpg
    20210314_145758_compress67.jpg
    963 KB · Views: 20

Bondo

Moderator
Staff member
Joined
Apr 17, 2002
Messages
71,082
Is there any signs that I can look at to tell for sure if it needs to be replaced? I have attached a picture.

Ayuh,...... The coupler in the picture is junk,..... The splines are very pointy, Worn out,.....
The inner tops of the splines should be flat, 'bout 3/32" wide,....
 

GSPLures

Chief Petty Officer
Joined
Sep 3, 2019
Messages
564
Ayuh,...... The coupler in the picture is junk,..... The splines are very pointy, Worn out,.....
The inner tops of the splines should be flat, 'bout 3/32" wide,....
I appreciate it, I will be adding that to the list of parts.
 

Scott Danforth

Grumpy Vintage Moderator still playing with boats
Staff member
Joined
Jul 23, 2011
Messages
50,234
the motor itself appears to be on borrowed time

if there is a crack on the outside of a 2.5/3.0, there most likely is a crack on the inside.

20210314_124823_compress35-jpg.335420
 

GSPLures

Chief Petty Officer
Joined
Sep 3, 2019
Messages
564
the motor itself appears to be on borrowed time

if there is a crack on the outside of a 2.5/3.0, there most likely is a crack on the inside.

20210314_124823_compress35-jpg.335420
I agree. I may be lucky or hopelessly hopeful time will tell.
When I first discovered the weld my heart sank, I ran a compression check which was decent numbers and all cylinders were within a acceptable range. I expected milky oil which when drained was old and no signs of water (i know this does not necessarily mean there is no crack but still better than I expected). I did some more digging on the history of the motor (bought from wife's distant family) I was told that the bottom end of the motor was rebuilt (hope they checked the inside of the block) and confirmed from my father in law who also stated the last time he was on the boat that the motor ran strong (been a mechanic for 40 years). The weld looks as if it had been there for a really long time. No signs of grind marks or repaints, unless the block had been blasted and repainted at some point. My father in law also said he does not ever remember the block being cracked (I know that doesnt mean it was not) but if I am lucky possibly a factory defect??? (I know highly unlikely)

With all that said, if I can get a couple seasons out of it I will be happy. I plan on getting a remanned or finding a donor boat when the time comes. Possibly sooner if a good deal comes by.
 

GSPLures

Chief Petty Officer
Joined
Sep 3, 2019
Messages
564
Well I ordered the gaskets needed for the exhaust, water circulation pump, and fuel pump and valve cover. Tomorrow I plan on removing all the other Items and inspecting and further clean up hopefully to not find the final nail in the coffin for the motor ☠️ 
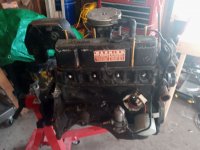
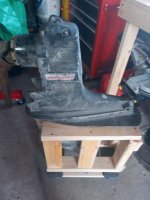
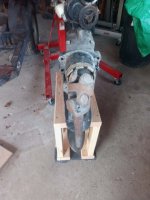
(at least I will have the gaskets for a reman if I do:unsure:). Once I fully determine this motor is going back in the boat I will finish ordering parts and rebuild the harness.
 

oldsub86

Petty Officer 1st Class
Joined
Sep 9, 2008
Messages
311
the motor itself appears to be on borrowed time

if there is a crack on the outside of a 2.5/3.0, there most likely is a crack on the inside.

20210314_124823_compress35-jpg.335420
So, how would he find a crack on the inside? Pull the pan and inspect? Where to look and what to look for? Would pressure testing the engine be sufficient to tell if there was a problem without pulling the pan etc.?
Does that look like a weld or epoxy or something? The "weld" looks pretty wide.
 

GSPLures

Chief Petty Officer
Joined
Sep 3, 2019
Messages
564
So, how would he find a crack on the inside? Pull the pan and inspect? Where to look and what to look for? Would pressure testing the engine be sufficient to tell if there was a problem without pulling the pan etc.?
Does that look like a weld or epoxy or something? The "weld" looks pretty wide.
Its definitely a weld on the block, but I agree it is wide.
 
Last edited:

GSPLures

Chief Petty Officer
Joined
Sep 3, 2019
Messages
564
I removed the carb, valve cover, and exhaust and separated the riser. I am pleasantly surprised how it looks. I was expecting a rusted mess. I still want to remove the fuel pump and water pump I just want to make sure I have the gaskets in hand before I do. Michigan Motorz shows online they are in stock, now I just have to get off work early enough to get there before they close.
 

Attachments

  • 20210317_175950_compress65.jpg
    20210317_175950_compress65.jpg
    769.5 KB · Views: 2
  • 20210317_175958_compress94.jpg
    20210317_175958_compress94.jpg
    847.2 KB · Views: 2

GSPLures

Chief Petty Officer
Joined
Sep 3, 2019
Messages
564
When I reinstall the exhaust and riser I planned on using anti seize on the bolts. I did not see anything in the manual about using RTV or anything. Do any of these bolts enter the water jacket? The gaskets had what looked to be RTV or anti seize on them I am assuming RTV because the parts needed gentile persuasion with a rubber mallet.
 

GSPLures

Chief Petty Officer
Joined
Sep 3, 2019
Messages
564
Hows it going? I have the motor cleaned up and ready for paint. I am still waiting on the exhaust gasket set to be delivered.

I have been reading other threads and there is a lot of mixed information. Should I use permatex aviation on the threads and gaskets and threads of the exhaust manifold, circulation pump amd thermostat housing? Seems people have had luck both ways. I trust the opinions on this forum so I was hoping for some of your opinions. Thank you.
 

Bondo

Moderator
Staff member
Joined
Apr 17, 2002
Messages
71,082
Should I use permatex aviation on the threads and gaskets and threads of the exhaust manifold, circulation pump amd thermostat housing?

Ayuh,.... I use either #2 for a non-hardenin' paste, or #3 for liquid,....
 
Top