1976 Montego 16- The "Free" Puppy

ratdude747

Petty Officer 1st Class
Joined
Sep 30, 2023
Messages
296
Looking into Rule pumps, the smallest full auto pump they make is the 500GPH Rule 25SA. Draws 1.8A @ 12V and 1.8V @13.6v supposedly. Does draw a bit of power when on, but that just means I need to be more diligent with disconnecting the battery when the boat isn't in use. I already do a decent job (I think) of opening the disconnect when the boat is sitting.

Close enough? The existing wire appears to be either 14 or 16 gauge... the new wire is 14 gauge. I think it's a 5A breaker but it's not marked and none of the pics I took when the console was out shows the full breaker part number cleanly (ends in 050, which is why I'm thinking it's 5.0A).
 

MNhunter1

Lieutenant Junior Grade
Joined
May 12, 2014
Messages
1,077
I'd skip the full auto and go to a manual with float switch, wired direct to the battery as well as the console as you noted in an earlier post. Your drain tube/hole will indicate how big you can go as the larger pumps require a larger hole. I think after 800gph it moves up from the 3/4" hose. Some run two separate pumps for added insurance if on bigger water, but I just stuck with one as I'm often only on inland lakes and there's typically others around the area.
 

ratdude747

Petty Officer 1st Class
Joined
Sep 30, 2023
Messages
296
I'd skip the full auto and go to a manual with float switch, wired direct to the battery as well as the console as you noted in an earlier post. Your drain tube/hole will indicate how big you can go as the larger pumps require a larger hole. I think after 800gph it moves up from the 3/4" hose. Some run two separate pumps for added insurance if on bigger water, but I just stuck with one as I'm often only on inland lakes and there's typically others around the area.

Was thinking roughly the same thing pump wise now that I've slept on it.

I'm thinking of getting a pump with a built in switch (due to the poor access to the area, having both in the same unit makes things a lot easier to manage). No worries about draining the battery when not in the water (that way I can keep the battery connected when towing, so I can flick the ignition switch to confirm battery/fuel status while on the trailer).

Power would still be coming from the console (so it uses the same breaker). On this boat, that breaker is tied to the battery... so all good there.

Not wanting more than 500GPH since that's what my wiring and hose will allow. This is only a 16' bowrider after all...
 

Moserkr

Chief Officer + Starmada Splash Of The Year 2021
Joined
Nov 23, 2020
Messages
871
I have an 800 gph on my 16' since thats what the PO installed. He upgrade the 1/2" to the 3/4" hose and fitting. Very thankful for it too since I almost sunk once before my rebuild due to just one lost rivet. Watching it pump water that was up to my floor boards for 5 min straight was eye opening. Havent installed the automatic pump I bought yet but I need to do that and hardwire it to the battery. Currently running off my control and fuse panel.

Wish I could help you with the leak but Im sure you will track it down. The rotten debris that came with it is cause for concern with the glass boat.
 

MNhunter1

Lieutenant Junior Grade
Joined
May 12, 2014
Messages
1,077

You could move up to 800 without issue. I always like to have it and not need it rather than need it and not have it. I lean towards the independent standard pump and float switch from a failure perspective. Honestly haven't done much research on failure rates of automatic pumps, nor tested the ability to still flip the switch at the console if the separate float switch fails, but I feel like it gives me more options and redundancy if the switch were to ever fail, i.e. hopefully won't take out the whole pump. Easier to swap out for new down the road if needed as well.
 

ratdude747

Petty Officer 1st Class
Joined
Sep 30, 2023
Messages
296
I have an 800 gph on my 16' since thats what the PO installed. He upgrade the 1/2" to the 3/4" hose and fitting. Very thankful for it too since I almost sunk once before my rebuild due to just one lost rivet. Watching it pump water that was up to my floor boards for 5 min straight was eye opening. Havent installed the automatic pump I bought yet but I need to do that and hardwire it to the battery. Currently running off my control and fuse panel.

Wish I could help you with the leak but Im sure you will track it down. The rotten debris that came with it is cause for concern with the glass boat.

I already have a 3/4 hose... my concern is overloading the wiring and/or tripping the breaker.

The rotten debris is from known locations... between the known deck issue (old damage) and a rotten divider board at the front of the engine area/end of the deck under the gas tank such is accounted for. From what I can tell, the damage is limited to those areas as they're separated from the stringers and hull by a layer of glass.


You could move up to 800 without issue. I always like to have it and not need it rather than need it and not have it. I lean towards the independent standard pump and float switch from a failure perspective. Honestly haven't done much research on failure rates of automatic pumps, nor tested the ability to still flip the switch at the console if the separate float switch fails, but I feel like it gives me more options and redundancy if the switch were to ever fail, i.e. hopefully won't take out the whole pump. Easier to swap out for new down the road if needed as well.

With my wiring/breaker, no. 800 requires a 7.5A breaker for a 12V pump (4A for a 24V pump, but this is a 12V boat).

If I had easy access to be able to "properly" mount a separate switch I'd see your point... but since I'm more or less forced to slide whatever I install under the engine (and let gravity hold it in place like the old pump), I don't see a separate switch being a good solution here.

---

Edit: Found an Albin 01-04-015 for $26 shipped... 500GPH with a float switch. Taking it!
 
Last edited:

ratdude747

Petty Officer 1st Class
Joined
Sep 30, 2023
Messages
296
Pump came in yesterday. Works great at least in testing.

The LAPS had the pigtails that match the stock pump connector in stock, so I used that rather than cutting up the new pump. I spliced that to some spare 16-3 extension cord cable I had in the junk pile (same as what the old pump used), giving enough length to be able to move the pump to a reachable position for testing. All splices were done with heat shrink crimps and two passes of electrical tape.

While I was down there, I found the long-lost plug for the front of the engine bilge... locked up with rust, it'd been under the engine for a very long time. I have new ones on today's mail truck...

Maybe we're getting somewhere???

(no pics due to the site issue... once resolved, there will be a rollup post with such).
 

ratdude747

Petty Officer 1st Class
Joined
Sep 30, 2023
Messages
296
Two things: First, I took the boat out today on Monroe Lake... more on that later.

Second, since it seems that the photo issue isn't getting resolved any time soon, I've uploaded some things to Imgur... here's what I had worked on previously with some additional commentary based on how today went:

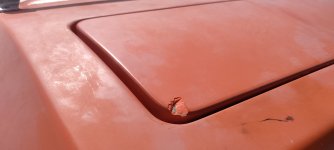
Internal Bilge Plug:

IZ1MO69.jpeg


There's supposed to be a bilge plug there, which I did eventually find in a rusted solid state. Fixed with a new plug and a fresh chain:

FsYfdmx.jpeg


No issues here... ski locker stayed nice and dry (yes, it was in the hole, not as shown).

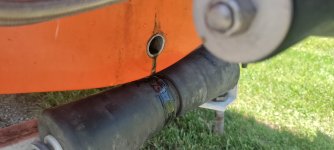
New bilge pump: Here's the new power tap I added for the automatic part of the pump:

DZLlGnz.jpeg


Eventually I'm thinking of redoing it by using a switch similar to the nav light switch with a 3rd middle position that only powers and using that for the "automatic" power feed for the pump. That way I can isolate the pump when driving/dry storing without needing to necessarily disconnect the battery. If I can even find a matching switch that doesn't stick out like a sore thumb. But for now, what's there works...

New bilge pump connections:

igHChuJ.jpeg


pXiWhu3.jpeg


Yes that is 16-3 extension cord cable... but the old pump also used such for its power lead (black instead of orange, but orange is what I had a bunch of in my wire drawer). Note that I kept the original connector so I didn't have to modify any existing wiring.

Can't say that we saw the pump automatically kick on (being a "dumb" pump with a float switch, it does backfeed the manual wire which lights the console light), but there wasn't much water back there when the outing was over, so all is well. I think a lot of the water that came on last time was in fact a ton that was trapped in the tube canvas that accidentally drained into the bilge We did tube a bit today, but it was a with a different tube that didn't have that issue.

----


Had a couple issues. First, for the second time, the steering wheel hub cover popped out on me. Since the wheel hub is cracked, I'll probably replace the wheel if I can (seems to be a standard tapered shaft + keyed type wheel, universal?)

Second issue probably ended the season though... the captain's chair busted on us.

QTmIEBm.jpeg

Been making some bad noises, but had no idea it was this bad... also didn't know this cushion had a wingnut that was supposed to allow it to be removed to reveal a bit more storage:

uY03QtI.jpeg


The cover has a small hole too. The rear cushion needs new foam/upholstery (animal damage present when I got the boat)... and the back of said chair has a small tear (on par with the side upholstery). That said, the small damage I can't be bothered about (as this is a boat in use, not a show/museum piece)... but obviously I need a new seat board for the captain's chair and will get the rear seat cushion redone (good original board, has been reupholstered once before). Not sure if the board is something I should make myself (my FIL has a wood shop, probably could make pretty easily with a router using the busted one as a flush bit template)?

Also of note is that I did determine WOT on this thing is 4050RPM and 41-42MPH on the current prop. Not the "over 50MPH" that the boat was advertised as, but that was with a very different prop (Aluminum Mercruiser 14.25"x21Px3, currently I have a composite piranha 14"x18x4) ... hole shot not very good on the stock prop I'm told. Since above 40 (ish) MPH isn't super usable for me (water too rough), I'll take the improved hole shot since my WOT is still in the 3800-4200 range spec'd by Mercruiser.
 

ratdude747

Petty Officer 1st Class
Joined
Sep 30, 2023
Messages
296
Forgot to post it, but the seat was fixed several weeks ago (used some 3/4 plywood that my father-in-law had on the scrap shelf). But, between booked weekends and remains of hurricanes I couldn't get the boat back on the water until today, which is the final outing of the year. Like the last two outings, we went to Monroe lake.

For the most part, the boat ran pretty much perfectly. One funny thing that happened was while my buddy was driving, we saw something shiny on the water. We intercepted it, and found it was a bag of chips still sealed up:

ace0bcc2-d19c-410a-a4a9-b9ca906ead81.jpeg

Yes, he did open the bag and found them perfectly edible. Did our part to keep the lake clean!

So, what did go wrong? A few minor things:

  1. As has been the case on pretty much every outing, cold starting is a bit of tricky task. Being carbureted, it can't idle at normal speed when cold (and being a boat, obviously there's not a fast idle cam). As a result, I have to throttle it up somewhat heavily for it to start, and when it does, it's turning 2000RPM+. I do make a point to make sure I cranked the engine over some before pushing the throttle (and priming it via the accelerator pump) to try to avoid burning the impeller (like I did earlier in this thread!!!), but I still am amazed the impeller is still working fine despite the fast running when starting up. I guess that's the difference between being in large body of water and being on muffs... which makes me wonder how I managed to not have such hard starting when on muffs? I was running E0 fuel then (not E10 like I have been, more on that later)... could that have anything to do with this?
  2. While using the lake water to wash excess sunscreen off my fingers, my wedding ring came off and went to the bottom of the lake. At least it was a cheap wish.com tungsten carbide one that was very worn and not something more valuable!
  3. While cornering hard at a bit of speed (not my driving), I noticed some noise from the outdrive. U-joint issue?
With this outing done (and the tank of E10 gas burnt as low as I dared), I began winterizing the boat on the way home by filling up on E0. I've also opened all the block/manifold drains (and yes, all 4 did drain effectively!) and will change the engine oil/filter, fuel filter, and outdrive oil sometime soon. I also will be looking to get the back seat reupholstered (an old issue temporarily patched badly with duct tape), patching some dock rash in the bow (marine-tex?), replacing some missing gap feeler/grout in the bow rubrail joint (where the two halves of the fiberglass shell meet, has been filled with something hard but is falling out in chunks), removing and hole filling the defunct pitot tube system in the transom (marine-tex yet again?), and the required annual waxing.

I need to check the bellows for dry-rot- I did see what looked like some rot starting there awhile back-. If such is the case (or the steering noise issue warrants further investigation), I will also need to figure out the best/safest way to pull the outdrive. The boat is currently sitting in my front yard; I have an engine hoist but I don't know if/how well it'd work in a non-paved environment. Originally I was given an old truck-bed mounted hoist that I was going to convert to hitch-mounted (and use with the back of my truck), but it's rusted solid. I also have an old hoyer lifter at my parents house (failed attempt at a small car engine hoist from 10 years ago) which might do the trick, but it has narrow wheels being designed for an indoor medical setting, likely making it a poor choice for outdoor use. I'm not super keen on parking the trailer in my driveway (I'd have space, but would have to park my 3rd vehicle in the yard). Of course, with the outdrive out, I'd check the gimbal bearing alignment and everything else back there.

All in all, a good (albeit somewhat short) first season... next year will be even more fun I'm sure!
 

ratdude747

Petty Officer 1st Class
Joined
Sep 30, 2023
Messages
296
Pulled the hoyer lifter from storage... I'm wondering if I can put different casters on it that handle being used in the yard. If nothing else, the lift mast slides out of the base and could be mounted in something else instead.
 

ratdude747

Petty Officer 1st Class
Joined
Sep 30, 2023
Messages
296
Test fitted the Hoyer lifter last night... Perhaps with some different casters I think I have a winner?

IMG_20241021_192636.jpg
 

ratdude747

Petty Officer 1st Class
Joined
Sep 30, 2023
Messages
296
Reviving this... now that the holidays have come and mostly gone, I can better budget repairs and upgrades.

Things I want to get done before the upcoming season (aside from the annual oil/fuel filter change and waxing):

  • Re-upholster rear seat cushion (a deferred repair from last season)- asking locally for a shop to do this...
  • Re-check bellows for dry rot (make sure it's not just cracked dirt)... and if so, replacing them and the like (gimbal bearing plus alignment check).
    • If I don't find rot, probably will skip it this year due to such being a rabbit hole and it already being a bit late in the offseason. But More than likely, what I saw was rot, and rabbit hole it is.
  • Remove the rest of the disused Pitot tube hardware from the transom and fill holes (Probably going to use six10 for that). Haven't decided if it's worth trying to gel coat the filler since pre-tinted orange is not available in small quantities (unless I want to spend $80 for a quart).
  • Repair some dock rash on the bow (more six10, while I have it out). Also reseal a 1/4" gap between the upper and lower hull at the rubrail (had been filled previously with caulking but is busted out, six10 appropriate for this too?)
  • Use expanding foam (or some other appropriate hard product) to line the keel under the ski locker to allow said locker to be usable for skis (or something to cover up the rough raw fiberglass currently exposed.). Maybe just lay some rubber matting or the like down there when in use?
  • (Maybe) replace the steering wheel that's falling apart (cracked, hub cover likes to pop out when in use as well).
The deck issue aft of the ski locker is being deferred (but watched) due to the wood being gone but a metal strip still providing what support is there... and a repair to such requiring the aft interior to be gutted, not something I'm feeling up to right now.

Eventually I want to have the heads re-seated so I can confidently run unleaded fuel without additive 100% of the time... but a $8 bottle of additive every 3rd fillup isn't that bad, hence why it's low on the list. Unless I found a deal on some "performance" 351 heads (and use them with head bolt adapter bushings)...
 

ratdude747

Petty Officer 1st Class
Joined
Sep 30, 2023
Messages
296
Some updates from yesterday:

  • Finally making a bit of headway with getting the seat cushion redone. The best auto/marine uphostery person in the county happens to be my manager's aunt... due to high demand I may end up on a waiting list, but if push comes to shove I'll add some foam and do a better job of duct taping it to get me by this season.
  • Took another look at the bellows... what I thought was dry rot actually appears to be old dirt. I'll keep an eye on it...
  • Got started on spring maintenance. Replaced the fuel filter. Once the last freeze has happened, will be changing engine/outdrive oils and greasing things.
  • Went to re-caulk some rubrail/hull/deck gaps, and discovered several rubrail screws had come loose:
    IMG_20250228_181300.resized.jpg
    • I was able to pull the rubber and tighten most of the screws. I had 3 or 4 that spun, but surprisingly all of them were in areas that weren't gapped. I pulled these screws and didn't observer any signs of rot (clean stainless, no staining or debris), but put them back in to avoid leaving holes
    • Did see a couple spots where it looked like screws had been removed and moved/redrilled 1/2" over. Maybe spun screws from the past?
      IMG_20250228_183714.resized.jpg
      • It did look like there was a hole in the gel coat too. I might hit those with the UV4000 while I have it out?
    • The rubber was very stiff... no idea if it's original. Or if it will go back in. Should I look into replacing it?
      IMG_20250228_184101.resized.jpg
  • Bought supplies to remove and fill in the holes for this defunct pitot tube on the transom:
    IMG_20250228_184746.resized.jpg
    • Plan will be to chase the holes with a drill, countersink the gel coat, then fill the holes with six-10 followed by a gel-coat repair kit.
      • Since pre-tinted gel coat for this boat isn't available (and I'm cheap), I'll be going the generic "mix it yourself" color blend route. Whatever gel coat I have left over will be used to patch various bits of dock rash elsewhere on the hull.
    • I don't ever see it being used since it interfered with the trailer (to the point of ripping and rotting the one bunk) and that I'm running a GPS speedometer.
Also, I already have one possible outing to a new (to me) location in the works. In June my parents are overnighting in French Lick, IN and got the room for 4. They don't boat (my dad is very hydrophobic), but since they offered and Patoka lake is close by, I might as well take advantage of it if the boat is in good order by then. My best friend (whose aunt/family gifted me the boat and has frequent boater miles with me) heads out there all the time, so a win-win-win?
 

ratdude747

Petty Officer 1st Class
Joined
Sep 30, 2023
Messages
296
Looks like I'll get to reuse the old rub rail. This particular profile appears to be long gone... modern rub rails are completely different.

Hoping a warm day and some silicone spray/paste will do it. Will likely put up a fight... it's a very "solid" profile:

IMG_20250228_184101.jpg

Work it with a putty knife?
 

MNhunter1

Lieutenant Junior Grade
Joined
May 12, 2014
Messages
1,077
Looks like I'll get to reuse the old rub rail. This particular profile appears to be long gone... modern rub rails are completely different.

Hoping a warm day and some silicone spray/paste will do it. Will likely put up a fight... it's a very "solid" profile:

View attachment 406074

Work it with a putty knife?
You can still find the rub rail, but it's not cheap. If it's not too far gone, I found the easiest way to reinstall them is soak the rubber in a big 5 gallon bucket or storage tub filled with hot water and some dish soap. It will make it more pliable and lubricated. Feed it into the rail directly from the bucket and use a needle nose vice grip on the leading end to give you something to help pull it along. Helps to have an extra hand, one to feed and one to pull, but I've done a few by myself as well. You might have to work a little to get it stretched enough to rivet it back in place using the original holes, but it doable.
Rub rails.jpg
 
Last edited:

Watermann

Starmada Splash of the Year 2014
Joined
Jan 12, 2013
Messages
13,822
You can still find the rub rail, but it's not cheap. If it's not too far gone, I found the easiest way to reinstall them is soak the rubber in a big 5 gallon bucket or storage tub filled with hot water and some dish soap. It will make it more pliable and lubricated. Feed it into the rail directly from the bucket and use a needle nose vice grip on the leading end to give you something to help pull it along. Helps to have an extra hand, one to feed and one to pull, but I've done a few by myself as well. You might have to work a little to get it stretched enough to rivet it back in place using the original holes, but it doable.
View attachment 406077
Yeap profile 0101G
 

ratdude747

Petty Officer 1st Class
Joined
Sep 30, 2023
Messages
296
Got it installed today. Other than stretching it to fit at the end (which I was able to use the existing holes and the screws to help pull and anchor while staking it down in the track), it went without a hitch. Installation was not the reverse of removal, as instead of trying to fold the lips to the groove, I instead shoved it from one end around the perimeter of the track.

IMG_20250318_175227.jpg

Other than teasing it past the aluminum rail junctions (where there is a hair of factory misalignment), nowhere near the fight I was expecting.

IMG_20250318_182048.jpg

Whew. Better yet, I didn't need to buy a new one!
 
Top