‘92 Johnson 90HP - Bad rectifier?

lerbyderb

Cadet
Joined
May 11, 2022
Messages
13
Hello all, first timer here with a question on my 1992 Johnson 90HP outboard, model TJ90TLEND.

First off, since I bought the boat in December, the Tach and Fuel gauges have intermittently not worked… would just go down to 0 RPM and fuel showing empty.

Other than that boat ran great. Maybe an occasional low speed stall…. Until yesterday:

Trimmed motor down to back off trailer, and once underway noticed trim no longer working. Got to fishing spot and realized the motor wouldn’t start back up either. Ended up bypassing starter solenoid to fire up motor and get back to ramp.

Today, noticed the main 20Amp in-line fuse blown. Replaced fuse, ran the trim motor for a couple seconds and it blew. Replaced once more and it blew before I touched anything… just had the key in on position Is all.

I’m thinking possible bad rectifier? Or stator? Any help is appreciated, and I’ll provide any more info if needed. Thanks!
 

racerone

Supreme Mariner
Joined
Dec 28, 2013
Messages
38,677
Test stator ( yellow wires ) if good then replace regulator / rectifier.
 

lerbyderb

Cadet
Joined
May 11, 2022
Messages
13
Test stator ( yellow wires ) if good then replace regulator / rectifier.
I did a resistance test on the two yellow wires from the stator. Got a reading of 1.3 Ohms. Is that what you are referring to?
 
Last edited:

lerbyderb

Cadet
Joined
May 11, 2022
Messages
13
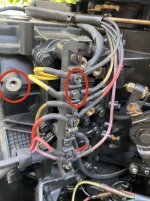
I didn’t get any reading from either yellow wire to a ground… assuming I tested correctly. See attached picture. Two circled wires are what I tested and then the circled hole I used as ground.
 

Attachments

  • 57DF84A6-E799-42B8-8A69-5DE7D01968AE.jpeg
    57DF84A6-E799-42B8-8A69-5DE7D01968AE.jpeg
    1,001.5 KB · Views: 11

havoc_squad

Senior Chief Petty Officer
Joined
Mar 5, 2011
Messages
739
If you replace the regulator/rectifier, make 100% certain you clean the mounting bolts and install both grounding washers on the correct spot shown on the parts diagram or you will be replacing it twice. Grounding washers are easy to miss on the importance of them.

Ask me how I know...
 

lerbyderb

Cadet
Joined
May 11, 2022
Messages
13
If you replace the regulator/rectifier, make 100% certain you clean the mounting bolts and install both grounding washers on the correct spot shown on the parts diagram or you will be replacing it twice. Grounding washers are easy to miss on the importance of them.

Ask me how I know...
Good to know! Did you have similar symptoms with your bad regulator/rectifier?
 

havoc_squad

Senior Chief Petty Officer
Joined
Mar 5, 2011
Messages
739
1.3 Ohms reading, that sounds like an OEM 6 amp 88 SPL stator was installed from my factory service manual instead of the 9 Amp for the 90 HP variant with regulator/rectifier.

The 9 Amp stator which it should have should be about 0.7 ohms.

Assuming that information is still the same and hasn't changed due to some technical service notice released by OMC/BRP.

If the diodes are fried on the rectifier there are two possibilities.

An open diode or a shorted diode. An open diode will not allow a reading any direction. A shorted diode will allow a reading both ways.

Either issue means it needs replacement. An open diode is better than shorted, because shorted diode could cause an electrical fire.

CDI electronics troubleshooting guide explains this best:

For ohms/diode test, disconnect the wires from the bus bar of the regulator/rectifier that connect to the stator for testing them with multimeter.

Diode plate check: Test the forward diodes between the two yellow wires and the red wire just like you would on a regular rectifier. You should get a reading one way but not the other. Check the resistance from each of the yellow wires to case ground, you should have a high reading, typically in the M range.

The red wire should not read to ground or show a very high reading, 25M ohms or more.

B) Tachometer Circuit: Check the ohms resistance between the gray wire and engine ground. You should read approximately 10K (10,000) ohms. Gray to red, and gray to the yellow wires should be a high reading, usually in the M range.

If any of these tests fail, the rectifier/regulator is bad. However it could pass this test but fail to regulate the voltage and overcharge the battery.

For that issue, one would need to test with a full charged good battery and monitor the voltage output with the engine with a load (not on muffs) around 3500 to 4500 RPM.

Once battery reaches its optimal charge (if good) the charging system voltage on positive should drop down to something very close to 13 volts.

If it is stuck near 14 volts or higher and the battery is fully charged, the regulator portion of it is fried and the rectifier/regulator needs replacement.
 
Last edited:

lerbyderb

Cadet
Joined
May 11, 2022
Messages
13
Okay, got a chance to do some readings on the R/R.

Top yellow wire to red wire: Reading one direction but not the other
Bottom yellow to red wire: NO READING EITHER DIRECTION

From Gray to Engine Ground: 10K ohms

For reading from yellow wires to ground, I couldn't get any reading. Is case ground different than engine ground? I'm sure I wasn't doing something correctly here. But alas, looks like that it failed the test via the no reading on second yellow wire. So looks like a bad Rectifier/Regulator then?

Would this cause the 20A fuse to blow just with key being on?

Thanks all for the help!
 
Last edited:

lerbyderb

Cadet
Joined
May 11, 2022
Messages
13
1.3 Ohms reading, that sounds like an OEM 6 amp 88 SPL stator was installed from my factory service manual instead of the 9 Amp for the 90 HP variant with regulator/rectifier.

The 9 Amp stator which it should have should be about 0.7 ohms.

Assuming that information is still the same and hasn't changed due to some technical service notice released by OMC/BRP.

I tested this resistance again on the stator with wires disconnected from bus, and some alligator clips.

It went down to a steady 1.0 ohms... and when I just touch multimeter leads together I have .3 ohms. So if you are supposed to subtract that, I actually do end up with .7 ohms?

Just thought I'd mention that if that helps.
 

lerbyderb

Cadet
Joined
May 11, 2022
Messages
13
Unfortunately on this engine model it seems I'll have to pull the flywheel and stator to replace the R/R?
 

havoc_squad

Senior Chief Petty Officer
Joined
Mar 5, 2011
Messages
739
If your multimeter is properly calibrated, it should have that resistance factored in with the original test leads. If you add or change the multimeter test lead components, then usually yes you have to calculate the difference.

Yes, flywheel has to come off for replacement.

Check flywheel and flywheel key condition while it is off. If key looks worn/rough then replace the key.

Clean dry surface when installing flywheel. Torque to factory specs once verified it fits properly. 100 to 105 ft/lbs, verify this yourself in factory service manual.

If some part of the rectifier/regulator grounded positive voltage to ground, yes it could have blown that 20 amp fuse whether trim was being used or not.

Only way to tell if the trim motor has a high amp draw issue that does not blow fuses by itself is an amp meter placed on the battery with all powered accessories disconnected. Run the trim motor in all normal up and down range and see if the amp draw stays within factory service manual limits.
 

lerbyderb

Cadet
Joined
May 11, 2022
Messages
13
Thanks for the guidance on the flywheel.

The multimeter I have now is a cheap one I’ve had for years. I will be getting a new one.

I did also start the engine via jumping the solenoid…. No change in voltage at the battery whether motor was running or shut off. But I’m also not sure how the blown fuse would affect that. It might not even charge the battery with that blown 20A fuse even if R/R was working?

I’ll have a new rectifier/regulator in hand tomorrow evening. I will replace it this weekend and give an update.
 

lerbyderb

Cadet
Joined
May 11, 2022
Messages
13
I just got through replacing the Rectifier/Regulator and got everything hooked back up. Trims & tilts up and down perfect when key is off. Did that for several minutes without issue.

I turned key to on position and after a minute maybe, it blew the 20A fuse again.

I'm pretty certain the R/R was bad, so I did need to replace it. But now thinking that is not what caused the fuse to blow. I'm having to guess there is a short somewhere? Or could a bad ignition switch cause this?
 

Crosbyman

Vice Admiral
Joined
Nov 5, 2006
Messages
5,760
the basic wiring shows the fuse feeding the front key switch which returns momentary voltages to T&T relays , the starter selenoid etc...

the T&T motor itself is transferred full B+ power unfused so it is not the likely source of the problem .

Neither should it be the selenoid activated just a few seconds .

so....something is pulling powerenought to blow the fuse.

ME I would rig a common light bulb (40-60 w 12v) into the fuse socket
with the key ON.....

if it turns bright all the time it is passing excessive current since you are not doing any T&T nor are you STARTING . check other load elements

start disconnecting load wires till it turns OFF that should clue you in to the problem source.


lerbyderb

Cadet
Joined
May 11, 2022
Messages
13
Crosbyman, thanks for your help.

I connected a 12v blinker bulb inline to fuse holder. It is bright as soon as I flip the key to ON. I will start in the morning trying to narrow down what wires are causing the issue.

Do you mean start disconnecting wires from the large red connector plug one at a time?
 

Crosbyman

Vice Admiral
Joined
Nov 5, 2006
Messages
5,760
large wires are not fused so I do not expect them
to be the reason the fuse blows.

one of the loads distributed by the switch ON position is drawing to many amps which kills the fuse. the light bulb will help you work on the circuitry save you some fuses :)

ohms law.....
V= RxI "? r "x I (20 amps) so ..... V/I =R 12vols/20 amps = .6 ohms
Alsmost a dead short ! if you measure the load side of the fuse with a ohm meter ( VOM ) to engine ground you should see .6 ohms or less !!

btw if you have a accessory plug on your shifter ..remove it in case you havea problem acc. wise.

hope morning fog is not to thick in my brain this morning :)
 
Last edited:

lerbyderb

Cadet
Joined
May 11, 2022
Messages
13
btw if you have a accessory plug on your shifter ..remove it in case you havea problem acc. wise.
Getting somewhere! Unplugged accessory plug under dash (to tach, fuel, and PSI gauges)…. No short! 12V Light doesn’t light up when turned to on. Only when key turned to start. So now I’m going to inspect all wiring to the gauges and see what I can find.
 

lerbyderb

Cadet
Joined
May 11, 2022
Messages
13
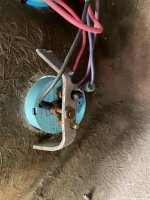
Took a look under the dash and it didn't take me long to figure out the problem. Someone at some point decided it would be good to make a bracket for the fuel gauge out of.... metal. They wrapped electrical tape around the posts and that was all that was separating everything from shorting. Removed the metal bracket and no short.

Thanks again Crosbyman and everyone else for the help. I probably should have found this sooner, but just had to look at the right place.
 

Attachments

  • image_55415491.JPG
    image_55415491.JPG
    2.1 MB · Views: 4
Top