14' SC Rebuild

frazoo

Petty Officer 2nd Class
Joined
Apr 13, 2017
Messages
198
A beautiful day out with little progress to show for it (many honey-do's in the way).
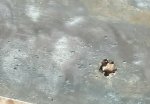
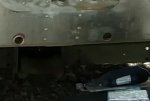
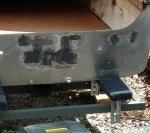
Dry fit the new transom to mark for the holes, then got out the RO sander and wire brush on the drill and started cleaning off the transom. I didn't realize (until the wire brush got done), how much pitting there was on it. If I recall correctly, I can use marine tex or jb weld for the pitting? Is one better than the other? And, do I need to wash down the aluminum with something to counteract the chemical process that caused the pitting before filling the pits?
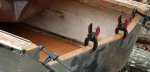
I moved the stanchion post (don't know if that is the correct term for it---what the winch is attached to?), back 8 inches to accommodate the new trailer length. The old bunks stood up on edge, the new ones are flat and appear to give much more support.
Started cleaning up the wheel fenders I had cut off so I can tack weld to reattach them (still hating myself for that misstep!).
Getting to the fun part now, layout and such.
 

M2HB

Petty Officer 1st Class
Joined
Oct 7, 2017
Messages
206
If you have changed your trailer length, and you already cut your fenders off, may I make a recommendation?
If you bought about 10' of 4" x 2" x 1/4" angle iron, you could cut that 10' piece into two 5' pieces. Then you could weld your axle spring shackle mounts to the bottom of the 2" side of the angle irons (instead of where they are now on the bottom of the trailer) and have an adjustable axle setup. You could make steps and fender mounts that weld directly to the 4" side of the angle irons so the fender, steps and axle all move together to give you the perfect axle location in relationship to the center of gravity of the trailer.

https://forums.iboats.com/forum/gen...-and-towing/10552418-restoring-an-old-trailer
 

Watermann

Starmada Splash of the Year 2014
Joined
Jan 12, 2013
Messages
13,822
Winch tower.

I used lots of cleaning vinegar and fresh water rinsing after wheeling off the stinky corrosion (smells like dirty gym socks) and yeah marine tex to fill in the pitting. I also prime and paint the surface to protect it.
 

frazoo

Petty Officer 2nd Class
Joined
Apr 13, 2017
Messages
198
It'the pits! :)

Getting everything scrubbed down and rinsed again, then I'll use JB weld as it's local (as in the shop right now), and starting to fill old holes in gunnel with the jbww ( nasty stuff by the way). Trying to order more hardware but finding locating what I want in the online store a particularly onerous task today.
 

Attachments

  • photo288832.jpg
    photo288832.jpg
    79.9 KB · Views: 6

frazoo

Petty Officer 2nd Class
Joined
Apr 13, 2017
Messages
198
If you have changed your trailer length, and you already cut your fenders off, may I make a recommendation?
If you bought about 10' of 4" x 2" x 1/4" angle iron, you could cut that 10' piece into two 5' pieces. Then you could weld your axle spring shackle mounts to the bottom of the 2" side of the angle irons (instead of where they are now on the bottom of the trailer) and have an adjustable axle setup. You could make steps and fender mounts that weld directly to the 4" side of the angle irons so the fender, steps and axle all move together to give you the perfect axle location in relationship to the center of gravity of the trailer.

https://forums.iboats.com/forum/gen...-and-towing/10552418-restoring-an-old-trailer

That's a very nice trailer you ended up with. I may not go that far with this trailer, but I definitely see a couple of ideas I will use.
 

frazoo

Petty Officer 2nd Class
Joined
Apr 13, 2017
Messages
198
Got the JB on the transom pits, got an order in for cleats, lights, seats and hinges.
 

Watermann

Starmada Splash of the Year 2014
Joined
Jan 12, 2013
Messages
13,822
The 2 part JB Water Weld stick epoxy works best for plugging unwanted gunnel and transom holes. Just don't use it on the sides or bottom to plug holes as an impact could dislodge it.

Mix up a small batch of the JB WW, pinch off a bit, roll it into a ball press into the hole with your fingers on the other side create a mushroom. Once dried you can sand it down flush easily and no more hole. The only surface prep I do is to make sure the hole and surrounding area is clean, wiping it with a solvent before putting the JB WW on. For the underside use a new sharp piece of 220 sand paper, press firmly covering the hole and rotate your thumb making scratches for the JB WW mushroom to grab hold of.
 

frazoo

Petty Officer 2nd Class
Joined
Apr 13, 2017
Messages
198
Thanks for that very concise description of the jbww procedure, made it easy to visualize.

Took the nasty, rust-infested winch apart and got it wire wheeled and cleaned up, and rust converter applied. Had to drill two 3/8" holes through the spool to accommodate a new strap with a loop end on it.
 

frazoo

Petty Officer 2nd Class
Joined
Apr 13, 2017
Messages
198
Final fitting of the transom, primed and painted interior aluminum. Rain moving in will be working in shop to over drill and then fill transom holes.
Click image for larger version  Name:	 Views:	2 Size:	209.1 KB ID:	10561891 Painted the winch and installed the new strap.
If rain holds off a bit will final adjust bunks and rollers and grind off the hanging bolster so they don't drag/snag something.
 

Attachments

  • photo288978.jpg
    photo288978.jpg
    209.1 KB · Views: 5
Last edited:

frazoo

Petty Officer 2nd Class
Joined
Apr 13, 2017
Messages
198
Since I'm lazy, I found these in a drawer in the shop and remembering WM's instructions for a bit of sharp sandpaper under the gunnel to sand a keyhole around old holes for jbww to hold on, I chucked one in a small drill and had them all done in short order.
 

Attachments

  • photo288982.jpg
    photo288982.jpg
    35.6 KB · Views: 3

frazoo

Petty Officer 2nd Class
Joined
Apr 13, 2017
Messages
198
deleted, double post somehow.
 

Attachments

  • photo289000.jpg
    photo289000.jpg
    184.2 KB · Views: 2
Last edited:

frazoo

Petty Officer 2nd Class
Joined
Apr 13, 2017
Messages
198
Got the 1" diameter splash well drain holes drilled out to 1.25" and filled with jbww.
 

Attachments

  • photo289000.jpg
    photo289000.jpg
    184.2 KB · Views: 4

frazoo

Petty Officer 2nd Class
Joined
Apr 13, 2017
Messages
198
Well, the rains are here and as much as I hate not being on the boat today the down time gives me a chance to clean and straighten up the shop a bit. "Broom time", is great for pondering (for me). I'm starting to think about color schemes, storage compartments, and types of paint to use.
I have three 'major' hobbies I mess about with in one small shop, doesn't take long for things to get out of hand. Hoping to uncover the new drain tubes and flaring tool I bought last year :(.
I've heard that messy people are creative people, don't know if that's true or not but I'll lay claim to it just as an excuse!
I know I'll be using the Rusto SE Primer on the boat, still contemplating the top coat, leaning hard toward the Rust-Oleum Pro unless I'm talked out of it.
Also starting to lean toward the idea of carpeting. Seems like it would quiet the boat down a bit, that can't hurt for fishing.
The seats I ordered from here are red and tan, so looking for complimentary colors along those lines.
Off to the salt mines!
 

frazoo

Petty Officer 2nd Class
Joined
Apr 13, 2017
Messages
198
Found everything I had ordered last year and then ordered more "stuff" for the boat. I keep telling myself there isn't much more to get, and then another couple or three Ben Franklin's go flying away. I know the pain will disappear on that first trip to the lake. :)
I checked out Alabama Dad's thread, I like his forward raised deck, will try something similar on mine.
 

frazoo

Petty Officer 2nd Class
Joined
Apr 13, 2017
Messages
198
A question, please.
I'm getting ready to put a second drain tube in on the opposite side of the knee brace (still don't understand their original placing, but that's a moot point now I guess). It scares me to death to drill a hole in the aluminum transom, so, what would be the best type of bit to use, and should I apply 5200 before using the flaring tool, or will it just squeeze it all out, so, would it be better to apply 5200 after the install? Thanks.
Oh, also, looking at the packaging pic, there is no thrust ball bearing, only flat washers, am I still okay without it?
 

Attachments

  • photo289109.jpg
    photo289109.jpg
    29.4 KB · Views: 7
  • photo289110.jpg
    photo289110.jpg
    142.2 KB · Views: 7

frazoo

Petty Officer 2nd Class
Joined
Apr 13, 2017
Messages
198
Thanks, after I thought about the bit for a bit, I remembered hole saws and went and grabbed one. Was trying to head off someone wasting keystrokes when I'd figured it out. Drilled the hole, will get it installed tomorrow. Getting antsy, July not that far away and I'm sloowww. :cold:
 

frazoo

Petty Officer 2nd Class
Joined
Apr 13, 2017
Messages
198
Got the new drain tube in place. Drilled the 1"hole, then use the Dremel with a sanding disc to go around the hole to make the tubing fit but still snug.
The transom had handles vs stern eyes, I'll fill in those eight holes and drill four new ones for the u-bolt eyes once they arrive.
Going to mock fit the SW now and start laying out for rear deck and holds.
 

Attachments

  • photo289173.jpg
    photo289173.jpg
    16.1 KB · Views: 5
  • photo289174.jpg
    photo289174.jpg
    168.8 KB · Views: 5

frazoo

Petty Officer 2nd Class
Joined
Apr 13, 2017
Messages
198
During the winter, I had a large oak tree fall on my bench, I didn't want to waste it so I cut out two pieces for cross frame supports at the rib closest to the transom.
 

Attachments

  • photo289186.jpg
    photo289186.jpg
    229.2 KB · Views: 6
Top