14' SC Rebuild

frazoo

Petty Officer 2nd Class
Joined
Apr 13, 2017
Messages
198
First cross brace in, then second
 

Attachments

  • photo289187.jpg
    photo289187.jpg
    419.7 KB · Views: 6

frazoo

Petty Officer 2nd Class
Joined
Apr 13, 2017
Messages
198
Looking at the SW and rear deck, I think I'll put a 16-18" wide bench seat up against the SW with a side to side floating seat and under bench storage.
 

frazoo

Petty Officer 2nd Class
Joined
Apr 13, 2017
Messages
198
I'm not real happy with how the bunks are laying up forward. At the rearmost bolster they lay flat, toward the front of the bunk, they are not in full contact across their width with the hull.
 

Attachments

  • photo289188.jpg
    photo289188.jpg
    367 KB · Views: 6

frazoo

Petty Officer 2nd Class
Joined
Apr 13, 2017
Messages
198
Referring back to the previous post to this one (#163), I have three bolsters that each bunk is fastened to. The bolster closest to the left in the picture is getting to the section of the boat where it is starting it's transition to the vee section of the hull. Would one bolster carry that short section of bunk, say cutting it about 8" behind that bolster, or would I need another cross member to carry another bolster to catch the then longer section of bunk behind that area?
Also, should I set the bunks to the hull first and then adjust the rollers according to how the hull sits on the bunks? Thanks
 

Watermann

Starmada Splash of the Year 2014
Joined
Jan 12, 2013
Messages
13,822
There ya go, no sense throwing away good AL, smart move to use it as a support.
 

frazoo

Petty Officer 2nd Class
Joined
Apr 13, 2017
Messages
198
UPS delivered everything last evening that has been holding up progress. The stern eyes came in, looking kinda big on a little 14'er, but better than the two old grab handles for sure.
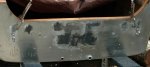
​Marked and drilled the transom for the 4 u bolt holes, marked for the u bolts drilled out new transom and stuffed jbww in the new holes, Drilled out the oversized drain holes previously filled with jbww, as soon as the four new filled holes set up I'll install, mark for the 1/2" u bolt legs, drill to size, and be ready to install the transom.
I now have half of the old holes in the gunnel filled and sanded. Finally made friends with jbww.
Will spend the rest of the afternoon under the trailer making bunk and roller adjustments.
 
Last edited:

frazoo

Petty Officer 2nd Class
Joined
Apr 13, 2017
Messages
198
A slight change of plans, when I returned to the shop after a lemonade break, the jbww-filled holes were ready to be drilled. Sanded the areas flat, drilled, and inserted into the transom. Voila, all holes in the right places!
According to the size of the stern eyes, I have a 20'er. :)
Transom back off and in shop for final epoxy coatings before final install. Need to go to big box store for measuring cups for the 'poxy.
 

frazoo

Petty Officer 2nd Class
Joined
Apr 13, 2017
Messages
198
Image did not load with previous post.
 

Attachments

  • photo289289.jpg
    photo289289.jpg
    153 KB · Views: 15

Watermann

Starmada Splash of the Year 2014
Joined
Jan 12, 2013
Messages
13,822
Image did not load with previous post
fetch

.

Looks like super nice fit! I like those stern eyes way better than the handles, nice work! :thumb:
 

frazoo

Petty Officer 2nd Class
Joined
Apr 13, 2017
Messages
198
photo289319.jpg Working on getting the bunks and rollers adjusted this morning. Bunks are now hugging the boat hull much better and I think in time will conform to the hull shape even more.
Starting to cut off bottoms of bolsters and rollers now, will need to go back and even them up a bit where I cut them out of square along their bottoms.
Getting ready to put transom in this afternoon, if I remember correctly, some mentioned buttering the transom with 5200? I guess it's not meant to go anywhere!
 

frazoo

Petty Officer 2nd Class
Joined
Apr 13, 2017
Messages
198
Transom in, used two existing holes near the center to draw the two pieces together until the 5200 sets. Clamped the upper edge for now, goi photo289326.jpg ng to check the transom cap the see if it will work in place of the clamps.
 
Last edited:

Watermann

Starmada Splash of the Year 2014
Joined
Jan 12, 2013
Messages
13,822
No 5200 on the transom, that would be a mess and 5200 is only needed in the through holes.
 

frazoo

Petty Officer 2nd Class
Joined
Apr 13, 2017
Messages
198
:facepalm:
#*%!@¢!!
Yep, a mess to get off.:faint2:
Oh well, getting out lots of gloves, shop towels, and some nasty chemicals.:lol:
 

frazoo

Petty Officer 2nd Class
Joined
Apr 13, 2017
Messages
198
Well, that was fun! (NOT)
Moving forward again, turning my attention to the splash well now and how I want the rear bench seat to be incorporated into that area.
Also considering the electricals, bow lights, stern light, battery locations, etc. I know little of electrical systems, fuse panels and things, hope I can find a good how-to for that.
 

frazoo

Petty Officer 2nd Class
Joined
Apr 13, 2017
Messages
198
Splash well in temporarily, took it to an acquaintance who fabricates and he pretty much confirmed what I thought, it is shot. Someone in it's past used the flat portions near the gunnels as a standing/ stepping area and ripped the back piece on both sides. It is also ripped along the transom where the lip meets the transom. He can repair it, or make a new one, but either way, he's 4 months out with work so I think I'll use the old one until he gets the new made up, that way I can fish :).
I was never worried about stripping the gunnels to perfection because I knew at the beginning they would be covered anyway. Also, where a PO installed cleats and such, the AL is pretty warped all around the jbww-filled holes. I''ll level that out after sanding down to bare in those areas with regular JB weld.
My transom should be a poster child for never putting that wood plate on there, it was the only place on the exterior that had any pitting.
 

Attachments

  • photo289413.jpg
    photo289413.jpg
    201.5 KB · Views: 5

Watermann

Starmada Splash of the Year 2014
Joined
Jan 12, 2013
Messages
13,822
Yeah that piece of wood on the transom has no reason I can think of other than to rot and cause pitting.
 

frazoo

Petty Officer 2nd Class
Joined
Apr 13, 2017
Messages
198
Getting ready to place the deck permanently. Do you all make that a 'permanent' install, or in such a way you can get it out at a later date?
 

Watermann

Starmada Splash of the Year 2014
Joined
Jan 12, 2013
Messages
13,822
I rivet my decking down and if I ever have to get it out at a later date it's rivet removal time.
 

frazoo

Petty Officer 2nd Class
Joined
Apr 13, 2017
Messages
198
Thanks WM.
Started mocking up the rear bench. I want to be able to access the area under the SW for battery or fuel can so I will leave the rear bulk head of the bench open in the center. I'm leaving the two sides open all the way back for ventilation and the holes in the SW for the cables will provide an egress point to the rearward. A hinged seat top will provide access to that area.
I just have to make sure the bench will be easily removable so I can install the new splash well later, so, I'll build the bench unit as you would a base kitchen cabinet, one complete unit.
 

Attachments

  • photo289563.jpg
    photo289563.jpg
    461.9 KB · Views: 5

frazoo

Petty Officer 2nd Class
Joined
Apr 13, 2017
Messages
198
Bench seat in now, debating the hinge material for the flip-up seat on it. I have some material called a "living hinge" I had purchased a few years ago when I was building a tiny travel trailer. I used the living hinge on the galley door (which weighed over 50 lbs.), never had a problem with it, and it's one piece so water can't get in through it.
Moving on forward to the bow area and the raised deck install there.
 
Top