1956 Evinrude Lark 30 HP Tear Down

Piomarine

Seaman Apprentice
Joined
May 1, 2020
Messages
31
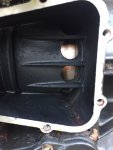
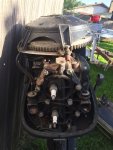
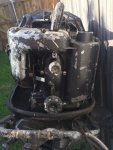
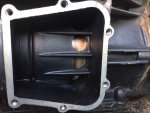
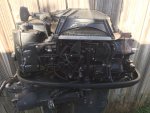
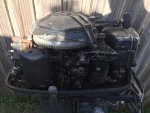
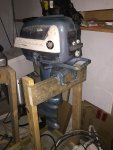
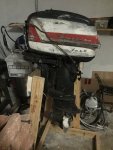
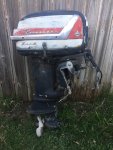
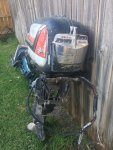
I have started a thread for my current project, a 1956 Arkansas Traveler Utility I am turning into a runabout. To push this tin can I have acquired a matching 1956 Evinrude Lark 30 HP, but this motor has seen better days! Until I dig into it I really will not know what I am dealing with. Now I am aware that there are most certainly better candidates for restoration, but this is the motor I have and I will not be allowed to purchase another one...I already got in trouble for buying this one (even more trouble for driving 6 hours round trip to get it!)

So here is what I know:

-The motor is locked and I have no clue why (no oil, overheated, sat too long...who knows)
-The transom clamps are seized (but that is a small issue)
-The gear select does move freely, but I have a sneaking suspicion it may not be connected (I have not checked to see if the prop spins while it is "in gear")
-It does have the starter, but it will also need to be overhauled (I believe it is locked up too)
-All of the wiring needs to be replaced, which tells me this motor has sat unused for a VERY long time
-Finally, I know that I will be in over my head on quite a bit of this...which is where I will rely on all of you.

I have the Gilmer guide, I am aware of the proper fuel:eek:il mix at 24:1 (or 16 oz/3 gal of gas) it is what I use on my '57 Sportwin, and I have already mixed up some ATF and acetone because I KNOW I am going to need it!

My question for the group is simply this...where should I start? (after I get the transom clamps loose)

I look forward to your input!
 

Attachments

  • photo331718.jpg
    photo331718.jpg
    553 KB · Views: 2
  • photo331719.jpg
    photo331719.jpg
    633.6 KB · Views: 1
Last edited:

F_R

Supreme Mariner
Joined
Jul 7, 2006
Messages
28,226
My first move would be to figure out whether or not it is worth messing with. In other words why is it seized? A good first inspection point is remove the two bypass covers from the side of the engine and peer in to see what you see. You will be able to get a glimpse of the piston sides and maybe the rings to see if they are stuck. You can also use a flashlight to look back toward the crankcase end. If you see signs of rust in the crankcase, that probably is fatal, but for sure it needs to come apart for further inspection of the bearings. Do NOT try to just free it up and get it running if the bearings are rusted. It will go boom.

You may not be aware that the early '56 30hp motors had an engineering failure. A bad seal would allow water to enter the crankcase and cause utter destruction of all the bearings. The serial number will reveal if you have one of the affected motors.

Don't spend any more money on it until you have made a thorough examination.
 

racerone

Supreme Mariner
Joined
Dec 28, 2013
Messages
38,454
Take it all apart before spending any more coins on it.-----Ask the mad hen if she would rather you spend time at the local watering hole or at your work bench.----Be cheaper to work on the old motor I would think.
 

Jdunham

Seaman
Joined
Sep 9, 2015
Messages
56
Hi Piomarine

I just went through this with the 1957 lark I made a post about a couple of weeks ago. Pulled it out of a dirt floor basement after 40-45 years.
It was stored without plugs and was also stuck solid. Teardown of the block revealed what folks are warning you about. Rust in bad places, likely what you will also see.
After the input of helpful users here, I went ahead and tracked down a donor motor for the powerhead.
The teardown and rebuild really only took me about 8 hours once I had the parts.
Because I wanted to get on the water and I didnt think the work would take long, I went ahead and used a 1956 30HP block on the 1957 35HP lark. It was the best match I could get in short order. All of the critical mounting surfaces and holes matched right up.
The ONLY part that was replaced was the complete powerhead. All of the other parts were re-used from the 57 lark.

It is my understanding that the blocks that will fit are (Johnson and Evinrude) the original 1956 30s, 1957-1959 35s, the 1962-1964 28s and the 1965-1971 33s. I have not personally confirmed the fit of the 28s and 33s, but I am looking for a 33 so that I can rebuild the lark again (much easier the second time) and run it on 50:1 mix. Should I locate one before you get to this project, I will certainly post an update on compatibility.

I had the benefit of another complete motor (56 johnson 30) on a stand as a reference to make sure I put all the pieces back together correctly but if you take pictures as you pull it apart you should be ok. If needed, I would be happy to send pictures of my motor if you need references for reassembly.

I have both a parts manual (copy of an original) and a seloc repair manual. I used both of them and would encourage you to pick up a parts manual. The diagram was a must for teardown and assembly.
 

tomhath

Master Chief Petty Officer
Joined
Dec 5, 2007
Messages
814
Take it all apart before spending any more coins on it.-----Ask the mad hen if she would rather you spend time at the local watering hole or at your work bench.----Be cheaper to work on the old motor I would think.

LOL. A young woman I worked with commented on her husband's hobby: "I'd rather he spent his time on that than fooling around with another woman"
 

racerone

Supreme Mariner
Joined
Dec 28, 2013
Messages
38,454
I used to say that I made $15.00 / hr helping folks with their motors.------$5 / hr for the work and saving $10 / hr on alcohol !!
 

Piomarine

Seaman Apprentice
Joined
May 1, 2020
Messages
31
I have had the access covers off and the pistons were both rust free. I did not look down into the crank case however (not sure if they are in the correct position to see in there) by I will definitely look into that as well. I am fortunate that I didn’t pay my right arm for the motor but I’m certain that the $180 was probably too much.

Is is there anything critical I need to be sure to do BEFORE the powerhead can come off? I feel like I read somewhere that the lower unit either needs to come off first...I don’t know. Assistance there is appreciated.
 

Jdunham

Seaman
Joined
Sep 9, 2015
Messages
56
My seloc manual suggests removing the lower unit on a stuck engine. It does not specify what can cause it but states that failure of the lower unit CAN cause it to lock and if it is locked and not shifting, there may be nothing wrong with the powerhead.
If it still wont turn over without the lower unit then the issue does lie in the powerhead somewhere.
I was able to determine that my motor had locked pistons because there was just enough play in the crank to feel it move relative to the block if I used one hand to rock the flywheel CW and CCW and the other hand had a finger jammed between the flywheel teeth and something fixed on the block.

If it is the pistons and they look good through the ports, you could pull the head and start tapping the pistons with a block of wood and a hammer. Maybe pull the exhaust cover off too to get some oil on them from the other side as well.

You can see the crankshaft through the intake covers if you use a light. How does it look? I think it was Racerone in my thread that pointed out that even if it moves, any rust in those bearings and they will be ruined really quick by just running it.

One other thought, there is an unobstructed path from the exhaust near the prop all the way into the cylinders for rodents and such if the motor happens to stop with one piston at TDC and one at BDC. if they stop in the middle, the exhaust ports are blocked and the critters cant get past the exhaust chamber on the starboard side of the block. I dont know if they can get in there with a vertically stored motor but they definitely can on one laying down.
 

F_R

Supreme Mariner
Joined
Jul 7, 2006
Messages
28,226
I have had the access covers off and the pistons were both rust free. I did not look down into the crank case however (not sure if they are in the correct position to see in there) by I will definitely look into that as well. I am fortunate that I didn’t pay my right arm for the motor but I’m certain that the $180 was probably too much.

Is is there anything critical I need to be sure to do BEFORE the powerhead can come off? I feel like I read somewhere that the lower unit either needs to come off first...I don’t know. Assistance there is appreciated.

Ok, you asked, so here goes-----If and when you decide to take the powerhead apart, it is a lot easier to remove as much stuff as you can, before removing the powerhead. Such stuff includes anything that has to come off before you can dis-assemble the powerhead, and includes the flywheel and magneto, electric starter, carburetor, reeds, etc, etc.
 

Piomarine

Seaman Apprentice
Joined
May 1, 2020
Messages
31
It was ground stored sideways. So I will also look for evidence of rodents/bugs.

Now one in the event that I pull it apart and find that the bearings are indeed rusted, is that terminal for the motor? Or can the rust be cleaned and the bearings replaced? Same question for inside of the crank case?
 

F_R

Supreme Mariner
Joined
Jul 7, 2006
Messages
28,226
If the bearings are rusted and pitted, so is the crankshaft. That is terminal. But we are getting ahead of ourselves here. Not enough inspection has been done yet.
 

Jdunham

Seaman
Joined
Sep 9, 2015
Messages
56
Worst case is a search for a replacement powerhead. Definitely not a trip to the scrap yard.
 

Piomarine

Seaman Apprentice
Joined
May 1, 2020
Messages
31
Had the shroud off today just to take a peak, still don't have time for a tear down yet, but I wanted y'all to see what I was working with.

The pistons do not appear rusted, but are discolored (no clue if that is normal or acceptable)
I pulled the drain plug and nothing came out but it was wet with oil
 

Attachments

  • photo332100.jpg
    photo332100.jpg
    393.9 KB · Views: 0
  • photo332101.jpg
    photo332101.jpg
    419.7 KB · Views: 0
  • photo332102.jpg
    photo332102.jpg
    466.3 KB · Views: 0
  • photo332103.jpg
    photo332103.jpg
    473.6 KB · Views: 1
  • photo332104.jpg
    photo332104.jpg
    662.7 KB · Views: 0
  • photo332105.jpg
    photo332105.jpg
    698 KB · Views: 1
  • photo332106.jpg
    photo332106.jpg
    730.8 KB · Views: 1
  • photo332107.jpg
    photo332107.jpg
    483.9 KB · Views: 1
  • photo332108.jpg
    photo332108.jpg
    635.1 KB · Views: 1

oldboat1

Fleet Admiral
Joined
Apr 3, 2002
Messages
9,612
The '57 35 has a more robust lower unit, so would not want to substitute the '57 powerhead in place of a '56 30, even if it bolts up. (was thinking the driveshaft for the '57 was larger in diameter, but maybe not).
 

Jdunham

Seaman
Joined
Sep 9, 2015
Messages
56
No corrosion in there. Spray it with some penetrating oil for good measure and pull the cover off the other side too.
it is stopped mid stroke so rodents in the cylinder isnt a concern.
I would definitely take the lower Unit off and see if it turns. If its still stuck i would put a good hardwood dowel through the spark plug holes and give each piston a whack.
you can pull the head to use a larger block and/inspect cylinder walls.

Thats the overflow plug. Get down real low and look at the bottom of the lower unit. There is a drain on the skeg casting.

Do NOT remove the philips screw.

when you get to the teardown, you will need to pull the flywheel. If you dont have a proper puller, harbor freight sells a cheap harmonic balancer puller kit that works. Looks like a crows foot.
use the 3 1/4-20 holes near he center. Dont thread in too deep as you will hit the coils. Pulling from the outer edge will break the flywheel. Avoid tapping down on the shaft as that can damage the lower seal. All of the ones i have done i just load up the puller and Leave it. Usually pops in a day or so if i keep torquing the puller. Stubborn ones get some light heat from a heat gun but never hotter than i can touch.

the driveshafts are the same, i didnt know there was a difference in the lower units. Thats good info.
 
Last edited:

Piomarine

Seaman Apprentice
Joined
May 1, 2020
Messages
31
I am aware that I pulled the overflow plug, but I did not have the motor up on a stand and couldn’t easily get to the drain, but seeing oil on the overflow gave me a good feeling. I had the head off a few month back but I cannot remember the condition of the tops of the cylinders. I will probably pull them again soon. I am also going to build a motor stand/work table to give me somewhere to work on the motor and not worry about losing parts and pieces.

Right now I am leaning towards an over heating situation, maybe a spun impeller caused a critical fail, the cylinder heads should paint the picture before I can tear it all down. It would also explain why there was a brand new impeller tied onto one of the brackets when I bought it, a previous owner may have been aware of the failure, but I have been assured by specialists on other forums that it can be rescued after an over heating! I may not have a paperweight after all!
 

Jdunham

Seaman
Joined
Sep 9, 2015
Messages
56
I just noticed in your last picture, a number of the head bolts are pretty much out. Was that you or did the previous owner already look and give up?
 

Piomarine

Seaman Apprentice
Joined
May 1, 2020
Messages
31
That was me not long after I got it. I pulled it off to take a look but I didn't take any pictures and I cant recall the condition. I just put the bolts back in partially to not loose them knowing I was going to be tearing into it further...In hindsight I probably should have tightened them all the way just to keep moisture out of the cylinders.

In other motor news, I used my fathers day privilege to work out in the garage and FINALLY get a couple of motor stands built. I built them a little taller than the plans called for to give me easier access to work on them without bending over at funny angles; it also gave me enough vertical clearance that I should (knock on wood) be able to drop the lower unit without too much of a fight (but that's a project for another day). After I finished cleaning up my mess in the garage, in order to get the wife's car back in the garage, I grabbed a screwdriver and pulled the oil plug on the lower unit...unfortunately, oil residue, but otherwise dry as a bone. So once I have decent access to my work bench I will start tearing into this thing for real!
 

Attachments

  • photo333165.jpg
    photo333165.jpg
    398.9 KB · Views: 0
  • photo333166.jpg
    photo333166.jpg
    479.9 KB · Views: 1

Piomarine

Seaman Apprentice
Joined
May 1, 2020
Messages
31
I took the time this afternoon to pull the cylinder head again and take a look...it's not pretty...nearly 100% certain this was an over heating situation.
photo333251.jpgphoto333252.jpg
 
Top