Re: 1958 mfg. ADDED NEW PICS
Re: 1958 mfg. ADDED NEW PICS
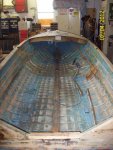
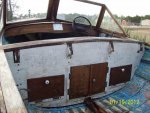
....I will need to buy some new Mahogany wood for repairs. No on here carrys it (Southport, NC) . May need to go to Raleigh or Charlotte...Bending some of the gunnell rail may be a trick . Anyone done that before??
Bending: Steaming is remarkably less effective once the wood has been dried - especially kiln dried. The cells actually undergo a change after drying- that is why most all bent wood is created using "green" wood in the steamer. Merely soaking the wood will not restore the same bendable properties, either- it just weakens the wood. Steaming works by actually softening the binding components of the natural wood allowing them to "slide" past each other. When cooled the bent wood retains its shape because the binders have returned to a solid condition. Bending wood is pretty cool- you start to apply force and the hot wood resists you and then you almost feel the binders "letting go" and the wood bends feeling almost like a piece metal with a little bit of spring-back. Then you wedge it to a form for cooling and drying and once cooled it holds its shape.
Mahogany is not that friendly to steaming anyway. I would suggest try a narrow strip (3/4x3/4) ripped on a table saw to see if it can be "dry" bent to conform to the shape you need. Bronze, brass, or even stainless screws can be countersunk periodically to provide a mechanical joint. If 3/4 width proves too difficult, 3/8 wide by 3/4 tall (or 5/4 if that will be your stock) can be bent much more easily. Then you laminate several jointed strips together to get the shape and size you need. After epoxy/glue/whatever sets you can countersink, apply screws, plug the holes, and plane flush.
You *can* use a 3/8 wide piece of your material as a batten to lay a scribe line on the deck pieces and then (if you have the skill and tools) hand plane it to the shape. Follow that by laying up the perimeter pieces that will make the bend and glue with waterproof glue (you can use epoxy) and then plane the surface flush with a smooth plane. If you are good with templating an electric router can be used to cut the deck to shape and then apply several strips smoothed on a jointer to build it up- you can even use a router to groove the edge and then make the first applied piece with a tongue to fit and waterproof glue it for a little more durability insurance.
(***I laid up a skiff gunnel piece once with 5/4 dried oak ripped to 7/16. Several layups with a rabbet to fit over the strakes of the hull and epoxy with a whole lot of clamps made a nearly undetectable joint. I used an air pinner with brads to "help" and relocated a few clamps. The pin-holes got filled with a tan filler and after varnish they were not noticeable. Use the straightest-grained wood you have to make the pieces and when glued up the glue line visually disappears after you plane it flush and sand it. In this case I used 5-min epoxy but there are better choices- although mine worked out just fine. The clear epoxy when cured takes on the color of the wood and looks like a darker grain line if your joints are smooth and tight. You want the joints pretty tight but not so tight that you force out all the epoxy or glue.)
Can't wait until pictures load again...


")