1965 Pacific Mariner 16'

rk970

Seaman
Joined
Jul 15, 2013
Messages
71
Re: 1965 Pacific Mariner 16'

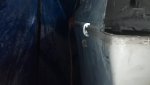
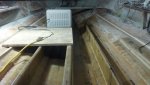
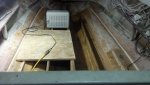
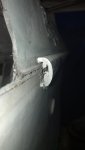
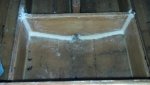
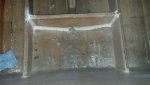
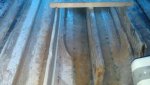
Some pics of were I am at. The side stringers in the center were not completely rotted (about 6' in the center) and had some integrity. I used two 2x4 to bridge across and hung the center keel/stringer from that when I bedded it in. I got a one layer of csm on the sides of the center stringer (extending 4" into the hull) I cut/ground out one side stringer. I hung the side stringer from the same 2x4 bridge that is now attached to the center and opposite side stringer.
I bedded in the side stringer with hairy PB, when that set I mixed up some micro and did the fillets. I will scuff/sand and put csm on the sides and into the hull (3"). When the csm cures I will cut/grind out the other side stringer..
I am doing it this way to keep the stringer in the original level plan.
rk
 

Attachments

  • 2013-09-22_17-10-42_904.jpg
    2013-09-22_17-10-42_904.jpg
    142.1 KB · Views: 6
  • 2013-09-22_17-10-25_356.jpg
    2013-09-22_17-10-25_356.jpg
    140.4 KB · Views: 6
Last edited:

Woodonglass

Supreme Mariner
Joined
Dec 29, 2009
Messages
25,929
Re: 1965 Pacific Mariner 16'

Rounding the stringers will make glassing em a lot easier. Nice work on the stringers.
 

rk970

Seaman
Joined
Jul 15, 2013
Messages
71
Re: 1965 Pacific Mariner 16'

Almost done with the stringers. One more layer of 1708 on the left stringer and two layers on the most outboard ones. Work has been slow since it is cold. (hi in low 50s and lows in 40s) 100,000 btu heater helps a lot. Boat is under a 20x30 tarp and tented in. Any idea or place to get replacement rub rail from?
I am getting stoked that I will be starting on the floor soon.
Robert
 

Attachments

  • 2013-11-03_17-01-58_661.jpg
    2013-11-03_17-01-58_661.jpg
    131 KB · Views: 4
  • 2013-11-03_17-00-53_941.jpg
    2013-11-03_17-00-53_941.jpg
    139.8 KB · Views: 4
  • 2013-11-03_17-01-02_707.jpg
    2013-11-03_17-01-02_707.jpg
    146.6 KB · Views: 4
  • 2013-11-03_17-01-20_946.jpg
    2013-11-03_17-01-20_946.jpg
    138.5 KB · Views: 4

jc55

Senior Chief Petty Officer
Joined
Nov 3, 2006
Messages
665
Re: 1965 Pacific Mariner 16'

Super nice glass work!
 

rk970

Seaman
Joined
Jul 15, 2013
Messages
71
Re: 1965 Pacific Mariner 16'

bilge box.
Just got it set in with PB. Tonight (if I can get the area warm enough) I will tab it with 1708.
Rk
 

Attachments

  • 2013-11-15_08-04-02_92.jpg
    2013-11-15_08-04-02_92.jpg
    139 KB · Views: 5
  • 2013-11-15_08-04-13_782.jpg
    2013-11-15_08-04-13_782.jpg
    142.5 KB · Views: 5

Woodonglass

Supreme Mariner
Joined
Dec 29, 2009
Messages
25,929
Re: 1965 Pacific Mariner 16'

Use blue tarp to cover the boat and stick a couple of 500 watt halogen light under there. Give it 1/2 hour and you'll be amazed at how the temps will come up. Use a heat gun to heat up the wood set the resin and Mekp in some pans of warm water to keep it warm. When everything is up to temp start doin the glass work and it'll be just like doin it in the spring time!!!:D;)
 

rk970

Seaman
Joined
Jul 15, 2013
Messages
71
Re: 1965 Pacific Mariner 16'

I have it under a 20' x 30' tarp/tent. with a 100,000 btu heater.. it still takes about 1 hour to get the surface of the hull up to 60?.
 

rk970

Seaman
Joined
Jul 15, 2013
Messages
71
No Title

The weather is warm. I am back at it. Floor (one layer of 1.5 csm on the bottom) was installed with PL and screwed down to the stringers every 6". 7" wide 1708 biaxial tape on the transition between the floor and hull. One layer of 1.5 csm 3" passed the biax and will be adding the one more layer of 1.5 csm 3" past the first layer of CSM.
 
Last edited:

Woodonglass

Supreme Mariner
Joined
Dec 29, 2009
Messages
25,929
You really need to use Photobucket to post your pics. The Forum is NOT functioning well and posting pics using the forum is just not gunna work!!!
 

rk970

Seaman
Joined
Jul 15, 2013
Messages
71


1969 Franken Merc.800. Parts from a 1150 distributer. nos 1350 lower unit housing, 800 gear set with a 1972 drive shaft. who know were the two lower cowls came from. 1150 re wrapped stator. 850 starter and bracket (some grinder work on the bracket to clear the coil). lots of shims and late nights cussing. she purrs like a kitten..
 
Last edited:

rk970

Seaman
Joined
Jul 15, 2013
Messages
71
Evercoat feather fill g2 with a HVLP gun. Sanded with 320 wet.
Rustoleum white primer tinted 1:8. 2oz of pentrol per pint and 1/2 oz of valspar enamel hardener per pint. Rolled on one coat wet sand 320
Top color is "Kentucky Blue Grass" alked enamel from Benjamin Moore. 1oz of Valspar hardener and 2oz of pentrol per pint. Rolled on 3 coats over a weeks time.
Rustoleum industrial gloss white. 1oz hardener, 2oz pentrol per pint. Rolled on 4 coats over a weeks time.
Interior is Rustoleum industrial grey. Same mix as before. 3 costs with a 4th on the floor with grip additive.
All rolled on. Secondary roller to knock down bubble's when needed.
 
Last edited:

sphelps

Supreme Mariner
Joined
Nov 16, 2011
Messages
11,475
Really nice work rk !
I don,t know how this thread slipped past my cool old classic boat radar .. You sure you didn't get my green paint formula somehow ? :D
Gunna tag along for the splash if there's room ....
 

rk970

Seaman
Joined
Jul 15, 2013
Messages
71
Well the turquoise color has a story behind it. I went to our local ace hardware and grabbed a few color chips. When I found a turquoise that matched the seats I went back and had a quart mixed up. Nine months later when when I need another Qt for the top paint Ace no longer does alkyd enamels.. Local BenjamenMoor matched it perfect for three times the cost, (but not three times better paint.).
I live in the Puget sound so my paint mix works very well for me. I sometimes tweek it with thinner (Naphtha or Mineral spirits) depending on temp/wind/baro pressure.
I have worked with Alkyd enamels for a long time. I always use an enamel hardener with no exceptions. It is a waste of time and money not to use hardener. You have to use multiple thin coats as it will never work as a one coat paint. Alkyd enamels cure by oxidation. Thick coats will skin and the underlying paint will take a looooong time if ever to cure (even it feels dry it will be soft) I put a coat on then wait a day. After a day I wipe it down with 50/50 mineral spirits/acetone mix. The mix has just the right solvent strength to get the next coat of paint to link to. I don't usually sand between coats unless more then 10 days have passed. I will use a fine scotch bright pad to knock bugs out between coats.
Work in one direction and keep a wet edge going, Look back and knock down bubbles if they don't settle. Its a zen thing, no dilly dolling around, just move as the paint allows it.
Its not hard to do unless it is your first time
smile.gif
.
 
Last edited:

Tnstratofam

Commander
Joined
Aug 18, 2013
Messages
2,679
I think the color combination looks good on that hull. To me certain colors can add the right feeling to a resto. Fresh and clean. Like a new start. Looks good at any rate.
 
Top