1968 Holiday Restoration w/pics

ezmobee

Supreme Mariner
Joined
Mar 26, 2007
Messages
23,767
Re: 1968 Holiday Restoration w/pics

U mean like this ezmobee??? :D

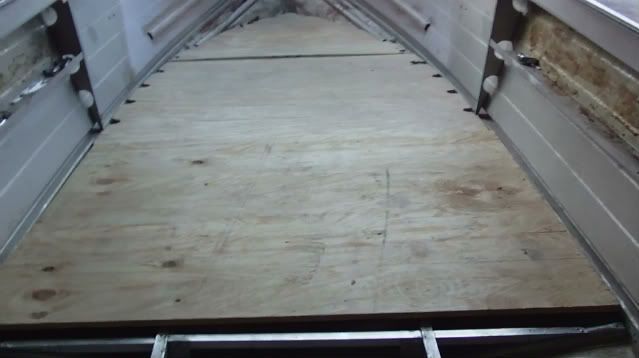
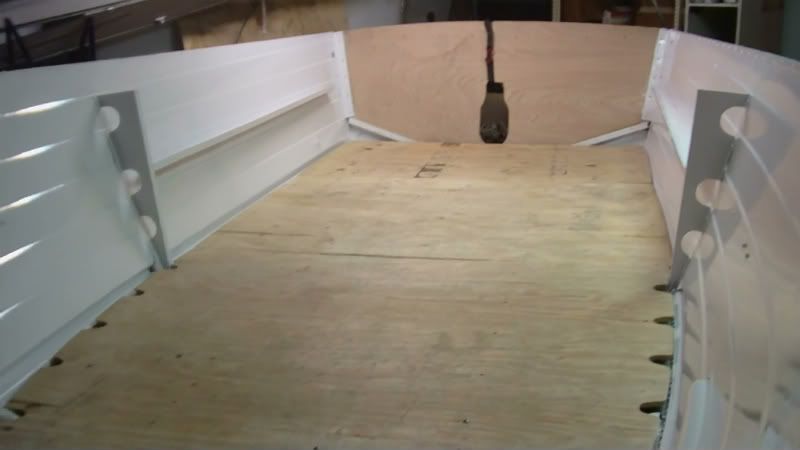
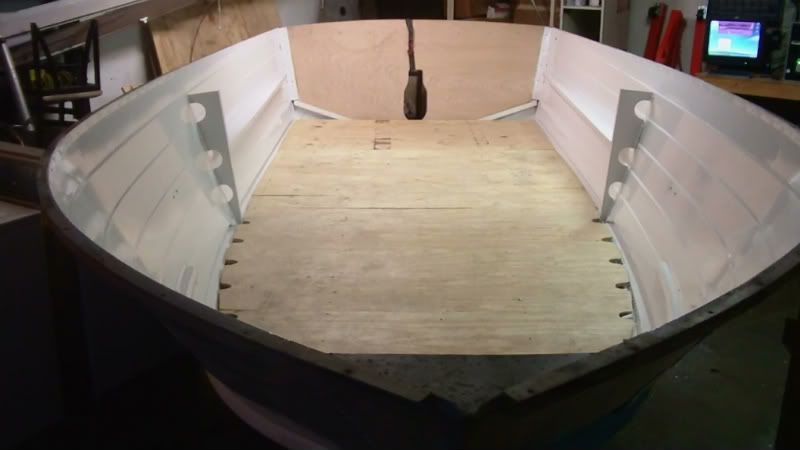
Sure is! Looks great. Awesome that your old floor is in good enough shape to be a template. That sure makes life easier. Mine was as well. However mine was not factory. It was redone once before, so I double checked each piece back in the boat to make sure I was 100% happy with the fit before I cut out a new one the same size.
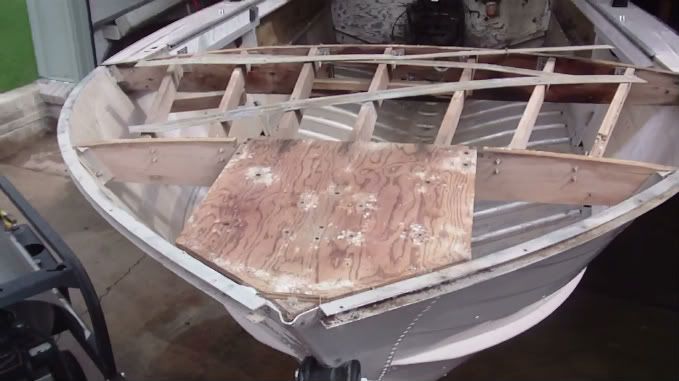
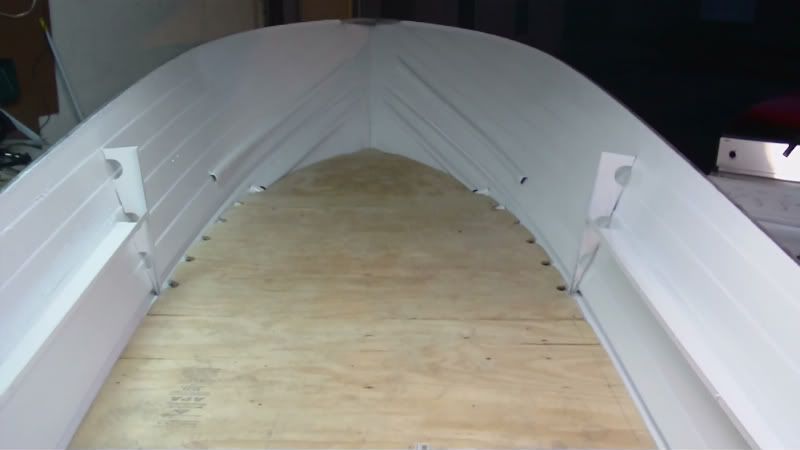
 

Azlo

Senior Chief Petty Officer
Joined
Jun 21, 2009
Messages
706
Re: 1968 Holiday Restoration w/pics

Good day today. Finished cutting the floor. Actually it was not that hard. Had to correct some errors but other than that not bad.

MAH001971.jpg


I think the hard part would be to drill the bolt hole in the correct spot. Right now im having many thoughts as to what to finish the floor with. Of course I have to encapsulate it. Will be using the epoxy!!,, no doubt!! But i know i don't want carpet. I been thinking of non skid paint, oh what about wrinkle paint, vinyl tile or crackle paint or bed liner for that matter. So many decisions, but i like to try new things, will see what happens.
 

CheapboatKev

Vice Admiral
Joined
Oct 4, 2008
Messages
5,813
Re: 1968 Holiday Restoration w/pics

Just a suggestion Azlo bro..
Why dont ya work one section of deck at a time and snap a chalk line on top of the deck? Then match the previous line to the next deck piece?

I would say NO to carpet, ditto on any type of household vinyl stuff..

Durabak looks really great, but may be $$$ I dunno..Ya can always paint and add sand or I used the Shark Grip stuff that ya mix into the paint..

Great wood work and look forward to seein more
 

BobsGlasstream

Commander
Joined
Sep 11, 2009
Messages
2,128
Re: 1968 Holiday Restoration w/pics

Azlo,
That transom looks real nice. it should last for years now.
I have heard a lot of good things about marinetex for filling holes. I'm not sure about the large one.
Keep up the great work. It's looking good
Bob
 

sprintst

Commander
Joined
Apr 18, 2009
Messages
2,066
Re: 1968 Holiday Restoration w/pics

Real nice transom work. I should have brought my boat by and we could have knocked both out at the same time. :) I would bave even supplied the beer.

Get some samples from Durabak... They shipped them to me almost on the same day somehow. The stuff feels like it could last on a tug boat...
 

Azlo

Senior Chief Petty Officer
Joined
Jun 21, 2009
Messages
706
Re: 1968 Holiday Restoration w/pics

Great Idea cheapboat, I dont have the chalk but i can draw marks,good idea bro.

Thanks Bobglasstream, i think im gonna try the marinetex. Been reading about it.

sprintst i dont drink beer ......I drink liquor :D Just kidding......Everybody has their own taste and color, I think everybody should believe in something ---

funny-babies-holding-a-beer1.jpg


--- I believe I'll have another drink. :p
 

sprintst

Commander
Joined
Apr 18, 2009
Messages
2,066
Re: 1968 Holiday Restoration w/pics

That is a one funny pic...

He looks pretty comfortable. Like me after a couple.

Just you mark out the transom hole from the old transom or drop the transom in and mark the outdrive hole.
 

Azlo

Senior Chief Petty Officer
Joined
Jun 21, 2009
Messages
706
Re: 1968 Holiday Restoration w/pics

Since the old transom was distorted from the rot i dropped in and marked it and then cut it.
 

Azlo

Senior Chief Petty Officer
Joined
Jun 21, 2009
Messages
706
Re: 1968 Holiday Restoration w/pics

Found some WRINKLE paint thought I would try it on the sides, instead of bed liner. SO far dont like it.

MAH002002.jpg


MAH002001.jpg


Feel innovative so will try something diffrent.
 

ezmobee

Supreme Mariner
Joined
Mar 26, 2007
Messages
23,767
Re: 1968 Holiday Restoration w/pics

Someone else used speckle paint and it looked AWESOME. I'd give that a try.
 

a70eliminator

Captain
Joined
Sep 9, 2007
Messages
3,762
Re: 1968 Holiday Restoration w/pics

Azlo, thanks for taking the extra time to document your progression it makes this site just that much better.
Screwing down the deck with the blind nuts is good, I would position a panel and install one thread insert and pin it down, then another in the opposite cormer just to pin it down, after two locations are pinned down you can then go and drill all the rest of the holes, then pull the deck and install all the inserts and they will line up perfect.
are you using countersinking heads?
 

Azlo

Senior Chief Petty Officer
Joined
Jun 21, 2009
Messages
706
Re: 1968 Holiday Restoration w/pics

Yes a70eliminator I will be using counter sunk screws they will also be tork screws. This is the first time i do a deck and not to mention something this different. But I love experimenting.
 

gstanford85

Cadet
Joined
Jun 5, 2009
Messages
6
Re: Starting 1968 Holiday Restoration w/pics

Re: Starting 1968 Holiday Restoration w/pics

I was able to replace my trim pump on a 75 evinrude 75hp with a brand new mercruiser inboard pump rated for over 200hp it has no problems lifting the motor now. I did have to run new lines and fittings, but i like the idea of having the pump inside the boat.
 

mikezohsix

Petty Officer 2nd Class
Joined
Oct 26, 2009
Messages
111
Re: 1968 Holiday Restoration w/pics

looks great.
you're doing the same thing I am, just my I/O is a Grumman.
My transom is back in, floors are glassed but not in.
These boats are amazingly similar, even the floor cut outs look almost the same.

I did the foam this past weekend, waiting for (yes I know most people recommend against it) my carpet to be delivered.

Here's my post...
http://forums.iboats.com/showthread.php?t=362705&highlight=grumman

I have to get the pix from the camera into the 'puter so I can update my post.

Are you glad you're working on a tinny?
I sure am.

mike
 

Azlo

Senior Chief Petty Officer
Joined
Jun 21, 2009
Messages
706
Re: 1968 Holiday Restoration w/pics

Man Mike thats a lot of foam you u had to take out!!

Looking good so far, hope to see u on yhe lake.
 

Azlo

Senior Chief Petty Officer
Joined
Jun 21, 2009
Messages
706
Re: 1968 Holiday Restoration w/pics

Happy New years to everybody. I have made a news year resolution and have made deadlines for my tin project.!!! Sooo... with that in mind , now that I have finished the floor.

MAH002251.jpg


I will be replacing the hood with aluminum square tubing just as i did the hull braces.

MAH000914.jpg


I think this will be lighter and stronger not to mention it will out last me.

MAH001282.jpg


At the same time i will be moving the dash forward about a foot which is where i have placed the captains seat right now. Im looking for more space and a lighter craft. Wish me luck!!

THIS YEAR IS GONNA ROCK!!!!!!!!!
 

sprintst

Commander
Joined
Apr 18, 2009
Messages
2,066
Re: 1968 Holiday Restoration w/pics

Nice work. It will be much better than factory with all the improvements.

Hopefully 2010 will be a kickass year for everyone...
 

Azlo

Senior Chief Petty Officer
Joined
Jun 21, 2009
Messages
706
Re: 1968 Holiday Restoration w/pics

So I started the braces for the dash. I don't know whether to make the dash taller or keep it original size.

MAH002311.jpg


It would be nice o have more space for the switches and gauges.

MAH002378.jpg


It doesn't quite fit yet but just a mock up now.
 

ezmobee

Supreme Mariner
Joined
Mar 26, 2007
Messages
23,767
Re: 1968 Holiday Restoration w/pics

Good to see you back at it. Good idea replacing the wood structure with aluminum. I always cringed whenever anyone would walk on the closed bow part of my Jupiter knowing there was nothing under there but 40 year old 1x4's.
 

Azlo

Senior Chief Petty Officer
Joined
Jun 21, 2009
Messages
706
Re: 1968 Holiday Restoration w/pics

I was getting bored of just work work and really not seeing some real progress. So i decided to paint the inside white to give me some motivation. Used rustoleum professional glossy white. Read and read on how to roll & tip. I have to say...I like it.

MAH002479.jpg


Used hi density foam roll 6 in and a 4 in brush to tip. Since it was the inside and some of it will be covered with upholstery dash, etc. I didnt work a lot on the prep work. Just cleaned and prime with zinc chromate.

MAH0024715.jpg


The coats were thick and leveled out well. But I think, and I might try it, that if i added some thinner the paint might of leveled out better. Any comments.

MAH0024713.jpg


On the second coat i waited 24 hours. I didnt sand i just applied the coat like i did the first one. All in all i was very happy. But if I was to use it for topside I would definitely work more on the prep, and sand before the second coat. Well now that i am motivated, I am gonna work on my dash.
 
Top