1969 glasspar refloor

Status
Not open for further replies.

ezmobee

Supreme Mariner
Joined
Mar 26, 2007
Messages
23,767
Re: 1969 glasspar refloor

Great work. Looking very solid. Should outlive you!
 

headhunter2

Seaman Apprentice
Joined
Aug 18, 2009
Messages
44
Re: 1969 glasspar refloor

I should have posted yesterday but the PL premium for the small gaps worked out great. Also I have found a better deck paint than I previously posted that doesn't break the bank, glidden poorch and floor polyurethane oil gloss, with a bag of non skid it should work great, avail at home depot for 22.96 a gallon.

Today I filled the foam holes in the deck with Peanut butter and any knot holes or defects in the wood tomorrow it's GLASS TIME, after sanding of course....ohhhhh more sanding don't know what I'd do without that...lol.
 

headhunter2

Seaman Apprentice
Joined
Aug 18, 2009
Messages
44
Re: 1969 glasspar refloor

Got some work done today, after sanding for 2 hours and vaccuming for 45 minuets I was able to get down the first section of glass on the deck. I was working with a 2 yard 38 inch piece of 1.5 csm and man did it and the wood suck up the resin, this piece took about 60 oz of resin to get in, if im messing up here some how let me know guys!!

Tomorrow I have to run in and get more resin...of course and find one more piece of csm, if i can't I have some cloth I can use, think its 1.5 oz too.

Current plan, after the all the glass is in on the deck I,m gonna sand the whole thing with 150 and lay down a light finishing coat of resin.

Some things I have learned so far in this project (and yes If I had read more posts I would be better off) Order all of your stuff from US composites and at least twice as much as you think you need..you can sell leftovers on craigslist.. this will save you much time and money. Do not for any reason set foot in a west marine store except to look at something for an idea they are the definition of rip off... 3 yards by 38 inches of 1.5 CSM from them is 45 bucks vs local shop 3..70 a yard or us composites at 3.50 a yard, do not support this company IMHO.

Here are some pics from today

top view of aft section glassed in, still need to finish the bilge access
IMG_3806.jpg


another view of the aft end glassed
IMG_3807.jpg
 

headhunter2

Seaman Apprentice
Joined
Aug 18, 2009
Messages
44
Re: 1969 glasspar refloor

Today was a big day, no pics though didn't think about the camera as I was in get-r-done mode. Got the deck glassed in all the way, man does that CSM drink the resin at one point I was mixing 50 oz batches which worked out much better than small batches. The big moment of the day was freeing my friendly neighbors garage after 2 weeks of boat and saw dust. It's finally starting to hit the 60s in the day up here so I should be able to finish up in my carport.

I still need to make the seat bases and glass in to the deck and I am going to make some retaining brackets for my topside fuel tanks, then of course sand the deck and paint...getting closer but the light is still dim at the end of this tunnel.
 

headhunter2

Seaman Apprentice
Joined
Aug 18, 2009
Messages
44
Re: 1969 glasspar refloor

Update - The weather has turned, almost 70 on saturday and today it snowed, probably won't get anything done for the next week or so due to the boat being in the carport and not the ohhhh so nice heated garage. Guess I can't complain too much though this is the first snow of the year for us and it's just a dusting, I feel for the guys on the east coast and midwest.
 

headhunter2

Seaman Apprentice
Joined
Aug 18, 2009
Messages
44
Re: 1969 glasspar refloor

Got to work today so that when it does get nice out I can get some work done. Today I built the seat bases. Used left over 3/4 doug fir ply from the deck and cut 12"x12" squares then cut 45 degree angles on the edges to make glass transition easier, and look better. After that I centered a seat base on the wood and drilled a pilot hole through for a reference point. Then I measured my Tnuts, shank height width and total base width of the tnut. Then drilled a recess so that the top of the shank would be even with the top of the base next drilled a hole all the way through for the shank, remember if you are doing this to use a backer board to decrease tear out from the bit also a drill press is perferred for straight holes.

After the holes were drilled i put pl premium on the tnuts and a washer on the bolts and tightend them down. Then brought them in the house to dry out needs to dry at above 50 degrees.

Next up is to cover the bases in glass then glass to deck, when I do this I will apply PL premium on the bottom and use 6-8 deck screws dipped in resin to secure to the deck and after that Im going to glass over the whole thing to the deck with a 6 inch tab from the base. For final install the seat bolts will get a healthy coating of 3M 4200, so i can still take them out in the future if needed, this is important because the rot on this 40 year old boat all came from the seat bolts and destroyed every thing over time.

Here are some base pics

Bottom of the base
IMG_3809.jpg


one of the T-nuts sunk into the recess with PL premium
IMG_3810.jpg


Top and side view of a base
IMG_3812.jpg
 

MTribe08

Senior Chief Petty Officer
Joined
Oct 25, 2008
Messages
680
Re: 1969 glasspar refloor

Looks really good..I decided against putting any screws into the deck for my wood pedestal. What I did was bond the pedestal to the deck with a layer of CSM, after that cooked off, I wrapped the pedestal in 6oz cloth and extended about 3 or 4" off the sides. The pedestal is solid as a rock. Might want to consider this way instead of putting deck screws into your deck. Your call. Here are some pics of how mine came out.

SSPX0863.jpg

SSPX0856.jpg

finalGelCoat003.jpg

finalGelCoat009.jpg

Finished003.jpg
 

headhunter2

Seaman Apprentice
Joined
Aug 18, 2009
Messages
44
Re: 1969 glasspar refloor

Well it's official I have the boat bug, as if i didn't know it already. Im trading my 88 full size bronco for a boat and 500 bucks. It's a 14 foot western welded hull on a galvinized trailer. Comes with a 9.5 sportwin evinrude that runs.

Here are some pics, and yes I know I'm not done with my current project but this is lake ready and the wife and kid can go out on their own on it when Im gone out to sea (NAVY).

Transom
IMG_3813.jpg


Interior hull
IMG_3814.jpg


Bad pic of trolling motor
IMG_3815.jpg


Port side
IMG_3816.jpg


Stbd side
IMG_3817.jpg


If anyone has any inputs on western boats let me know before tommorrow or its a done deal for me, no hull wounds at all on this boat.
 

ezmobee

Supreme Mariner
Joined
Mar 26, 2007
Messages
23,767
Re: 1969 glasspar refloor

Never heard of them. Looks like a nice 'lil fishing rig though.
 

headhunter2

Seaman Apprentice
Joined
Aug 18, 2009
Messages
44
Re: 1969 glasspar refloor

Looks really good..I decided against putting any screws into the deck for my wood pedestal. What I did was bond the pedestal to the deck with a layer of CSM, after that cooked off, I wrapped the pedestal in 6oz cloth and extended about 3 or 4" off the sides. The pedestal is solid as a rock. Might want to consider this way instead of putting deck screws into your deck. Your call. Here are some pics of how mine came out.

When you bonded with CSM did you wet out to the bottom of the base and wet the deck and press down with some weight while it cooked? Just trying to figure out how to do this right, since your post and since all the work glassing in a watertight deck I also do not want any holes in it. Thanks for the idea man.
 

headhunter2

Seaman Apprentice
Joined
Aug 18, 2009
Messages
44
Re: 1969 glasspar refloor

Set up the seats today for fit checks and set in the controls so it would feel right when done. Here's my idea the two pedistal seats up front and the box frame will have a strong top with a hinge and a seat similar to the others flush mounted on top so I can use this space for some storage. I plan on just glassing the box to the deck, I'm not set on this idea yet so any input is good input.

The basic layout looking aft to fwd
IMG_3819.jpg


The possible box frame and position, yep gotta move the rod holders
IMG_3820.jpg


Looking aft
IMG_3821.jpg


Top view
IMG_3824.jpg


Soon to be dead fish eye view..lol
IMG_3826.jpg


Drivers seat, controls, wheel relation
IMG_3830.jpg


Thanks for looking
 

headhunter2

Seaman Apprentice
Joined
Aug 18, 2009
Messages
44
Re: 1969 glasspar refloor

It warmed up today and I got home before dark so I sanded the spot on the deck for the front seat mounts and put a layer of csm on the bottom of the mounts and pressed em down. Man that 1.5 oz csm on the deck is some thick stuff didn't really notice how thick till I started sanding, If this thing ever leaks throug I'll be surprised. I will post some pics of the mounts after they set.
 

headhunter2

Seaman Apprentice
Joined
Aug 18, 2009
Messages
44
Re: 1969 glasspar refloor

Finally nice weather and some time off, I have been busy, coated the seat bases with resin and sanded the whole deck in prep for paint. Just finished pressure washing the boat a while ago and will be painting tomorrow weather permiting... test run saturday!!!! Here are some pics.

If all goes well some future upgrades for the interior, no more ugly brown vinal on the sides Im gonna go with grey or blue and yesterday ordered a bimini top (navy blue) for a hundred bucks off ebay. Also I managed to pick up a pair of scotty down riggers for 50 bucks from a buddy...watch out salmon here I come. lol.


This is a good feeling no matter what
IMG_4004.jpg


The deck fwd sanded and washed
IMG_4005.jpg


Aft sanded and washed

IMG_4006.jpg
 

headhunter2

Seaman Apprentice
Joined
Aug 18, 2009
Messages
44
Re: 1969 glasspar refloor

Got the first coat of paint in today, it went in great.

fwd

IMG_4011.jpg


aft

IMG_4010.jpg
 

son of a son of a sailor

Seaman Apprentice
Joined
Apr 15, 2010
Messages
33
Re: 1969 glasspar refloor

HEY MAN!!! Great to see someone with the same boat. I've been looking around and finally found someone that is handeling the same can of worms i'm about the open up. I'll send pics soon. BTW... what part of the Navy? Res? Where do you drill? I'm prior VR-61 mech from Whidbey.
E.
 

headhunter2

Seaman Apprentice
Joined
Aug 18, 2009
Messages
44
Re: 1969 glasspar refloor

HEY MAN!!! Great to see someone with the same boat. I've been looking around and finally found someone that is handeling the same can of worms i'm about the open up. I'll send pics soon. BTW... what part of the Navy? Res? Where do you drill? I'm prior VR-61 mech from Whidbey.
E.

I'm active, stationed at bangor, bubble head and all. I know this is a hard boat to get info for but there are a few out there still, solid hull and mine has been great on the water so far.. any questions pm me and I'll help you out as much as possible.
 

son of a son of a sailor

Seaman Apprentice
Joined
Apr 15, 2010
Messages
33
Re: 1969 glasspar refloor

I'm new to this site and tried to PM you but nothing pops up when I click on it.... I'll figure it out.
Yeah, got a few questions:
First, I notice that at the aft part of your bilge you don't have a "scoop" or something separating the top deck from the bilge. I've taken my deck off and there is a big half bowl shaped area made of glass. It spans from the port and start bird foam "stringers". It makes no sense to me why this is there, as you were saying it would be great to just have a spot to put a fan in and blow out your bilge. Was wondering if you just cut that out during the demo of your deck, and just I can't see it from the pictures???

Second, wanted to know if the foam "stringers" you removed were really bad. Was there moisture unde /in the foam? I've been tossing around the idea of pulling all the old foam out or not. I realize that if the floor is out, it might as well get done. Mine looks rough, and the two or three small 1x cross members that span the two needs to get pulled. My idea was to just completely do away with the bilge. Was going to cut JUST the top glass off the port and star bird "stringers", grind and clean the center bilge, and then fill the bilge completely with foam. Making the entire below deck one foam support. Might be a little over engineered, but if all the air cavities in the deck are void, then you leave no room for future rot.
Just my ideas. Just wanted to see what you might think.
 

headhunter2

Seaman Apprentice
Joined
Aug 18, 2009
Messages
44
Re: 1969 glasspar refloor

I'm new to this site and tried to PM you but nothing pops up when I click on it.... I'll figure it out.
Yeah, got a few questions:
First, I notice that at the aft part of your bilge you don't have a "scoop" or something separating the top deck from the bilge. I've taken my deck off and there is a big half bowl shaped area made of glass. It spans from the port and start bird foam "stringers". It makes no sense to me why this is there, as you were saying it would be great to just have a spot to put a fan in and blow out your bilge. Was wondering if you just cut that out during the demo of your deck, and just I can't see it from the pictures???

Second, wanted to know if the foam "stringers" you removed were really bad. Was there moisture unde /in the foam? I've been tossing around the idea of pulling all the old foam out or not. I realize that if the floor is out, it might as well get done. Mine looks rough, and the two or three small 1x cross members that span the two needs to get pulled. My idea was to just completely do away with the bilge. Was going to cut JUST the top glass off the port and star bird "stringers", grind and clean the center bilge, and then fill the bilge completely with foam. Making the entire below deck one foam support. Might be a little over engineered, but if all the air cavities in the deck are void, then you leave no room for future rot.
Just my ideas. Just wanted to see what you might think.

Trust me on this, after you start your demo work you will only want to do this once so here is my advice. My boat did not have the "scoop" you are talking about and I'm pretty sure this was the original deck. The scoop seems like a bad idea because you want any water that drains over the fwd end of the deck to end up in the bilge and drain out the aft end. Also I would not close in the bilge area, every boat needs drainage, you will get water in it one way or another from rain, waves or wet people, keep your bilge area from fwd to aft. For the foam, mine was wet, I stuck a blade in it to cut a test section and it was soaked, yours will probably be the same way. As I said earlier once you rip out the old stuff you're gonna want to do this right. Replace the foam and the wood stringers and crossmembers with doug fir, easy to get here in the north west avail at home depot or lowes. For the foam I got mine at a marine shop in tacoma for a 100 bucks for a 2 gallon kit 2lb foam, was just enough for the job but I think you could order from US composites for a comparable price, I recomend them for all you glass needs. Hope this helps, just remember to cut shallow when pulling your deck up thats where I made my mistake cutting a hole in the hull thats another post of mine. Good luck and any other questions just ask. If you have pics they are gold for getting help info off this site.
 

son of a son of a sailor

Seaman Apprentice
Joined
Apr 15, 2010
Messages
33
Re: 1969 glasspar refloor

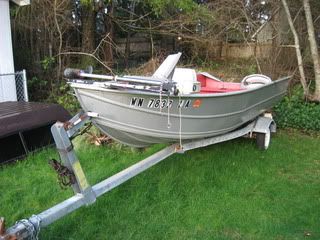
Great, thanks man!!!! Pics soon to come!
I built a 17' Pygmy sea kayak from 3/16" Okuma marine ply, so I know the tedious work involved in cutting panels and mat, wetting, filling, sanding.... the list goes on.
What is your take on NOT using wood at all? What about honeycomb composite panels? I know it's an "out there" idea and twice to three time the price as wood. But think of the weight savings, time saved wetting glass over wood (especially both sides - as you stated was beneficial). Also, there is the re-assurance that it will never rot again. I realize in one of your posts you had stated that you planned on only keeping your boat for two or three years. By no means am I discounting your project. Bravo Zulu man! Not to mention the money saved.
I guess MY real question you is, would there be any way you could give me a rough break down of what your material costs were? No need to break it all down or detail it out. Just a quick estimate of what you think your deck project was start to finish. I have a rough idea of what you used, and I'm not asking for you to build me a shopping list. I.e. (2x12 stringer, a SH*T ton of epoxy resin, glass 1.5 oz., foam 3/4 or 5/8 ply, screws, filler, glass tape, primer, paint, non skid, plus all the extras sand paper etc.)
Here is a quick link for honeycomb panels is anyone else is looking with similar ideas:
http://www.lbifiberglass.com/NIDA/nida.html
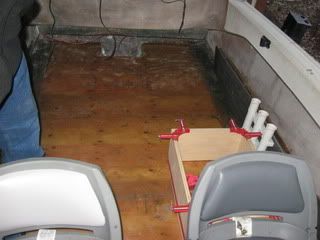
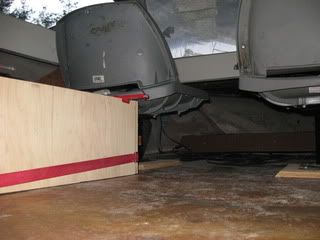
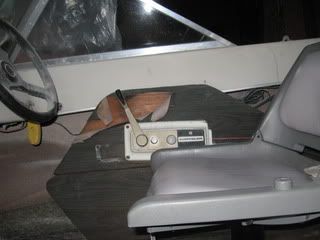
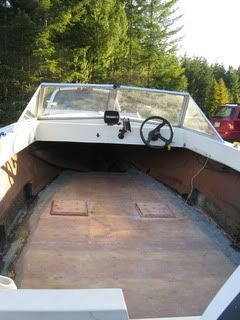
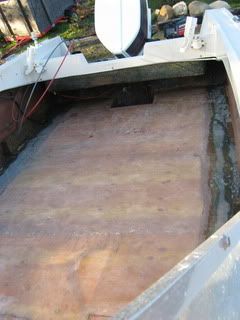
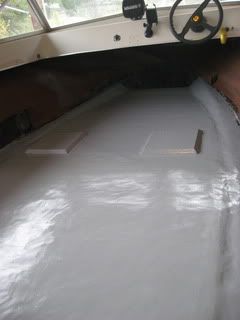
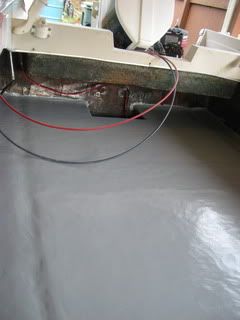
Thanks again for all your help. Pics are in-process.
 
Status
Not open for further replies.
Top