1969 Starcraft Mariner Restoration

Joined
Jan 16, 2012
Messages
17
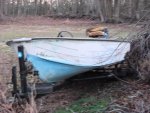
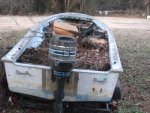
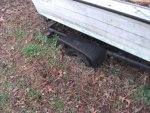
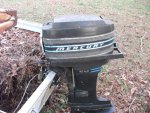
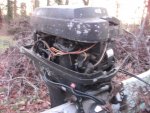
We have a '69 14 ft Mariner that has been sitting in the back yard for the past 15 years or so. Although the boat was fully functional when we last had it in the water back in 1997, it was starting to become unreliable and leaky. Not to mention, it always smelled funny. I asked Pops if I could have it to try and restore, and he said go for it. Fortunately, the dog house kept the possums from moving into the powerhead, and the trailer axle prevented the trailer from sinking to China.
 

Attachments

  • harvester 002.jpg
    harvester 002.jpg
    145.6 KB · Views: 4
  • harvester 003.jpg
    harvester 003.jpg
    114.9 KB · Views: 4
  • harvester 006.jpg
    harvester 006.jpg
    136.1 KB · Views: 4
  • harvester 007.jpg
    harvester 007.jpg
    146.1 KB · Views: 4
  • harvester 008.jpg
    harvester 008.jpg
    115.2 KB · Views: 4
Joined
Jan 16, 2012
Messages
17
Re: 1969 Starcraft Mariner Restoration

So far I have not been successful in bringing the 1970 Mercury 400 back to life. I have done a partial rebuild on the carb (thanks to some previous owner using red loctite to seal the brass access plugs on the jets, ports, etc.) I also rebuilt the fuel pump, put new plugs, and was able to get a good spark on both plugs. The electric starter is finicky, so I am going to replace the brushes and polish up the starter drive after I spend some time on the hull. Pops rebuilt the gears in the lower unit soon after we got the boat, so I would like to try and get this outboard running for a few more years. The gear oil contained no water or metal fragments, so it looks good so far.


IMG-20120203-00210.jpg
 
Joined
Jan 16, 2012
Messages
17
Re: 1969 Starcraft Mariner Restoration

I towed the Mariner in front of the garage this weekend to start gutting the hull. For some reason, I was unable to pump up the trailer tires :confused:

After pulling out a few trees, removing the casting platforms, helm, and carpet, I was able to get a good look at the deck. Yep; it's definitely a non-sealed half plywood, half potting soil deck under there. There was some waterlogged styrofoam under the deck, but no pour in foam. We also found Jimmy Hoffa under the deck...


The cedar transom board turned out to be a bear to remove. It took about 2 hours to completely get out. I found that a hammer drill with a chisel was the best tool for the job. In one Saturday I was able to get the hull down to bare aluminum. After a long power washing, and 2-3 hours of scraping out the 20 year old body filler, I started to find all of the loose rivets and small holes in the bottom of the hull. No worries, I have started practicing with my Alumaloy sticks...

IMG-20120602-00075.jpgIMG-20120602-00076.jpgIMG-20120602-00077.jpgIMG-20120602-00078.jpgIMG-20120602-00079.jpg
 
Joined
Jan 16, 2012
Messages
17
Re: 1969 Starcraft Mariner Restoration

Aside from finding Jimmy Hoffa, I also found out that my transom plate was made from an old road sign. That's.... actually a good idea. Pops has some scrap aluminum at the farm shop, but it's good to know I can scavenge some signs if I need more ally. Since those tires still won't take air, I had to improvise to move the hull out to the farm shop for further work.

IMG-20120602-00081.jpgIMG-20120602-00080.jpgIMG-20120603-00082.jpg
 
Joined
Jan 16, 2012
Messages
17
Re: 1969 Starcraft Mariner Restoration

First attempt at using the alumaloy sticks. It turned out to be uglier than sin, but it holds very well. I think this stuff is going to work very well for patching my holes, seams, and rivets. This stuff melts at 730-750 degrees F. I thought that my 1500 degree heat gun would work without burning through the thin aluminum, but I could never get a drink can hot enough to melt the stick. I still need more practice before I attempt to stick this stuff to the hull...

IMG-20120604-00083.jpg
 

jbcurt00

Moderator
Staff member
Joined
Oct 25, 2011
Messages
25,118
Re: 1969 Starcraft Mariner Restoration

Welcome to the Iboats dry dock, some of the more finicky tinny owners won't catch your thread unless you ask a MOD to move it to the Starcraft owners forum. The glassers can be helpful w/ some aspects of your resto, but the SC tin owner's group may prove more helpful. And if you want to research how to's & some of the different ways to customize your rig during the rebuild/rehab/resto there will be many more tin options to consider in that forum. Ezmobee is 1 of the mods who prefers the tin, look up him & his thread. There are lots of resources to be found @ Iboats & the SC owners group.

Happy to follow along either way, I have a foot in both camps.

Best of luck getting her back in service soon. A farm shop (& more importantly, a covered workspace) will be most helpful as you tear her down & put it back together.

Welcome again.
 

jigngrub

Fleet Admiral
Joined
Mar 19, 2011
Messages
8,155
Re: 1969 Starcraft Mariner Restoration

Someone should be very ashamed of themselves for doing that to an aluminum boat!:mad: ... but I'm glad you've decided to breathe new life into her.;)

I really can't see any reason for those tires not to hold air:confused:

The Alumalloy sticks might be good for patching small holes, but I'd replace the loose/leaky rivets instead of trying to seal them up with the stick stuff.

You can easily replace through hull rivets with closed end blind rivets like in this vid:
http://www.youtube.com/watch?v=L0MA1-5NXjs&feature=related

... and owning a rivet setting tool and an assortment of rivets comes in very handy when you own an aluminum boat.

It looks like you're off to a good start and we'll be glad to watch you make your boat pretty again.
 

jasoutside

Supreme Mariner
Joined
Dec 20, 2009
Messages
13,269
Re: 1969 Starcraft Mariner Restoration

We have seen some rough starts here on the iboats dry dock but yours is wwwwooooogh baby!! Compost container!!!:eek:

Welcome to iboats:)
 

glnbnz

Chief Petty Officer
Joined
Oct 4, 2011
Messages
458
Re: 1969 Starcraft Mariner Restoration

I just had to throw myself into this thread so that I can follow along!!

This is good stuff. I have said that IF I do another restro it is going to be a tinny. :eek:

Good luck Philbosaurusrex, I look forward to updates!! :)
 
Joined
Jan 16, 2012
Messages
17
Re: 1969 Starcraft Mariner Restoration

Playing around with some hull colors, using the latest and greatest in hull rendering software...


nose art.jpg
 

ctriverfish

Petty Officer 2nd Class
Joined
Apr 16, 2012
Messages
109
Re: 1969 Starcraft Mariner Restoration

Fill her with water and see where she leeks. A spring loaded prick punch to mark the leaking rivets and drill and replace. Mix up some gluvit or use 3M 5200 on the replacement rivets off to the races you go.
Good luck on you restore.
 

jbcurt00

Moderator
Staff member
Joined
Oct 25, 2011
Messages
25,118
Re: 1969 Starcraft Mariner Restoration

Playing around with some hull colors, using the latest and greatest in hull rendering software...

Better then some...... Not sure she'll live up to the shark attack persona though:facepalm:

Don't discount bare polished aluminum. It looks really sharp, even on smaller boats & there are a few different products available that make it easy to keep bright & shiny:D:cool: And it can only be a portion of the hull that you polish. The blue & white are great too, they will look totally different when you reverse them in your rendering: White lower, blue upper at the gunwale...

But anyway you choose, that's one of the good parts of restoring a boat, you get to pick almost everything to suit you & your needs.
 
Joined
Jan 16, 2012
Messages
17
Re: 1969 Starcraft Mariner Restoration

I've considered polishing the ally below the water line and sealing it with Sharkhide. I'm hoping to get the paint stripped off this week/weekend, so I can see how many dings, dents, and holes there are to deal with. The condition of the hull will determine if I go with polished ally or paint.

The original paint was white/blue above/below the water line. I'd like to keep the interior and gunnels white or light gray so I don't get baked in the sun. The rub rails and trim pieces will be polished and sealed to match the new stainless hardware that's going on it. Back when the boat was running, it flew a pirate flag (I was 11 years old at the time, it was awesome); I'd like to give it a Spitfire like nose design to give it the attitude she used to have...
 
Joined
Jan 16, 2012
Messages
17
Re: 1969 Starcraft Mariner Restoration

My first attempts at stripping the bottom paint has been less than satisfactory. So far I've used a quart of Citristrip and a lot of water through the power washer. There are also a few holes that someone did a quick patch on many years ago.

IMG-20120605-00085.jpgIMG-20120605-00086.jpgIMG-20120605-00087.jpgIMG-20120605-00084.jpg
 

jigngrub

Fleet Admiral
Joined
Mar 19, 2011
Messages
8,155
Re: 1969 Starcraft Mariner Restoration

Let the citrusstrip set over night at least, then after you get it removed hit any paint residue with a wire cup brush in an angle grinder.

Those holes look like good places to practice with your alumalloy sticks.
 

bonz_d

Vice Admiral
Joined
Apr 22, 2008
Messages
5,276
Re: 1969 Starcraft Mariner Restoration

I'll be watching for sure. Looks like fun.
 

Huron Angler

Admiral
Joined
Apr 7, 2009
Messages
6,025
Re: 1969 Starcraft Mariner Restoration

Nice project Philbosaurus, I like that hull.:)

I used citristrip and it worked well with a plastic brush, like an oversized toothbrush.

If I had to do it again I'd prefer not to use a wire wheel/grinder since it marks the bare metal to all he*%.

The citristrip will work well, it may take a few coats with scrubbing in between.

Welcome aboard, and good luck to ya!
 
Joined
Jan 16, 2012
Messages
17
Re: 1969 Starcraft Mariner Restoration

Haven't had much time to work on the boat this week because I've been helping on the farm after work. I did play around with the hull colors again. I'm thinking polish aluminum above the water line, and black paint below the water line.

nose art 2.jpg
 
Joined
Jan 16, 2012
Messages
17
Re: 1969 Starcraft Mariner Restoration

You can easily replace through hull rivets with closed end blind rivets like in this vid:
http://www.youtube.com/watch?v=L0MA1-5NXjs&feature=related

... and owning a rivet setting tool and an assortment of rivets comes in very handy when you own an aluminum boat.

It looks like you're off to a good start and we'll be glad to watch you make your boat pretty again.

Any ideas on using aluminum/aluminum rivets instead of the more common aluminum/steel rivets? I'm worried that a steel mandrel will start putting rust stains on the hull after a while. I can order aluminum/stainless, but they're not cheap. The ally/ally rivets also have a much lower withdrawal and shear strength.

I'd appreciate if anyone knew a good place to order an assortment of close ended rivets. Right now Fastenall looks like my best bet, but they rarely keep them in stock so I have to take a gamble on ordering them. I will order a heavy duty riveting tool from good ol' Amazon.
 

jigngrub

Fleet Admiral
Joined
Mar 19, 2011
Messages
8,155
Re: 1969 Starcraft Mariner Restoration

I buy all of my rivets from here:

http://www.rivetsonline.com/rivets-en/blind-rivets-en/closed-end-blind-rivets.html

They have the best selection and prices. Order a selection of different grip lengths and diameters, I mainly use 3/16 and 1/4" diameters in dome head and some counter sunk heads. My grip ranges vary from 1/8 to 3/8".

I prefer the steel mandrel aluminum rivet because they're the strongest. Rust is minimal, but a dab of marine epoxy or 5200 over the mandrel hole after setting will eliminate rusting completely.

You may also want to consider fastening your decking down with open end rivets in the 1/4" dia. and a dome or wide flange head, they're much cheaper than Stainless self tapping screws.

I fastened my 3/4" decking down with these:
DSC02214.jpg

... and it is rock solid. I put them in on 8" centers laterally and 12" centers (rib spacing) longitudinally. I installed them exposed so I can drill them out and remove my deck without messing up my marine vinyl deck finish.
 
Top