1974 Starcraft Capri 15' trihull restore/new everying that was wood

Status
Not open for further replies.

admjmck

Cadet
Joined
Sep 10, 2013
Messages
16
This may sound and look familiar to some of you. I started this back in the fall ( http://forums.iboats.com/forum/boat...apri-15-trihull-restore-floor-project-started ) But I ran into title issues. Apparently the last 2 or 3 owners ran the boat on the "current" sticker without ever transferring the title. After weeks of telling me he had a clean title, the sell gave me what he had and $100 back (so now I have $150 in the boat and trailer). The last guy on the title was nice enough to help me out and despite the Post Office losing a certified envelope with the title in it, I got the title last week so I can dive in.

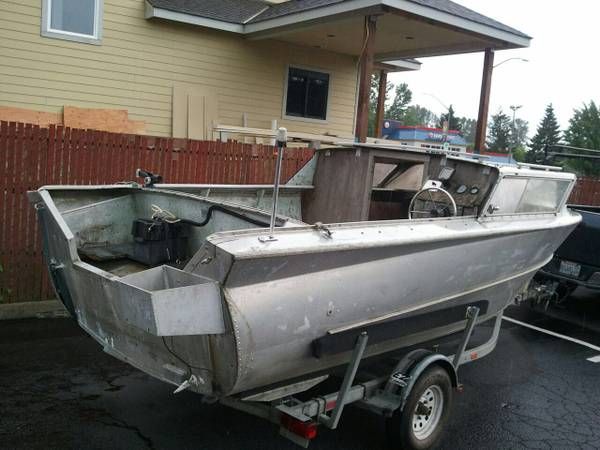
I put the boat on a cradle in the garage last fall and was finally able to do something with it. Today I added some supports and was able to get the top off . We put the top backwards on the trailer with a few sawhorses supporting the front. I was ready for most of what I found, underneath, but of course I unearthed a few questions.

Screen Drain: There is a metal screen glassed in up front, it is just in front of the foot area/walk way part of the cap. I am guessing it is part of a "drain" system. It leads to the area on either side of the main stringer, which should be filled with foam from what I have gathered on this site. Even if water got in under the seats, it should run to the back and not necessarily to this screen. I have not seen another trihull with this type of setup. Any thoughts? Should I keep it, or cut it out and extend my wood and glass up there? I was planning on this just having the normal bilgewell/deck drain system that I have seen on most trihulls.

Transom: The guy who got the replacement title for me said he had the transom replaced 5 or 6 years ago before he sold it. I drilled a couple small holes last year and the top 3-4" were soft. I figured that while I was doing this, I might as well get it all out of the way. It looks like I have 2 different pieces making up the transom, 1 the basic shape of the back of the boat (like normal), the other is the slightly smaller rectangle that has the bolts through it for the tie downs. From what I have found in my reading (just got Runabout Renovations in the mail today) and in the forums it look like most boats just have the outside piece, do you think I need the additional support of the inside piece?

I am going to put my 2"x4" braces and straps in to get the hull to the right width (there was no floor in the boat when I got it, so I am using measurements from when the cap was on) and then get to cutting and grinding. Any thoughts and guidance would be appreciated!


admjmck

Cadet
Joined
Sep 10, 2013
Messages
16
Anyone have any thoughts on if the drain was original? Should I keep it with the center drain down the boat? or cover it over and fill all 4 cavities with foam? I'm really not sure how much good the drain would do. The molded seats are about even with the drain so that water will flow back to the floor anyway.
 

jbcurt00

Moderator
Staff member
Joined
Oct 25, 2011
Messages
25,164
Unfortunately, the forum's experiencing some trouble hosting pix.

Open a photobucket acct, it's free. Each pix will have an IMG code. Copy the code & paste it in your posts. It'll show up nice & big IN your post rather then as an attachment that must be opened. The IMG code looks like this:
IMG]http://i1246.photobucket.com/albums/00O0O_7F1ewQJ3g61_600x450_zpse86102df.jpg[/IMG

And the pix are nice & large IN your posts:
00O0O_7F1ewQJ3g61_600x450_zpse86102df.jpg
 

admjmck

Cadet
Joined
Sep 10, 2013
Messages
16
Thanks, let's see if this helps


drain screen (this is the only foam that was under the cap when we lifted it off)


close up of screen


after the foam has been removed


admjmck

Cadet
Joined
Sep 10, 2013
Messages
16
I think I am going to cut the screen out, I can't tell if it was original or not (it looks like a few different ages of fiberglass in all of this), and just run plywood up where the screen is and then fill the center 2 voids with flotation foam. If anyone has ever seen anything like this, or thinks I should keep it the way it is I would appreciate your thoughts.
 

Mud Puppy

Petty Officer 1st Class
Joined
Sep 8, 2013
Messages
276
About the screen...

not real sure why anyone would want to expose the stringers to any possible water intrusion. I would want everything encapsulated and keep the water away from the wood period, but that's just me.

Pretty sure that the foam you pulled wouldn't be enough to keep 'er afloat if you breached the hull either.
 

admjmck

Cadet
Joined
Sep 10, 2013
Messages
16
Finally had a few hours to get at it with the grinder and oscillating tool and was able to get most of the front junk out.


as soon as it get the small cross brace out I will be able to mock up my templates for my stringers. I used my oscillating tool to get through the fiberglass and the grinder some around the edges. The wood was rotten and flimsy enough that I was able to pry and pull it out. Very little cutting needed.

If you can tell from the pictures, do you think my flapper sanding wheel will be enough to smooth this out or should I stay at it with a regular cutting wheel? I have not pulled the flapper out yet.
 
Joined
Jan 19, 2014
Messages
28
If you have a grinder, use that. It will make sanding go quicker. All you need is an angle grinder sanding disc backer pad and some sanding discs. I picked my up at Menard's for like $15. One thing to remember is to wear a respirator at minimum if not a tyvek vest with it. I got away with wearing a hoodie, stocking cap, gloves, and jeans but I am use to working with fiberglass. You do not want to breathing in the fiberglass particles. It will also get really dusty too.

http://www.amazon.com/Task-Tools-T22513-Grinder-Sanding/dp/B00A8GSXYG

http://www.amazon.com/3M-SandBlaste..._sbs_hi_4?ie=UTF8&refRID=1VH41YPT6NSRNC6R5W9D
 

Rickmerrill

Senior Chief Petty Officer
Joined
Mar 13, 2014
Messages
686
As far as I can tell from the picture it looks like you've got it pretty close all the way around so yeah let the grinding begin! Wood recommends the resin disc with a backer pad, lasts a little better and a bit cheaper, as adm mentioned above, but plenty have used flapper discs so start with what you got and consider trying the resin discs and see what you think.
 

admjmck

Cadet
Joined
Sep 10, 2013
Messages
16
Great, thanks! I am going to try and get to Harbor Freight or Menards in the the next few days. I have been using a respirator and have some tyvek coveralls I will be pulling out for the next few steps.

I brought home some scrap corrugated plastic from work so I can trace/trim out my stringer patters.

RM I have been following your progress, looking good! a little hope for the rest of us!
 

admjmck

Cadet
Joined
Sep 10, 2013
Messages
16
I have been cutting and grinding, but things have been put on the back burner a bit. We ran into a few medical bills for our youngest so any money headed toward the boat has been re-purposed.

I know it will cost more in the long run, but would it hurt anything to glass as I go? If I do the resin and cloth at different times (say a few weeks apart) will there be any issues with the new material bonding to the old? I would like to be able to make some progress rather than waiting until I can order everything at once. I also would like to be able to work with this over the winter but I don't want to take the chance of the resin sitting out in the cold garage.

I have not been able a definite answer on the flammability of the resin. I know it is flammable, but does anyone know if it is just the liquid, or is it the fumes as well (like gas)? I have a few kerosene heaters I use in the garage and I am trying to find out if that is safe or not.
 

Woodonglass

Supreme Mariner
Joined
Dec 29, 2009
Messages
25,929
Polyester resin fumes are flammable. However, it does take a high concentration of them in a highly enclosed area for them to become combustible. It's better to be safe than sorry so I'd advise NOT to use open flame heat ever during the initial layup glassing process. After the glass has "Kicked" and its curing it's fine to use the Kerosene heaters to maintain the temps. It is possible to do layups in the winter if you use the proper techniques. Tenting the area to be glassed and using Heat lamps or Halogen lights under the tent can do the trick. Kerosene is a WET heat and that's not good for glassing. What's required is to get the substrate and the resin and glass all to a temp of 60 degrees or above and keep it there for 2 hours and then keep the temps at 32 degrees or higher for the next 24-48 hrs. Like I said, the kerosene heat could be used after the first 2 hours. As long as you use laminating resin and NOT the Big Box store resin that has wax in it you can do your layups several days apart with out having to sand between layers. It'll stay tacky and your bond should be good. If the area is dust free and clean. If not, then you'll need to wipe it down with acetone for sure.
 

Rickmerrill

Senior Chief Petty Officer
Joined
Mar 13, 2014
Messages
686
Glass as you go - I've been trying to stay in the 16 hour window for a good chemical bond (and avoid sanding!) but even with all my supplies here I'm so darn slow I can't always do that. I try to plan out areas that I can cover from start to finish within that window or at least minimize the amount of sanding so for instance I'll PB a stringer and layout 1 side then all I need to do is scuff up the PB before doing the other side. Yeah I stretch the window, think most do and I've never heard of a problem but two weeks might be a stretch, at least it would probably mess with my mind but I do tend to the anal retentive side...
 

Mikeopsycho

Senior Chief Petty Officer
Joined
Feb 6, 2014
Messages
738
If you know your going to have to grind on newly laid glass sometime down the road, maybe it's be best to use wax in your resin so it doesn't clog up your sanding disks. Just a thought.....
 

Rickmerrill

Senior Chief Petty Officer
Joined
Mar 13, 2014
Messages
686
Great idea Mike, I hate gummy sanding worse than grinding! Haven't actually used it yet I bought a gallon of PVA to play with (have wax too). I like the idea of PVA better due to contamination concerns. It cleans up with warm water. The wax really ought to be removed with a wax/grease remover before sanding, lots of clean rags, wipe in one direction (you know that drill). All my anal-ness on this comes from my car painting days where contamination will bite you in the butt and just sanding will spread the wax around and imbeds it in the surface. That's just my thinking not my doing and what do I know!
 
Status
Not open for further replies.
Top