1976 Century Arabian - Mercruiser 888 - Boat Restoration

scoutabout

Lieutenant Commander
Joined
Oct 14, 2006
Messages
1,568
Hi Jones - I also have been lurking here watching you put her back together. Top notch work on that interior framing and I really liked the drain tube idea too.

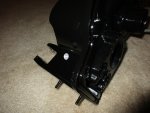
I was going to chime in with the same suggestion about the engine access. I had a SeaRay with a very similar rear cockpit including a hinged sunpad over the engine. What really saved my sanity is that the firewall had a cutout just the width of the engine that could be easily released and lifted out. Two quick cuts and you could have the same. Much lighter than lifting out a piece the entire width of the cockpit.

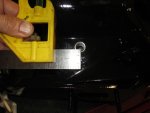
The other item I wanted to mention was the SeaRay had an even smaller round access hatch about the size of a small dessert plate in that centre cutout. I think it was so you could fire an extinguisher in there without having to open the entire compartment and have flames spread. Not sure if that is a more recent USCG requirement for engine compartments. Worth a thought.

Anyway, carry on! I love the Arabian and recall drooling over that model. I was ten when yours rolled out of the factory and I thought Century was the best.
 

jones01m

Petty Officer 1st Class
Joined
May 23, 2011
Messages
252
scoutabout, you and DRS4146 have certainly given me something to think about on the engine access. My guess is even if it only takes me 15 minutes to disassemble that I would probably struggle with working in a hard to access area for an hour or more before attempting the dissassembly. Maybe not human nature, but my nature for sure. Anyway I have a little time before I pass the point of no return.

I wonder on the fire concern if I could squirt through the three 2 in holes in the ski locker area???

When I get the final concept worked through on finishing the bow area I will come back to these items.

Thanks for the suggestions.
 

scoutabout

Lieutenant Commander
Joined
Oct 14, 2006
Messages
1,568
My recollection was the circular access hatch was placed about inline with where the fuel line ran along the top of the motor and into the carb. Not sure if that was by design as the most common area for leaks and fire or by fluke. Anyway in that situation you'd want quick effective access and I'm not sure the ski locker vents would be it. Of course the reality is I'd have probably just thrown the kids overboard and followed literally hot on their heels anyway!

Looking forward to seeing whatever you come up with.
 
Last edited:

Bayou Dave

Lieutenant Commander
Joined
Dec 13, 2012
Messages
1,780
Here are a couple of thoughts. Might or might not work in your situation. Cut an opening in the back of the front seat for accessing the rear. You won?t have to cut all the way down, just enough to get through. On the engine cover hinge the top at the stern so it opens up. On the front of the engine cover, the vertical piece, make it removable by sliding the whole piece up and out of the way. You can make a channel on each side to slide it into to hold it stable.
IMG_0030_zpshkrb1tq8.jpg
 

Kiloecho

Seaman
Joined
Sep 2, 2015
Messages
51
Great job Petty Officer 1st Class jone01m! I salute you!

I plan to jump in behind you with the rebuilding of the floor and stringers on my 1974 Century Arabian.

Kilo Echo
 

jones01m

Petty Officer 1st Class
Joined
May 23, 2011
Messages
252
Kiloecho, when do plan to start gutting the horse? I have learned from a bunch of mistakes so if there is anything I can do to help please let me know. So many threads bring in different knowledge to the boat building topic here in this forum that one can learn from. I look forward to seeing another century under the knife.

DRS, I appreciate you taking the time to add suggestions above. For now I will (I hope) keep the forward progress and move towards the bow.
 

Drb007

Petty Officer 1st Class
Joined
Jun 17, 2012
Messages
240
Jones,
I just spent bits of today reading through this entire thread. You have made me feel damned near normal. I am in the midst of restoring a 1972 Steury with/for my daughter. We are two years into it and 22 months behind schedule. I am still trying to finish my Eriba Puck project at the same time. And getting ready to start my 68 Century Cheetah. I'm rooting for you. Keep at it. Can't wait to see the finished product!
Dave
 

jones01m

Petty Officer 1st Class
Joined
May 23, 2011
Messages
252
Drb, now I am feeling a little more normal. With a job and family there are so many things that take time away from the rebuild... good things. I know one thing though, she will eventually get done, and when she is it will be a day of certain celebration.
 

jones01m

Petty Officer 1st Class
Joined
May 23, 2011
Messages
252
Yesterday was about creating a bulkhead in the bow to stiffen the gunwhales in that position and to also create a structure to secure a panel. The the most difficult part of the whole process was figuring out how to get a perfect plane at that cross section of the boat. For this a laser level was used that projects a line. The boat was first leveled in all directions and the level positioned on the gas tank mount vertical face. The process was boiled down to the few bullets below

1) Level boat, laser level a plane, then mark the plane
2) Hot melt little blocks to the plane marks (these are easy to remove later)
3) Create a pattern from 1/8' masonite. The thin masonite was chosen because it can easily be snapped by hand to size

Pictures:


jones01m

Petty Officer 1st Class
Joined
May 23, 2011
Messages
252
The bulhead in the bow was constructed and installed. I cut a cover panel that will be stiffened up and sealed at a later date. Still need to figure out how to transition from the front curved seat back to the bow, dash, etc. Each little bit makes the overall picture become more clear.


jones01m

Petty Officer 1st Class
Joined
May 23, 2011
Messages
252
No Title

Man... it has been so long I can't even remember how to post a photo. I told my family I would never give up. I am about a month or two from test firing a 351 I pulled from an E350 van and completely rebuilt. What a chore. Anyway, my hope is to stay more engaged on here as I believe I am now on a roll to the finish. We will see...
 

Attachments

  • photo275383.JPG
    photo275383.JPG
    143.6 KB · Views: 2

jones01m

Petty Officer 1st Class
Joined
May 23, 2011
Messages
252
folks, I have more updates but struggling with the pictures.

At this rate I post about once a year... this is bad I know.

the 351 is complete and had first fire yesterday. What an engine.

I do have a question for the expert team here: I bought a gimbal housing but it appears that the bottom holes dead end. I am guessing these just need to be drilled or milled out. would anyone know? I appreciate the help.
 

Attachments

  • photo291596.jpg
    photo291596.jpg
    1.3 MB · Views: 1
  • photo291597.jpg
    photo291597.jpg
    1.2 MB · Views: 1

jones01m

Petty Officer 1st Class
Joined
May 23, 2011
Messages
252
also attempting to post my first youtube video. let us see how this works.
Video is of first start on the 351W. It started right up and I immediately went into the 2000rpm break-in for 20 minutes. The engine ran cool but did not have enough supply pressure from hose to get water out of port elbow. It trickled before start then I think the exhaust pressure would not allow the flow.

Still hope someone could answer the question on drilling out the lower exhaust holes on gimbal housing.???
 

EricT71

Cadet
Joined
Mar 20, 2016
Messages
16
Hello jones01m, your resto looks great, I am really looking forward to seeing it splashed! Sorry I can't help you with those blind holes in the gimbal housing, except that I think those are where the raw water that cools the block exits.On my 888 they face to either side, are you sure they don't make a 90* turn outboard to the side?

The main reason I am posting is I also have an 888, the Ford 302 2bbl is lethargic and I have pondered upgrading to a 351 4bbl. It appears that is what you are doing. I have questions about the compatibility issues. I know the deck height on the blocks are different, does the exhaust line up? If not, are the mods to make it work expensive? What about the fuel system, does is require a different fuel pump? I take it the motor mounts and bellhousing pattern are identical. I'm on the fence whether I should do the 351 4bbl swap or just swap the entire sterndrive to a BBC/Bravo. My boat is a Slickcraft SS235, pretty heavy, deep vee with a lot of hull/water contact so I need more HP for a decent cruise speed.
 

jones01m

Petty Officer 1st Class
Joined
May 23, 2011
Messages
252
Eric, I appreciate your feedback. I was able to find an internet photo of the holes, and it is just how you said; they come out 90deg. It was really hard to see this in images because the view angles were never right to show both holes on one side at once. I will post this modification when I do it sometime this week.

The 351 will pretty much just bolt right up to an 888 set-up, and it is a matter of how far you want to take this to determine the degree of changes needed. I chose one of the most difficult paths as I always tend to do. Attached is an image of the block I took out of a 1996 E350 ford van. It is essentially the same Windsor block used since 1969, but with an update to roller cam. If you go this route you will be able to use most of the long block, but many little detailed swaps that can get expensive. I can step you through the details as needed. If you take a marine 351 such as a Mercruiser 233, it will be plug and play. There is a 1-3/4" spacing difference between the y-pipe and exhaust elbows in width. I am not sure if this is all attributed to the difference in 302 to 351, or if there was some misalignment originally that was taken up by the boots. on the 233 you can see where the boots are skewed quite a bit (internet images). I don't like this because I want to easily hook it up and the new boots are pretty stiff. I therefore elected to make two spacers 7/8" thick to bolt to the bottom of the y-pipe. I am almost done with this and will post these details.

Just a side note... although I have some strange attachment to Ford, if I were to go this far with the swap out again (meaning down to the block) I would have purchased and entire Chevy 350 set-up from a donor boat. Everything is easier with the Chevy, and less expensive.
 

Attachments

  • photo292288.jpg
    photo292288.jpg
    69.2 KB · Views: 2

EricT71

Cadet
Joined
Mar 20, 2016
Messages
16
Yes I agree that the Chevy stuff is so much less expensive, plus way more selection and availability. Is there an intake manifold for the 351 that lets you run a quadrajet without an adapter? Are you using the serpentine accessoy drive?
 

jones01m

Petty Officer 1st Class
Joined
May 23, 2011
Messages
252
Eric, I just know that I went with the Edelbrock dual plane intake for 351 and a new Edelbrock 1409 carb. I can certainly measure the spare gasket if you need measurements.

----

Made a bit more progress on the idle relief port. Not sure exact what the drill size and position should be for 70862A1 Gimbal Housing, but went for it anyway. I ended up with a 9/16 final drill size and it looks about right to me.


Attachments

  • photo292354.jpg
    photo292354.jpg
    253 KB · Views: 0
  • photo292355.jpg
    photo292355.jpg
    190.4 KB · Views: 0

jones01m

Petty Officer 1st Class
Joined
May 23, 2011
Messages
252
... and 1 of 2 y-pipe spacers done tonight.
was able to duplicate the o-ring groove from the center sections for face sealing. So I just needed an additional 2 seals and maintained original o-ring part number.
 

Attachments

  • photo292457.jpg
    photo292457.jpg
    267.1 KB · Views: 0

jones01m

Petty Officer 1st Class
Joined
May 23, 2011
Messages
252
Attached is a video of the y-pipe modification and assembly.

Photo of complete assembly... needs paint still.


Attachments

  • photo292934.jpg
    photo292934.jpg
    310.2 KB · Views: 2
Top