1977 Cruise Boats Restore

drewpster

Commander
Joined
Oct 17, 2006
Messages
2,059
Re: 1977 Cruise Boats Restore

Great work Greg. Looking good. How is your collection of dust going? Got plenty? I know I do. BTW to anybody needing any dust!, Greg and I have plenty. Mine is a little older vintage, but stuck to everything in my shop. (even after several cleanings) If you need any, let us know. Just write

drewpygreg dust collection services
ichtyback, USA :D :D :D :D
 
Joined
Aug 17, 2009
Messages
941
Re: 1977 Cruise Boats Restore

Drew,

Yeah I had plenty for sure. I am thinking about two or three 5 gallon buckets worth. It was pretty amazing how fast that stuff builds up when you grind. You just have to get in there and knock it out and clean it up. BAM! Done!
 
Joined
Aug 17, 2009
Messages
941
Re: 1977 Cruise Boats Restore

Next step?stringers. Looking at the hull of this boat I noticed that where the hull sides meet the hull bottom is a flat spot. That is where the deck will rest at the edges.

P1010861-2.jpg


This makes for a little simpler rebuild in that I have fix points for measuring and referencing. Since the stringers were unusable as a pattern for the new stringers I had to take measurements to reconstruct them. So the first thing I did was to place marks on the hull along the keel from the stern to the bow every 12?. These will be the measuring points for the stringer heights.

P1010864-2.jpg


Also in looking at the hull bottom I decided to add an additional set of small stringers where those flat pieces of ply where imbedded in the glass (top pic). This will allow the stringers to run along the chine areas of the hull bottom as such giving a nice flat spot to bed the stringers. I use a straight flat piece of scrap wood and cut it to the width of the hull. I then positioned the piece across the hull (to simulate the deck) and take measurements from the bottom of that piece to the hull where the stringers will rest. So I would have four measurements (one for each stringer) every 12? all the way down the length of the boat giving a rough profile of each stringer. This worked well because it helped to compensate for variations in the hull bottom, thickness of the glass in the stringer area, etc.

P1010864-3.jpg


Using a sharpie I wrote the stringer height for each stringer every 12? on the hull bottom. I then built each stringer using its corresponding set of dimensions. The two stringers that I removed were made of 2?x6? dimension lumber of some sort. The new replacement stringers were made from ?? exterior ply glued and screwed together just like the transom. Since I needed a stringer 12? feet long I used two pieces that were 8? and two pieces that were 4? long. When I assembled them together I placed the joint at opposite ends of the stringers. For the secondary smaller stringers that I was adding I used a single piece of ?? ply with a 12?? overlap joint. I also rounded the tops of the stringers slightly to ease the laying of the glass over them. When I installed the stringers, I cut the transom ends to match the transom angle to ensure a snug fit. Once the stringers were bedded in with PL premium I left them cure over night. I screwed scrap wood across the tops of the stringers to hold them in place while the PL cured. The next day I came back with more PL and added in filets just like the transom. I let all of the PL premium cure at least 72 hours or longer before proceeding with the glass work.

P1010864.jpg


P1010863.jpg


P1010867.jpg


You can also see here the resuts of the grinding and cleaning.
 
Joined
Aug 17, 2009
Messages
941
Re: 1977 Cruise Boats Restore

Now onto the fiberglass work. I had never done fiberglass work before. I am however very handy, crafty, works well with tools and unafraid to tackle DIY project like this. (I am not humble though ;) ) So I broke down the different parts of the boat that would need to be glassed ? transom, stringers and deck. After much reading, researching and talking to the pros, I decided to go with one layer of 1.5oz CSM over the transom and stringers followed by a layer of 1708 biaxial cloth. The deck would get a layer of 2oz CSM on the bottom and the top. The original manufacturer only used a layer of CSM and some woven roven over the stringers. The 1708 will be much stronger and easier to apply. The transom is roughly 3? x 6? and the boat is roughly 17? long. So here is what I calculated;

Transom:
1.5 CSM - 6 ft x 1yd/3ft = 2yds + 1yd (fudge factor) = 3yds
1708 - 3yds + 1yd (fudge factor) = 4 yds
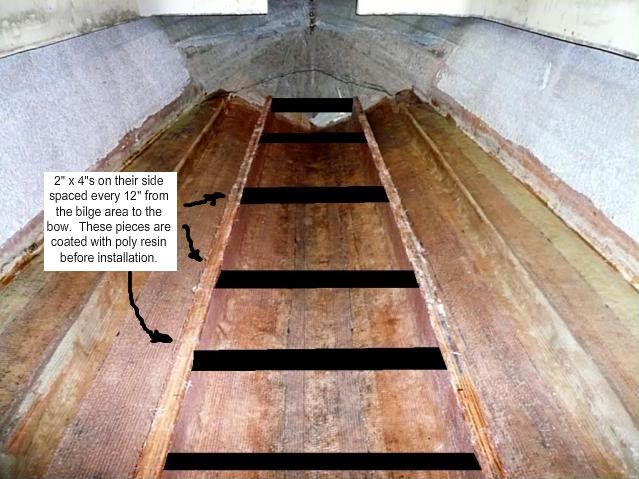
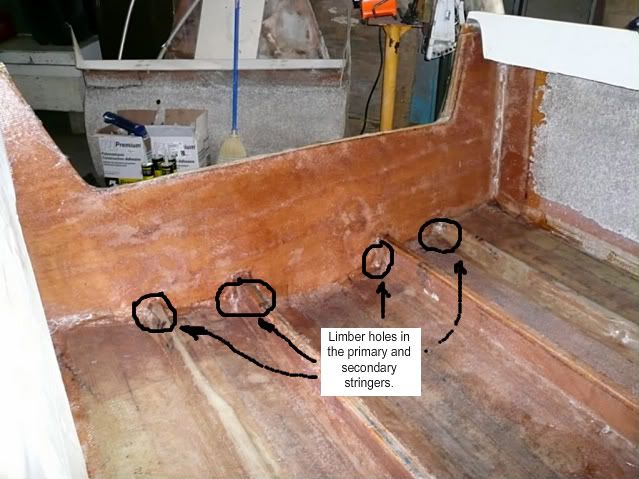
Stringers:
1.5 CSM ? 12ft (stringer length) x 1yd/3ft = 4yds x 2yds/stringer = 8yds
(Since I cover two stringers with one piece by splitting down the middle I only
need a total of 8yds)
1708 ? 8yds + 4yds (extra width for tabbing) = 12yds
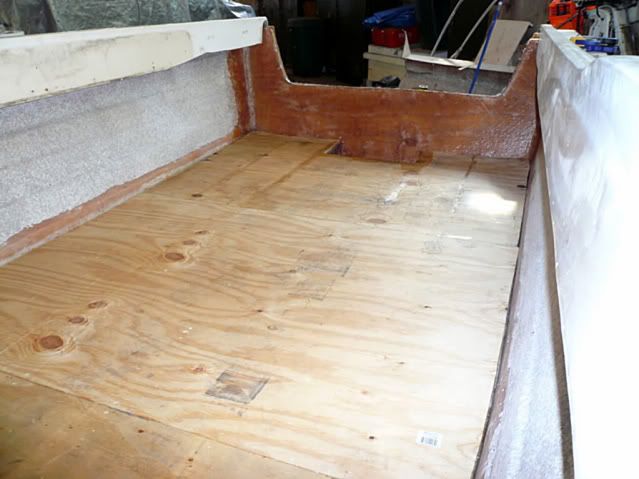
Deck:
The 2oz CSM is 50 inches wide. The pieces will run crosswise or abeam so the linear length off the roll will run port to starboard and the 50? wide part will be running for and aft. - 17? (boat length) x 12in/ft / 50in = 4 pieces needed on each side of the deck running stern to bow. Since the deck is approximately 6ft wide that makes 6 ft x 4 pieces = 24 ft x 2 (top and bottom) = 48ft x1yd/3ft = 16yds + 2yds (fudge factor) = 18yds ( I know I could have used less here since the bow tapers and is not a full 6?, but for simplicity purposes I used an equal width)

So the totals:
1.5 CSM = 3+8 = 11yds
2oz CSM = 18yds
1708 = 4+12 = 16yds

Polyester Resin: I took a guess based upon threads that I read and figured 8gal would be a good starting point. (I actually used about 11 gal total.)

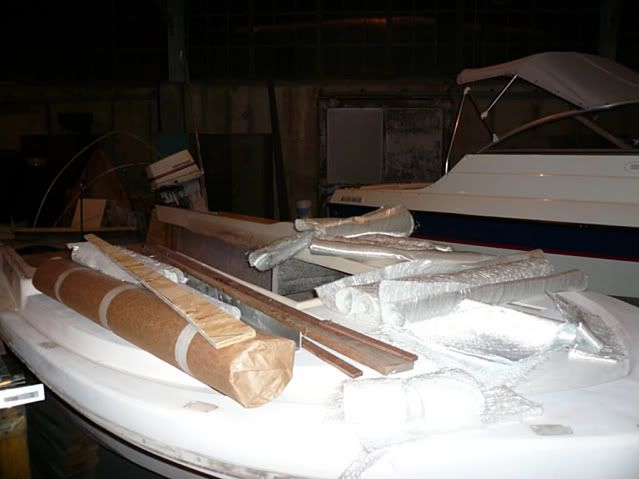
Other stuff: Cabosil ? 2 ea of the 5qt containers
Microspheres ? 1 ea of the 5qt container
Milled Fibers ? 1 ea of the 5qt container
1/4" chopped strands ? 1 ea of the 5qt container
MEKP ? 16oz
1Qt containers ? 5
2.5Qt containers ? 5
5Qt containers ? 2
2 ea of the fiberglass rollers (3/8?)

I got all of my supplies from US Composite and it ran around $650.00 including shipping. I also bought some additional resin (3 gals) for another $90.00.


Now that the math drill is over, let?s get to work. I first started with the transom and laid out a piece of CSM and used a Sharpie to mark the cut out pattern. Once that was done I mixed up about a quart of resin. I used short nap 6? paint rollers to apply the resin and wet out the glass. Chip brushes also work well in small areas or in corners and such. I applied a coat of the resin first to the wood and the hull around the transom where the glass would be. I let the wood soak up the resin for a few minutes and applied some more to the transom wood. I then placed the pre-cut piece of CSM on the transom. The tackiness of the resin will hold it in place. I then used the roller to apply more resin to the glass until fully wetted out. Make sure you keep your roller wet with resin because if not it will draw resin back out of the glass as you go along. Once you are done, wait and monitor the curing of the resin. If you mix the resin according to the US Composites instructions you will have a good 20 minutes of work time. Make sure no dry spots form under the glass as it starts to cure. If you see some drying add a little more resin to that spot. Continue to do so until the resin starts to ?kick? and then let it go. Key areas to focus on are the edges and inside corners and to make sure those areas stay firmly down and fully contacted. I then moved right onto the 1708 layer. If you have multiple layers you can go one after the other while the first one is still tacky. This is actually preferred but not always doable depending on the orientation of the lay-up.

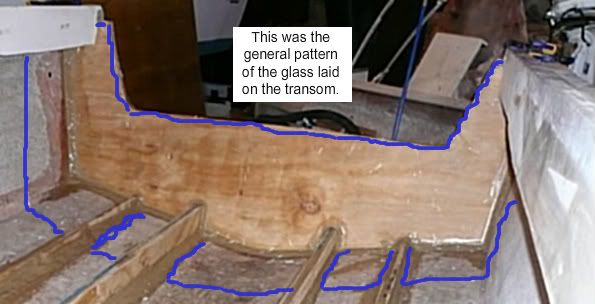
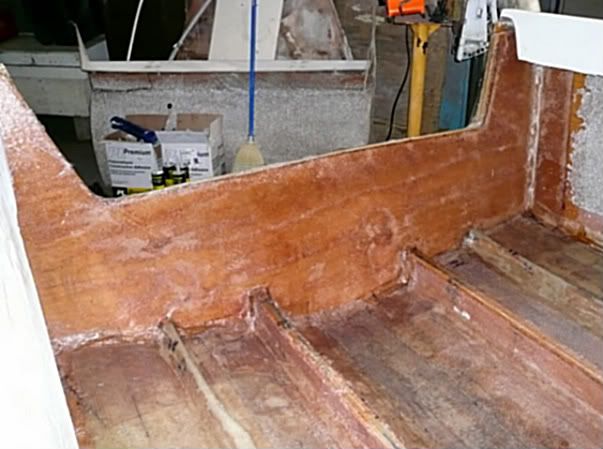
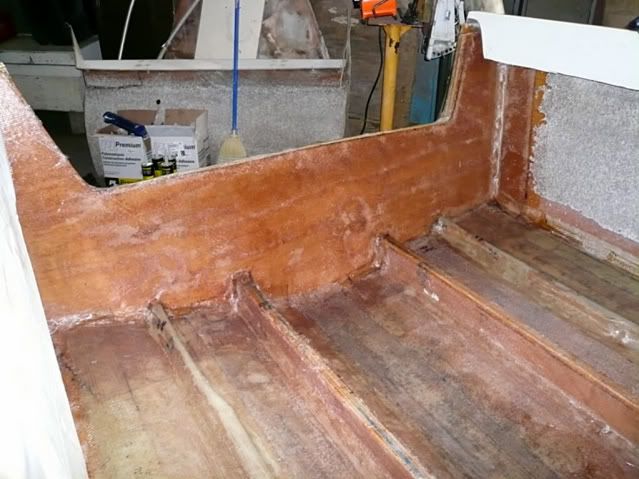
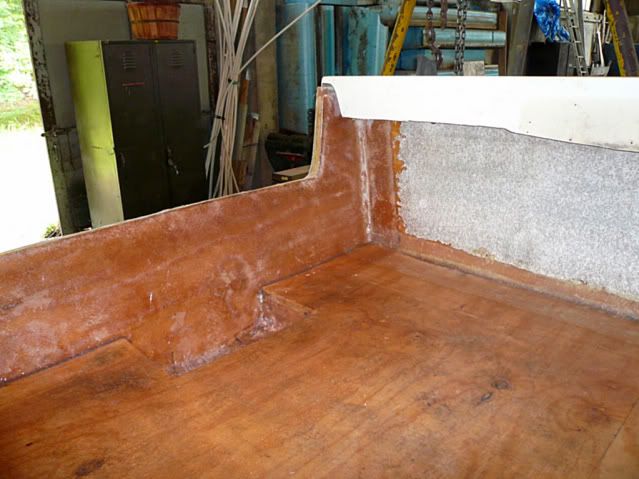
This is the general pattern I used for the CSM and 1708 on the transom. It extended beyond the edge of the transom and I cut out where the stringer were to create a tabbing to the hull.

P1010864-4.jpg


Here is a pic of the transom all glassed in. Notice the tabbing onto the hull side and bottom.

P1010870-1.jpg
 
Joined
Aug 17, 2009
Messages
941
Re: 1977 Cruise Boats Restore

Thanks 4Winns. I just wished I had not lost so many of my pics on my old cell phone. Oh well, there are lots more pics comming up.
 
Joined
Aug 17, 2009
Messages
941
Re: 1977 Cruise Boats Restore

Once the transom was totally glassed, I moved on to the stringers. I cut the CSM so that it would lie completely over the stringer and out about 6?-7? on the hull bottom. I first wiped everything down with acetone. I then mixed up some resin and coated the stringer and a portion of the hull. I let that tack up some and then recoated the stringer. I then laid a strip of the CSM down the full length of the stringer. Where the stringer met the transom I cut the CSM so that the glass would tab onto the transom. Again using a short nap roller I wetted the glass completely. Even though I rounded the top of the stringer slightly I had difficulty getting the CSM to lay flat on the tops of the stringers. When you wet out CSM it tends to stretch a little as the binding material dissolves, creating some extra loose material to deal with. I worked and worked to get everything to lay flat but it just wouldn?t go. So I just made sure I had good contact with the sides of the stringers, the filet and the hull. The extra CSM that gathered at the top I would leave and just come back and cut it off before I placed the deck down. After I got all of the CSM laid down, I came back and repeated the process with the 1708 with the exception of going over the top of the stringers. With the 1708, I just applied it to the sides of the stringers and out on to the hull bottom. This all worked out well since there was not only overlap of the CSM and 1708 but also I made sure there was over lap between the stringers effectively covering the hull bottom with several layers of CSM and 1708. Once the stringers were finished I laid a single layer of 1708 down the middle of the keel area to provide some additional reinforcement. Here is the finished product:

P1010870.jpg


P1010869.jpg


Glass supplies on top of the boat.

P1010866.jpg
 

sasto

Captain
Joined
Jun 1, 2010
Messages
3,918
Re: 1977 Cruise Boats Restore

Nice job.......whenever we had a problem wrapping over a radius like your stringer we always had a pair of cutting sheers handy and made a slit in the cloth which would ease the rolling process.
 

4Winns2

Petty Officer 1st Class
Joined
Nov 2, 2006
Messages
327
Re: 1977 Cruise Boats Restore

Thanks 4Winns. I just wished I had not lost so many of my pics on my old cell phone. Oh well, there are lots more pics comming up.

Interesting. I just found my camera in the boat having been lost for weeks now. I had a ton of pics from the summer on the lake. My week is made now that I've found it.
 
Joined
Aug 17, 2009
Messages
941
Re: 1977 Cruise Boats Restore

Thanks Sasto. That's a great suggestion. I didn't think of that at the time. Makes sense.
 
Joined
Aug 17, 2009
Messages
941
Re: 1977 Cruise Boats Restore

Interesting. I just found my camera in the boat having been lost for weeks now. I had a ton of pics from the summer on the lake. My week is made now that I've found it.

Nice. Those kind of surprises are the best.
 

ezmobee

Supreme Mariner
Joined
Mar 26, 2007
Messages
23,767
Re: 1977 Cruise Boats Restore

Textbook job so far. Keep it up!
 
Joined
Aug 17, 2009
Messages
941
Re: 1977 Cruise Boats Restore

EZ,
Thanks for the positive support. I have studied and learned from the best here (EZ, Oops, Erik, Bob, Arch, Frisco, Vegas, Wood, Yacht Dr., Drew, et al.) All you guys sure have helped me form a good vision of what needed to be done, plan the work and have great results in end.
 
Joined
Aug 17, 2009
Messages
941
Re: 1977 Cruise Boats Restore

The next step in this process is to cut and install the deck. I am not sure what the thickness of the original deck was since the original deck was replaced by some god-awful heavy ?? PT ply. I wanted to keep weight down so I planned on using ?? exterior ply that will be glassed on both sides. Since I know the ?? ply will flex quite a bit across a span of 14? or more, I decided to add 2?x 4? cross members every 12? between the two main stringers to give maximum support in the heavy traffic area in the center of the boat. The main stringers were about 23" apart and the secondary stringers were only about 11" from them. The first piece was fully glassed and inserted downward to form the front of the bilge area. The remaining pieces were placed flat wise, from there forward. I coated these 2?x 4?s with poly resin before gluing and screwing them in place. I don't have pics of this but here are a few illustrations.

Crossmembers2-1.jpg


Crossmembers1-1.jpg


There was a large rectangular piece of fiberglass in the bow of this boat when it was originally built (See first set of pics in this thread). It contained floatation foam and a small built in cooler box. I removed this when I did the demo part and my plan is not to replace it but rather just run the deck all the way up to the bow. I will probably custom build a bow box sometime in the future but not right now. Anyway, I measured the deck similar to how I measured the stringers. I took width measurements every 12" from the stern to the bow to get a profile for marking and cutting the deck. I then took a piece of 1/2" ply and oriented as it would be installed, length wise across the boat so that the factiory cut edges on the 8' long sides would be at the stern and the other facing the bow. I marked a center line down the middle and transferred the dimensions to the plywood marking half the dimension on each side of the center line.

DeckCut-1.jpg


Using a straight piece of thin wood, I connected the dots adding curvature (bending the wood straight edge) as I needed to simulate the curvature of the hull side. I then cut the deck piece out and test fit the piece. I fine tuned each piece as I made it to ensure a nice tight fit between the pieces.

Here are the pieces test fitted in place but not yet installed.

P1010871.jpg


P1010872.jpg
 
Joined
Aug 17, 2009
Messages
941
Re: 1977 Cruise Boats Restore

Before installing the deck there are a few minor things to take care of. One is to drilled limber holes at key locations in the stringers in case if any water were to get in it has a place to drain through to the bilge area.

P1010869-1.jpg


P1010870-2.jpg


The limber holes were about 3/4" in diameter and after I drilled them I coated the inside of the hole with a loose mix of resin and chopped strand. This is necessary to seal the exposed wood from any water.

Another thing to take care of is to cut out the bilge area in the stern piece. I measured and cut that out. Notice the 2"x 4" (fully glassed) that I installed to create the front part of the bilge area. The limber holes onto the bilge area are difficult to see.

P1010874.jpg


The underside of each piece of the deck was glassed with 1.5oz CSM. Once that was set I glued down the deck sections with PL preimum and screwed them down to the stringers.

P1010873.jpg


P1010875.jpg


P1010872.jpg
 
Last edited:
Joined
Aug 17, 2009
Messages
941
Re: 1977 Cruise Boats Restore

After I got the main parts of the deck down I had to make the final piece of deck to go into the bow area. This was the only somewhat tricky part. There are no stringers under the uppermost bow area to attach anything to. So I had to measure and cut out that final piece such that it was a snug fit. I planned on gluing it in place around its edges with some PB mix and then glassing it. I put a small piece of scrap wood that fit under the main deck and also extended out into this open area so that I could hold this piece of decking in place until I PBed in.

P1010875-1.jpg


With that final piece in place, I sealed the entire edge of the deck with a PB mixture and also created a filet for final glassing. Here is a pic after the PB was put in and tabbed with 1708. This pic also shows the front upper most bow area glassed in with 1708 as well.

P1010911.jpg


Once this was completed I proceeded to cover the entire deck with a layer of 2oz CSM.

P1010913.jpg


P1010912.jpg
 
Joined
Aug 17, 2009
Messages
941
Re: 1977 Cruise Boats Restore

The next thing I wanted to do was to build the console supports. These are going to be made from 3/4" exterior ply and fully glassed on all sides. The first step in the process was to temporarily re-install the windshield. This has to be done because the height of the console dictates the alignment of the pass through door in the center of the windshield. I took a small hydraulic floor jack and placed some scrap wood across the opening in the front of the console and slowly raised it up. I closed the front windshield door and continued to raise the console until there was a good even clearance around the door opening and the door opened freely without binding on an edge. I then measure the height of the console at common points. I also took several measurements from the hull side out to where the support will end to get a rough profile on that edge. I cut these pieces out and test fitted them. When everything was good I completely glassed them with 2oz CSM. When everything cured well, I pre-sanded these panels before I installed them since it was easier to do it on a tabletop as opposed to when installed. These panels were mounted behind the console and are attached by screws through the front. I double checked the door opening again and installed the panels with the jack in place. I secured the panels with screws through the front and from behind at the bottom into the deck. The screws in the back where ?toe-nailed? from behind on an angle down into the deck so that the heads were flush with the panel.

P1010951.jpg


After the panels were in place, I removed the jack and made sure the door still opened and closed freely. I then mix up a batch of PB mix and applied all along the bottom and filled the gap between the hull side and the panels. Once this set, I ground smooth the fill to make everything nice and even for future painting.

P1020014.jpg
 

ezmobee

Supreme Mariner
Joined
Mar 26, 2007
Messages
23,767
Re: 1977 Cruise Boats Restore

Everything looks amazing. Any reason you went with 3/4" under the consoles? Seems needlessly heavy to me.
 
Joined
Aug 17, 2009
Messages
941
Re: 1977 Cruise Boats Restore

Thanks EZ.

I used the 3/4" for two reasons - (1) That's what I had readily available and (2) I will be mounting two switch panels in the driver's side panel. That will require me to cut two 3.5"x 5.5" holes into the panel. I figured the 3/4" would provide better strength with this material missing. It's not too bad weight wise.

Here is a pic of one of the switch panels.

Switchpanel-1.jpg
 
Top