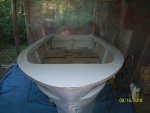
1977 Sylvan Sea Monster Side Console Rebuild

oldrem

Commander
Joined
Nov 7, 2013
Messages
2,002
I would add an inline fuse at the battery, 20 amp since your primary is 12ga.

Thx Rob, I'll have to take a good look at the loom. I'm pretty sure it's 12 at the switch but I think heavier on the battery end. I'll gage it.
 

Watermann

Starmada Splash of the Year 2014
Joined
Jan 12, 2013
Messages
13,822
Ok, was seeing the 12 on the diagram and the primary wire feeding the fuse block should be fused at the battery at it's rating for the wire gauge.
 

oldrem

Commander
Joined
Nov 7, 2013
Messages
2,002
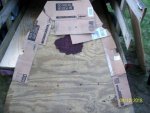
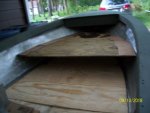
It didn't seem to matter how many measurements I took. I laid out more than 50 points on the wood off a center line and it just wasn't what I wanted so I took the old upper deck and started stapling pieces of cardboard to it then cut with an electric shear until I had what I wanted..

decking2.jpg

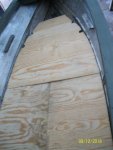
With that as my template, I was able to cut the last section of the lower deck.

decking3.jpg
 

kcassells

Fleet Admiral
Joined
Oct 16, 2012
Messages
8,738
Yea I love to make those templates. Little cardboard, foam, glue gun does the trick.
 

mickyryan

Rear Admiral
Joined
Apr 18, 2016
Messages
4,216
I already have separate Blue Sea 6 socket fuse block and 6 banger terminal block, so will have to make do there. To cut down on the number of wire sizes, I changed the 18's to 16's. Hopefully I have the drawing right now ??


the 18 gauge were fine where ya had them going to led only, i added a spreader bar on the front and that needed 12 gauge , the reason i had drawn it for the other fuse panel was because it had switched and non switched but it looks like yours will be fine
 

oldrem

Commander
Joined
Nov 7, 2013
Messages
2,002
Don't feel like I accomplished much tonight. All I did was mark up where I want to place the seating and mock up the template for the raised deck. Dang it gets dark early now.

Upper deck Template.jpg

Tomorrow night I'll start masking planning for a day of priming and painting Sunday. Won't be home until after dark Saturday with opening day of bow season.
 

oldrem

Commander
Joined
Nov 7, 2013
Messages
2,002
There's nothing quite like trying to apply masking tape in pitch darkness using a head lamp while being levitated by quarter sized blood sucking skeeters. Should have fired up the Thermacells.
 

kcassells

Fleet Admiral
Joined
Oct 16, 2012
Messages
8,738
Here's what I do; Drink beer or whatever beverage of choice. So after they bite you they are easier to kill or fly into a wall.
I must say though..more than once, I saw a sign , very small by my boat that said ' Happy Hour, Free."
 

oldrem

Commander
Joined
Nov 7, 2013
Messages
2,002
Had both a good day - and an awful day today.

Started early and finished up the masking followed by SE priming some small things on the inside. Scrubbed everything down good with acetone and a micro fiber towel.

Got the old gun setup and primed at 50 PSI. Yeah!! the correct setting worked perfectly.

Mixed up a batch of tractor paint and let it stew while I cleaned up the old gun.

Screw up #1 Managed to spill more than half the first batch, so only had enough to paint the helm.

Batches 2, 3 and 4 went perfectly - spraying a light coat then going back over with a wet coat. Then came the 5th and final batch. Had just enough hardener left to mix it.
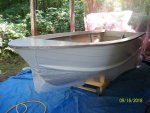
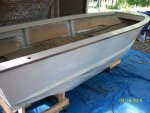
Paint Base Coat 1.jpgPaint Base Coat 2.jpgPaint Base Coat 3.jpgPaint Base Coat 4.jpg

Screw up #2 Not sure if I added too much Naptha or just rushed the job. All I know is that I got some nasty runs.

Screw up #3 Tried to fix #2 and just managed to make an even bigger mess. Once it cures I'll have to sand those areas out and redo them. I'll be a good test of the Preval sprayer WOG recommended. They were so cheap I picked up 2 of them weeks ago. Can they be used with primer also?? These photos are embarrasing
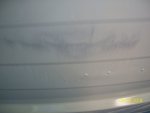

Paint Runs1.jpgPaint Runs2.jpg
 

kcassells

Fleet Admiral
Joined
Oct 16, 2012
Messages
8,738
Well ya got alot done...just some touch up. I hate when I step in the paint can. :)
 

sphelps

Supreme Mariner
Joined
Nov 16, 2011
Messages
11,475
Had a real bad run on the WM .. Zool suggested getting a nibbler to take it down cut and buff .
I used a make shift nibbler .. Disposable razor with a little water ... Real carefully pull it across the run and take it down almost all the way . Then wet sand compound and buff ... Worked like a champ ... Just be carefull pulling the razor you dont want to dig in the wrong spot ..
 

oldrem

Commander
Joined
Nov 7, 2013
Messages
2,002
Had a real bad run on the WM .. Zool suggested getting a nibbler to take it down cut and buff .
I used a make shift nibbler .. Disposable razor with a little water ... Real carefully pull it across the run and take it down almost all the way . Then wet sand compound and buff ... Worked like a champ ... Just be carefull pulling the razor you dont want to dig in the wrong spot ..

I read that and had put a nibbler on my wish list - ordered it right shortly after it happened. Should have it Tuesday to try out.
 

zool

Captain
Joined
Aug 19, 2012
Messages
3,432
I read that and had put a nibbler on my wish list - ordered it right shortly after it happened. Should have it Tuesday to try out.

The longer the paint cures, the harder it is to "nibble" , so it may take more effort to level it.

Just curious, what are those grey cardiographs above each run/drape?....did u try to correct a previous run, then respray?...Ive tried that and those pics look like what happens, the paint seems to slide off the wiped area and drape down...

Anyway, all in all, the paint looks good with little peel. If you have to resand the area,just mask off with the paper folded back, so no hard edge, and respray it..the paint is new so it will buff out mostly invisible.

Youre getting there man!
 

oldrem

Commander
Joined
Nov 7, 2013
Messages
2,002
The longer the paint cures, the harder it is to "nibble" , so it may take more effort to level it.

Just curious, what are those grey cardiographs above each run/drape?....did u try to correct a previous run, then respray?...Ive tried that and those pics look like what happens, the paint seems to slide off the wiped area and drape down...

Anyway, all in all, the paint looks good with little peel. If you have to resand the area,just mask off with the paper folded back, so no hard edge, and respray it..the paint is new so it will buff out mostly invisible.

Youre getting there man!

Yep that's exactly what I did and made a small run into a big mess - thanks for the tips
 

oldrem

Commander
Joined
Nov 7, 2013
Messages
2,002
Not sure what to do here. I hit some of the nibs with the nib file before work this morning and they seemed to still be gummy and filled the file quickly. Looks like I'm going to have to take a lot down, but trying not to make a bigger mess. :(
 

kcassells

Fleet Admiral
Joined
Oct 16, 2012
Messages
8,738
O.. that sucks. The wet nips. I guess another way to look at it is that they aren't rock hard.
I guess when the tip pops out wet like that I would wipe that area off with some acetone. Should air dry it out.
Appears like your going to have to rework thaose areas in any event.
 

zool

Captain
Joined
Aug 19, 2012
Messages
3,432
Its just trapped solvents on the thick areas, take a layer off all the areas, then let them gas off and cure some, then do some more til its almost level . Your gonna have to respray anyway cuz of the wiped areas above.
 

hvymtl939

Chief Petty Officer
Joined
Feb 6, 2017
Messages
495
Don't know how I didn't catch this one until now, but that trailer rebuild is incredible! I'm working on a vintage aluminum one myself, and I'll be following this closely. Absolutely amazing work.
 
Top