1978 Blue Fin Sea Hawk Project

badbarracuda

Seaman Apprentice
Joined
Nov 7, 2013
Messages
31
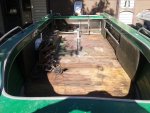
This is my first thread. I will try to track my progress and welcome feedback as well as advice. Just picked up this Blue Fin. The floors were soft and the Console as well as interior panels were in need of replacement. I am getting great ideas and advice so I hope this will benifet others. I gutted the floors Foam as well as most of the interior. Next step will be to get 3/4" Marine Grade plywood and cut to fit epoxy both sides as well as edges with 2- 3 coats. Just picked up .875-1" Aluminum Rivets from McMaster Carr part # RAA816 25 pack ( KB-84953140 ) I am going to add some support to the center stringers as well as cut and refit closed cell foam on port and Starboard sides I am leaving the center open for drainage as well as some storage and additional bracing. Stay Tuned......
 

Attachments

  • 775669_10151927215094871_866488008_o.jpg
    775669_10151927215094871_866488008_o.jpg
    156.3 KB · Views: 2
  • 615025_10151929295019871_38832655_o.jpg
    615025_10151929295019871_38832655_o.jpg
    149.6 KB · Views: 1
  • 965704_10151951282059871_2074884544_o.jpg
    965704_10151951282059871_2074884544_o.jpg
    140.7 KB · Views: 1
  • 1398379_10151929295239871_1549996580_o.jpg
    1398379_10151929295239871_1549996580_o.jpg
    140.2 KB · Views: 1

Bondo

Moderator
Staff member
Joined
Apr 17, 2002
Messages
71,357
Re: 1978 Blue Fin Sea Hawk Project

Ayuh,.... Welcome Aboard,.... Nice project,... I'll move this to the drydock for ya,...

See ya there,.... ;)
 

badbarracuda

Seaman Apprentice
Joined
Nov 7, 2013
Messages
31
Re: 1978 Blue Fin Sea Hawk Project

Just picked up this used center console used. Going to wet sand it, fit it up for new electronics steering and some guages. I just have to figure out how to flip the throttle around to work on the Console. It's mounted on the Gunnel.
 

Attachments

  • 1398356_10151969884739871_1434619880_o.jpg
    1398356_10151969884739871_1434619880_o.jpg
    146.2 KB · Views: 0
  • 1400814_10151969884874871_1127144429_o.jpg
    1400814_10151969884874871_1127144429_o.jpg
    147.3 KB · Views: 0

lokonn

Chief Petty Officer
Joined
Aug 8, 2012
Messages
443
Re: 1978 Blue Fin Sea Hawk Project

Looks like a great project. From what you know of the boat was it always a center console? I have no experience with center consoles, I assumed all of power, steering and electrical lines were run under floor to console. New console looks like a good find. Making good progress.
 

badbarracuda

Seaman Apprentice
Joined
Nov 7, 2013
Messages
31
Re: 1978 Blue Fin Sea Hawk Project

Looks like a great project. From what you know of the boat was it always a center console? I have no experience with center consoles, I assumed all of power, steering and electrical lines were run under floor to console. New console looks like a good find. Making good progress.

Thanks! From what I know yes it always was a center console, odd with the throttle mounted on gunnel. Steering and electronics were run thru the floor. The throttle cables were run along the gunnel. At this point I want to get the floor & floatation prepped. Then I will worry about seating and console braceing. I like how you stacked your foam, I think I am going that route. I think I am going with a Navy Blue or even an Ice Blue to replace the green. I also think I like the Natural Vinyl.
 

jbcurt00

Moderator
Staff member
Joined
Oct 25, 2011
Messages
25,236
Re: 1978 Blue Fin Sea Hawk Project

Welcome to the iboats dry dock, tin division

Looks like a great project,

Best of luck making this BlueFin YOURS ;)
 

badbarracuda

Seaman Apprentice
Joined
Nov 7, 2013
Messages
31
Re: 1978 Blue Fin Sea Hawk Project

Thanks! Just started reading the '60 Glastron thread.... very nice project!
 

jbcurt00

Moderator
Staff member
Joined
Oct 25, 2011
Messages
25,236
Re: 1978 Blue Fin Sea Hawk Project

Thanks! Just started reading the '60 Glastron thread.... very nice project!
Sorry, but don't over expect over in the FireFlite thread. It's still w/ me, but has been relegated to not now, or next :rolleyes:

The Duracraft is coming along though. Stop by anytime........
 

badbarracuda

Seaman Apprentice
Joined
Nov 7, 2013
Messages
31
Re: 1978 Blue Fin Sea Hawk Project

I am getting ready to tackle the flooring. There is thin bracing to mount the flooring to I was thinking about beefing that up with more aluminum bracing. Any thoughts ? I am going with the 5/8" marine grade ply I already picked up the Aluminum Rivets ( Thanks For the info Lokonn ) The closed cell foam was in great shape had some brown but I tossed them I am going to pick up some more closed cell foam as wenn as lay down some pvc for cables and eletronics. I will try to post my progress.
 

lokonn

Chief Petty Officer
Joined
Aug 8, 2012
Messages
443
Re: 1978 Blue Fin Sea Hawk Project

Good to see you back at it!
 

jbcurt00

Moderator
Staff member
Joined
Oct 25, 2011
Messages
25,236
Re: 1978 Blue Fin Sea Hawk Project

That thin strip is only to keep the edges of adjoining sheets of decking (flooring) aligned & even. It's plenty strong enough to reuse, no need to get thicker. In some project that are 'pre-gutted', the strips are missing. Since there are cut-off's left over from cutting the deck, some use rips of plywood along the edges to join sheets to each other.
 

classiccat

"Captain" + Starmada Splash Of The Year 2020
Joined
Dec 20, 2010
Messages
3,412
Re: 1978 Blue Fin Sea Hawk Project

Cool Project! They're good boats :D :cool:

Do you have anything creative planned for the steering on this ex-side console?

attachment.php
 

badbarracuda

Seaman Apprentice
Joined
Nov 7, 2013
Messages
31
Re: 1978 Blue Fin Sea Hawk Project

Cool Project! They're good boats :D :cool:

Do you have anything creative planned for the steering on this ex-side console?

attachment.php

As far as I know this was a wooden center console boat. The console was rotted but the steering cable and electronics were run through the floor. The throttle cable however was run up under and mounted on the starboard side. I am going to move everthing to the new console replace the steering cable ( it is locked up ) . I think I located a power trim unit to add.. I want to replace the bulky seats for a lean post and I would like to go with a cooler seat in front of the console. I want to redo the bow area with a storage/ casting deck. I plan on using this as a bay boat.
 
Last edited:

badbarracuda

Seaman Apprentice
Joined
Nov 7, 2013
Messages
31
Re: 1978 Blue Fin Sea Hawk Project

Finally back to post some progress! Started sanding down the Live well. I pulled the Groovy 70's print off. Taking my wife and Daughter to the Boaters saftey coarse this weekend and next. My daughter has caught Fluke Fever! Hoping to cut and fit up the 5/8" marine plywood. I am a little nervous about coating it with the resin. I think I need the temp to stay above 60 so It cures. Any thoughts?
 

badbarracuda

Seaman Apprentice
Joined
Nov 7, 2013
Messages
31
Re: 1978 Blue Fin Sea Hawk Project

Anyone have ideas on paint for the topside of the boat I want to get rid of the green and go Navy Blue as well as Navy Blue on the console. I was wondering ig one paint would work on the Aluminum as well as the Glass.
 

jbcurt00

Moderator
Staff member
Joined
Oct 25, 2011
Messages
25,236
Re: 1978 Blue Fin Sea Hawk Project

prep is different for the 2, but Rusto pro w/ enamel hardener can be shot on both aluminum & fiberglass
 

kjdunne

Petty Officer 1st Class
Joined
Sep 22, 2007
Messages
370
Re: 1978 Blue Fin Sea Hawk Project

Post a pic of the shifter / throttle control. If it's a typical OMC side surface mount type, they can be configured to be mounted on either side. Easy to change over, can describe how to.
 

lokonn

Chief Petty Officer
Joined
Aug 8, 2012
Messages
443
Re: 1978 Blue Fin Sea Hawk Project

Can tell you the resin work will go better with warmer weather. I did warm my resin and catalyst with halogen light for a bit before using and that seemed to help things. Becareful though with those lights. I set the epoxy on the cement floor, pointed the halogen at the floor and indirectly at epoxy. Didn't want to melt the bottles! The concrete got warm and the heat gently warmed the epoxy. Good luck.
 
Top