1978 Sea Ray SRV-260 with twin I/O Mercruisers, cleanup and replace whats needed...

Rick Stephens

Admiral
Joined
Aug 13, 2013
Messages
6,118
How much you all think I'm going to need in supplies and approximate cost

No idea without seeing it. But judging by my own experience, make an estimate and then double it. You'll be closer to the neighborhood.
 

White90GT

Petty Officer 2nd Class
Joined
Jul 5, 2011
Messages
161
I guess the thing thats driving me to want to rebuild this boat is the dual engines. Most boats of this size had single big blocks in them. I like the dual engines for two reasons and I'm sure most would agree: #1 if you go 10-20 miles from port and lose an engine, the other one should still be OK. #2 I think the dual straight 6 cylinders with the modifications the previous owner made will perform better and get better fuel economy than a single big block. #3 See #1 LOL.

I've just kind of always wanted a dual engine boat to play with and considering this is a trailerable boat and I like the design, I think its right. Problem at this point is time and money. I just pulled the engine from my race car to do a rebuild which I suspect will cost me a few thousand. That said the boat will be on the back burner for quite some time. I may have to get a big tarp and go park it at my parent's place for a while until fundage is ready, or until I have spent a little here and there to gather up the fiberglass supplies.
 

White90GT

Petty Officer 2nd Class
Joined
Jul 5, 2011
Messages
161
OK, this boat is a bit weird, maybe someone else can confirm or explain the Sea Ray Construction methods from the late 70s.
I got to digging in the boat more this weekend thinking I would dig the 100 gallon fuel tank out. I already cleaned off the top of it front to back, now at the rear there is the bulkhead between the tank and engine bay. The bulkhead immediately behind the tank is/was 3/4" ply with fiberglass on both sides. To either side of that bulk head is some really thin plywood, maybe 3/8" thick at most with fiberglass on both sides. I found a hole in the fuel tank on the rear about mid way down, rust/corrosion hole. The 3/4" thick piece of plywood was only rotted on the very port side edge, the rest of it was solid. The bulkheads on either side of the fuel tank are completely rotted inside the glass, just wet black mush in there.

Now here comes the weird part. What I thought were stringers on either side going from the transom to the engine bay front bulkhead don't really look like stringers. When I drilled into them a couple months ago, I noted water came out of almost every hole I drilled. What I didn't notice is there doesn't appear to be any fiberglass on the back side of those "Stringer" looking boards. It looks to be foam inside a box and the box was not fiberglassed on the inside, only the exterior. The dimensions appear to be the same on port and starboard sides, just a vertical board and horizontal board forming a flat surface for a block of foam on the starboard side and a plastic water tank on the port side to sit on top of. I removed those tanks and started cutting into the plywood. The top board does appear to be fiberglassed on both sides, but the vertical board does not. A screwdriver goes through the exterior fiberglass, through some mush, then into foam.

So what am I missing here? Does this boat not have structural stringers? Is the fiberglass thick enough to maintain hull rigidity alone? Or is it counting on these bulkheads of 3/8" plywood only fiberglassed on one side to handle things?

See pics:
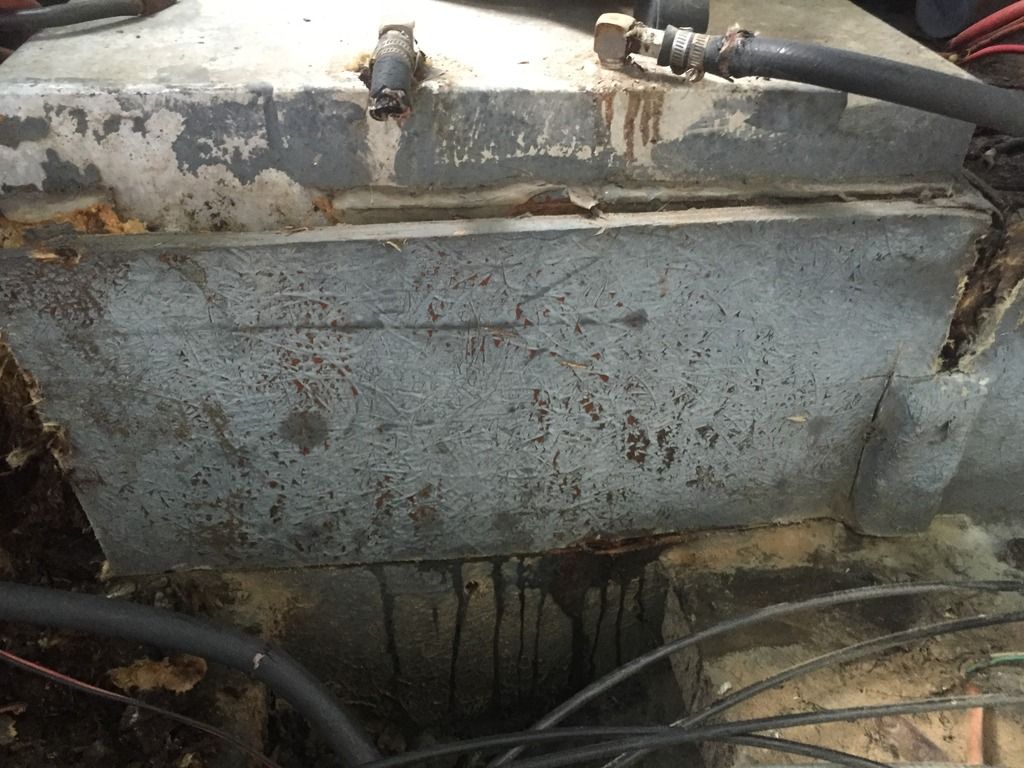
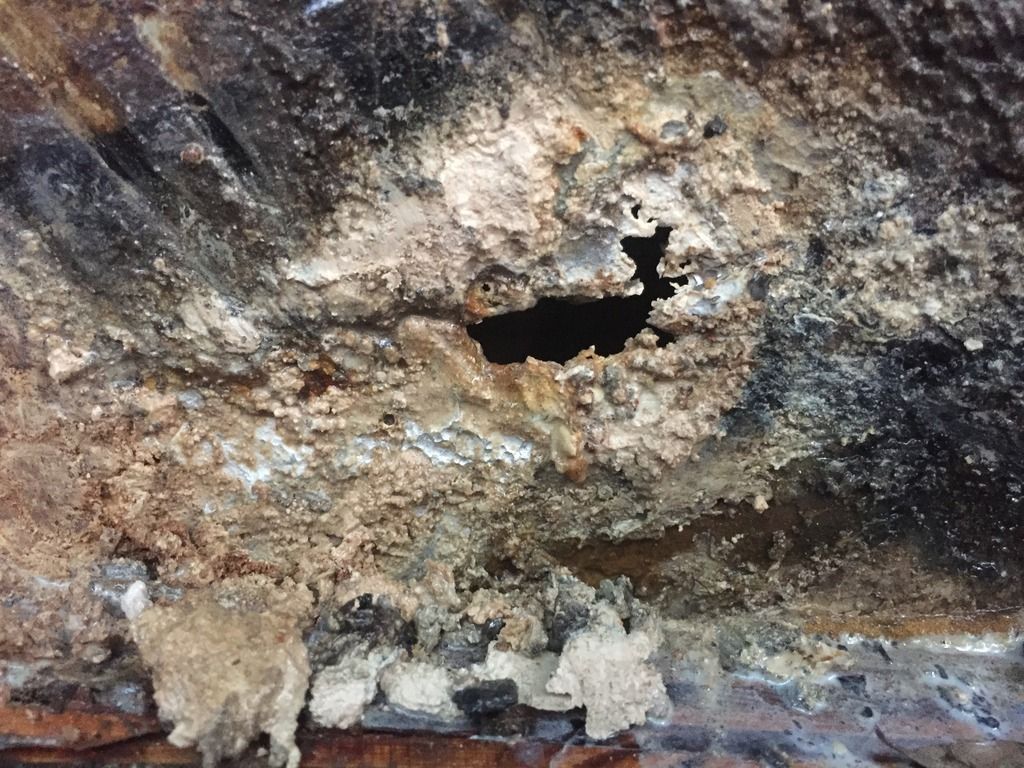
Bulkhead behind fuel tank:


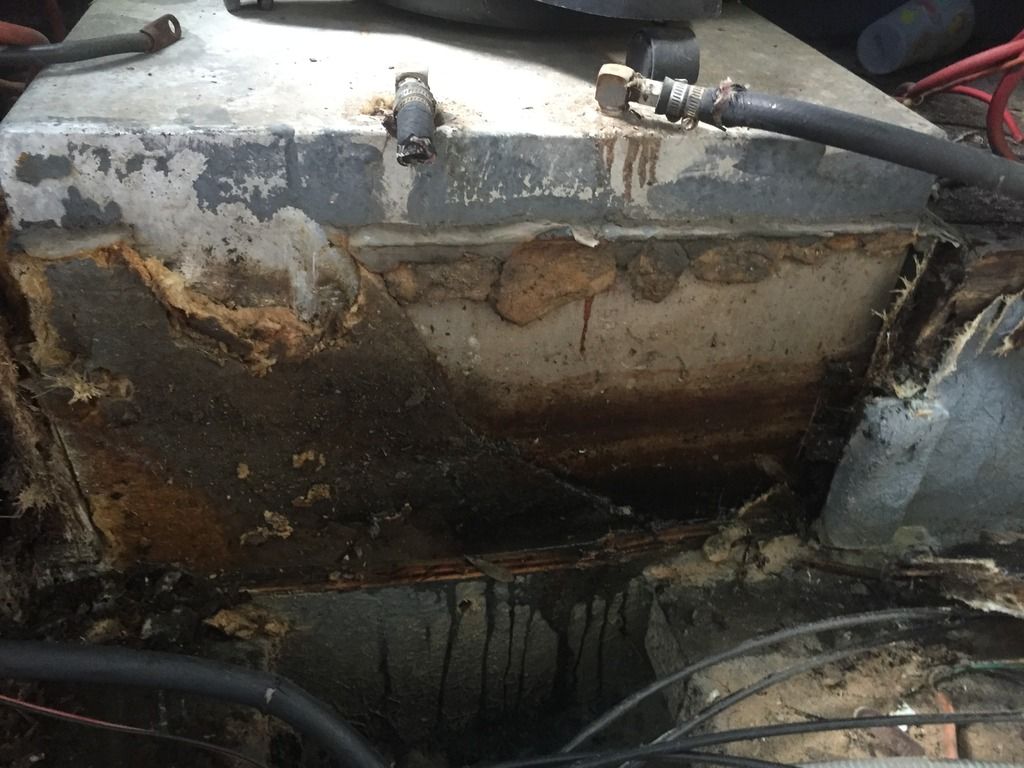
What happened after I used my grinder with cutoff wheel to cut horizontally across and try to remove that bulkhead. See the water draining?


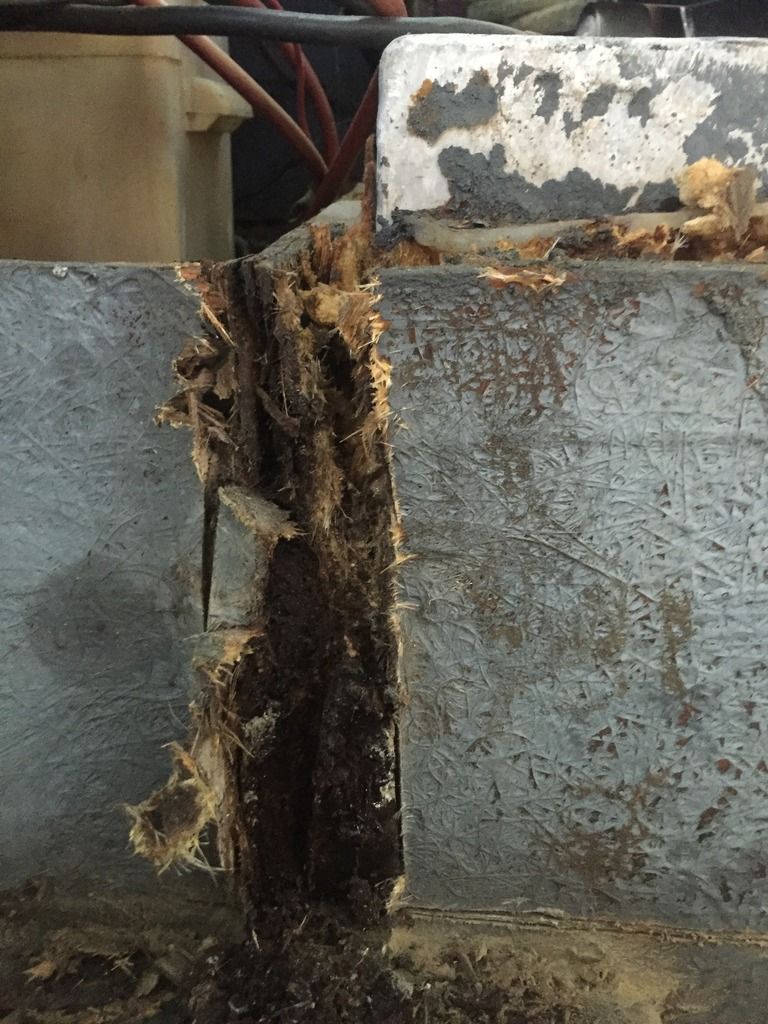
Port side rot of bulkhead behind tank?


Starboard side rot of bulkhead behind tank?


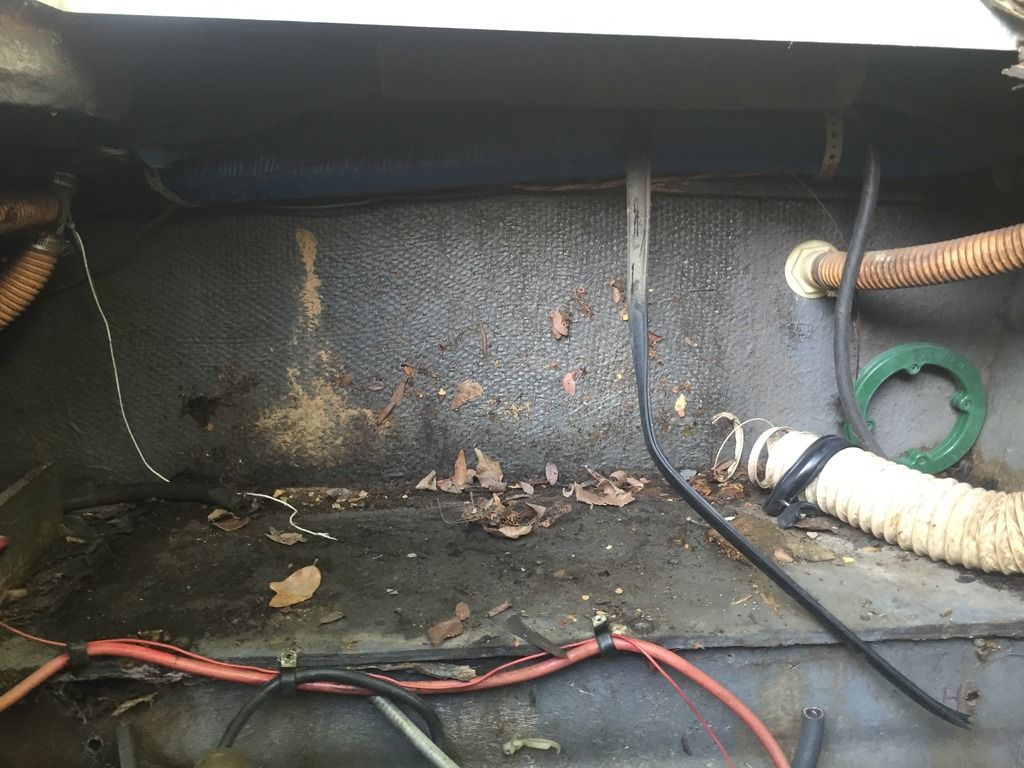
bulkhead removed, you can see the back of the tank, but I need to go lower to cut it out and get the tank out. You can see the hole in the tank. Any suggestion on how to break the tank free? I?ve got to take some measurements before I cut anything else out like the engine mount pad.


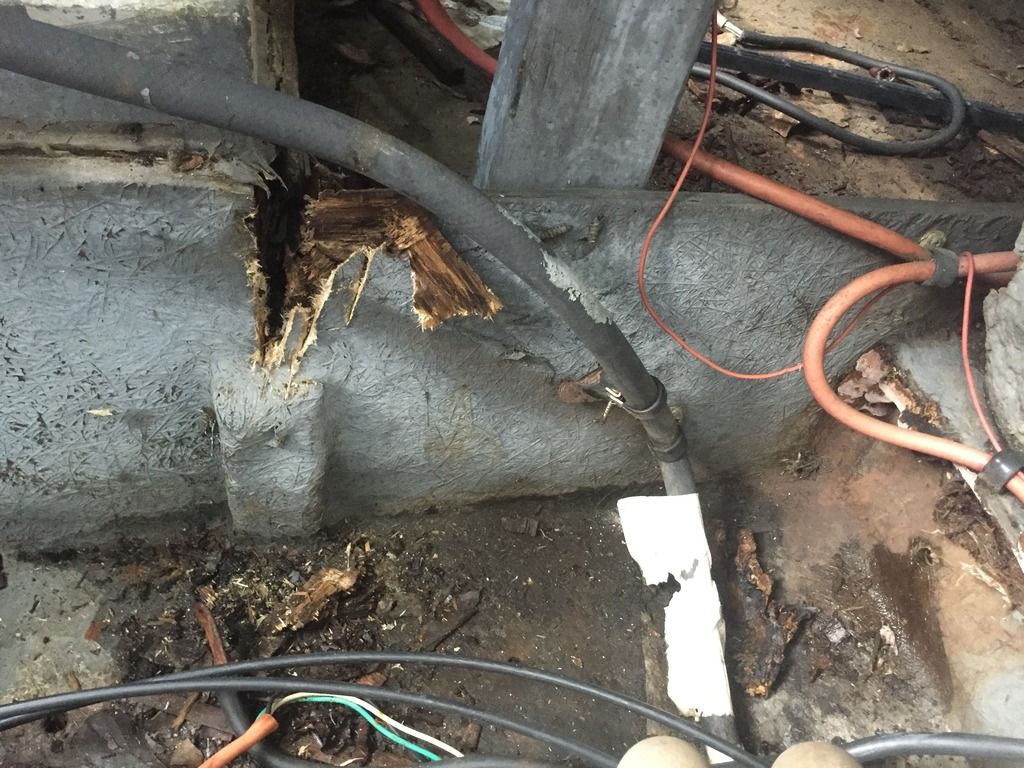
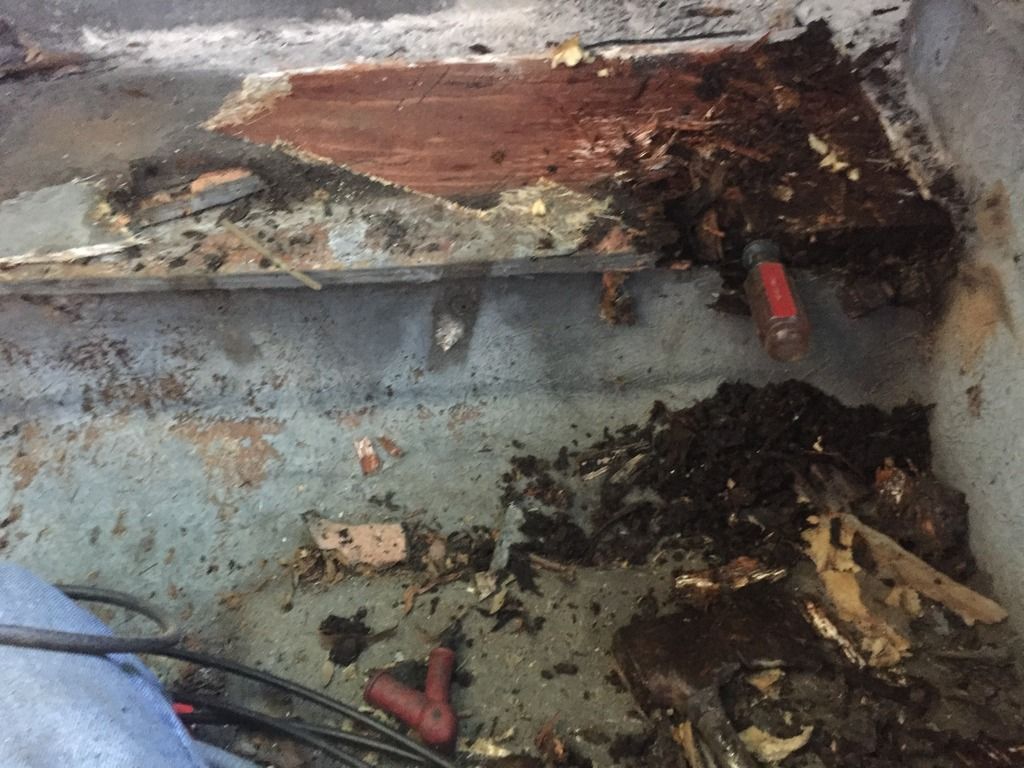
Port side stringer/box uncut?water tank removed


Cutting into the top of the port side stringer box and peeling back the fiberglass. You can kind of see where the foam is on the vertical surface there.


Everyone please feel free to comment your thoughts. I guess I?m at the point where I?m about to start the major deconstruction where I start completely cutting out bulkheads and possibly the engine mount platform. Please let me know what to measure and whats the best way to take those measurements so I can get everything back in place. If the engine mount pad is still solid, should I just cut it out from the very bottom by the hull so it will be easy to fiberglass back in place?
I did figure out why so much rainwater is getting inside the cabin, I knew it was coming from the stairwell that goes down into the boat and know there is a drain hole on one of the steps to catch the water and drain it. Well, guess where that drain hole hose goes? Yep, right to the small bulkhead in the cabin just in front of the fuel tank where the cabin bilge pump sits. Obviously there?s no power to the boat/bilge pump, so it just accumulates water until I go in there and pump/vacuum it out. I?ve put a tarp over the windshield and front cockpit area at this point hoping to stop water intrusion down the stairwell.
 
Last edited:

White90GT

Petty Officer 2nd Class
Joined
Jul 5, 2011
Messages
161
Seems every time I go to post pictures from photobucket here or on Club SeaRay, its different coding. Usually I was having to just copy the HTML link and put the IMG tags in front and behind. This time that didn't work, but using the IMG link from photobucket with the URL tag did.

Either way they are posted, let me know your thoughts. Thoughts on how to remove the fuel tank with all the foam still around it? Thoughts on why those boat doesn't appear to have a traditional thick fiberglass encased stringer on each side?
 

White90GT

Petty Officer 2nd Class
Joined
Jul 5, 2011
Messages
161
I took lots of measurements yesterday, transom width and height, motor mount width/height/thickness, distance from sides, etc? bulkhead locations, stringer box width/length/height, etc?
I cut out a big chunk of the motor mount pad so that I could cut out the bulk head behind the fuel tank in order to get it removed. That was a PITA to cut the motor mount pad out. At first I thought I could use the cutoff wheel and just cut it away from the hull on the sides, but that didn?t break it loose. So I decided to whip out the sawzall and just cut the center section of the mount pad out. I cut it at an angle on both sides, directly behind the split in the bulkhead for the fuel tank, that way if I need to set it back in place for some reason for measurement I can. But it does look like the mount pad is going to have to be rebuilt as well, it has some rot in it.
So after getting the mounting pad out of the way I could get down to the lower part of the bulkhead behind the fuel tank and cut with my cutoff wheel. Even after cutting as deep as I could with the grinder, I still had to work it heavily to get it to break loose because I just couldn?t cut deep enough and it seemed there was a few small threads of fiberglass still holding it all together.
So it looks like most of the wood in all the mid and rear bulkheads is wet and junk. Inside the cabin doesn?t look bad though. I just haven?t cut much in there yet. But the flat laying wood below the floor on the sides of the fuel tank appears to be rotten, at least at the rear. Once I cut open the rear bulk head where I could see the flat laying wood, I got up in there with a long screw driver and just pulled out lots of mush.
Still looking for comments advice about the rear stringer/box setup. Why does it not have thick plywood with fiberglass on both sides for the rear stringers?

A few pics in her current position as I?m starting deconstruction?


Last edited:

White90GT

Petty Officer 2nd Class
Joined
Jul 5, 2011
Messages
161
The cut out motor mount pad leaning up on Starboard side, and the cut out of the bulkhead behind the tank laying on top of it...


The back/aft of the fuel tank now fully visible after bulkhead was removed. Now to figure out how to pry this 100 gallon tank out of the foam. I'm hoping all the wet foam will just easily break loose from the tank, but we will see. Almost thinking of hooking something into the hole in the bank wall of the tank and trying to lift with that. I mean its a decent sized hole, so that entire back wall of the tank probably needs to be replaced? Advice on removing tank?

 
Last edited:

Mikeopsycho

Senior Chief Petty Officer
Joined
Feb 6, 2014
Messages
738
I worked a pry bar under my 120 gal tank and pried against a scrap of plywood to protect the hull. Just kept applying and releasing pressure till it suddenly broke loose.

Personally, I wouldn't attempt to repair the rotten tank, it's just not worth it. I think for safety reasons you'd be better off replacing it. Just my $0.02.
 

White90GT

Petty Officer 2nd Class
Joined
Jul 5, 2011
Messages
161
I hooked a strap to the tank and across the upper floor bracing just above it and put constant pressure on it as I beat on it and went down both sides with a long sawzall blade breaking the foam loose from the tank. It still hasn't budged. I don't have a good long pry bar right now to get under there, so I guess I'll be visiting neighbors this evening or tomorrow to borrow something to pry under there. I did find that it still had some Turpentine aka leftover fuel still in the tank. I pumped out what I could using one of the hose connections on the tank for the starboard side. The port side hose connection was clogged up.

If I have to replace the tank, I'm hoping a local buddy who recently told me he was doing a lot of alluminum welding will be able to help me out and build one. Maybe he can also build me an aluminum engine bay cover, however I'm thinking a shiny aluminum engine cover may be too bright and hot in the Texas heat. I guess it could be alluminum and be painted white with some anti-skid stuff put into the paint.
 

Rick Stephens

Admiral
Joined
Aug 13, 2013
Messages
6,118
You've been doing a lot of work. I don't think you care so much how SeaRay built that strange floatation space, you can glass in plywood instead.

Sure be nice when the fuel tank is out. No way I would try and rebuild it either. Oxidized aluminum is nearly impossible to repair. It welds poorly and leaks easily. I can't believe they bedded that tank so much - I would prefer an aluminum tank had spaces around most of it other than carefully configured areas of support structure. Even a thin air gap will keep it from reacting and corroding from contact with anything in the wood and foam and the water that inevitably gets in. Looks to me like you might need a couple pry bars on blocks made from 2x6s. May even come down to cutting away some of that tight fitted structure they built around the thing. Wow, lots of crap packed in around that tank and all swelled up with water,
 

White90GT

Petty Officer 2nd Class
Joined
Jul 5, 2011
Messages
161
Thanks Rick. I may go ahead and start cutting things away from the tank on the sides. Just tough to get to those areas on the side since the floor is above it all.
One good thing I've found is that it looks like the floor above the engine bay is separate from the main deck area and is easily removable. so when it comes time to put a new transom in I should be able to get the deck out of the way eassily.

I'm trying to do a little each day, its helping me lose some extra weight working outside in the heat an hour or two each day. I'm an IT guy by trade so I spend my days in an office.
 

Rick Stephens

Admiral
Joined
Aug 13, 2013
Messages
6,118
I'm trying to do a little each day, its helping me lose some extra weight working outside in the heat an hour or two each day. I'm an IT guy by trade so I spend my days in an office.

I resemble that. Working on the boat is a great break from a keyboard.
 

White90GT

Petty Officer 2nd Class
Joined
Jul 5, 2011
Messages
161
Nothing really to report. we have had a lot of rain over the last few weeks so I havent worked on the boat. I still cant get the fuel tank out so I guess I'm going to have to start cutting around it. lots of decking pieces under the floor but above the stringers. so I guess I will start cutting those out once it stops raining every day.
 

White90GT

Petty Officer 2nd Class
Joined
Jul 5, 2011
Messages
161
OK, spent a little more time on the fuel tank and finally got it to release from its styrofoam tomb. I haven't fully removed it yet as I'm going to borrow my neighbors tractor with front end loader to lift it up out of the boat, but I've got it to a point where I can get it out with the tractor.

I had previously attached a ratchet strap to an opening in the floor and another through the keyholes in the transom to keep pressure on it as I pry'd it up with a 4' long crow bar, but that wasn't working. So I tried another approach...

I took a 4"x4" board across the beam/sides and attached a come-a-long to a hole in the back of the tank and put heavy pressure with the come-a-long as well as using the pry bar. Still very little wiggle. So I grabbed another 4"x4" board across the beam and my 2nd come-a-long and cut a notch in the tank about mid way up (where the step down is from the taller part of the tank to the smaller part that is under the aft birth) and attached the come-a-long to it at a bit of an angle, so I got upwards pull and rearwards pull with two come-a-longs now as well as a strap through the key-holes in the transom. With some pretty heavy tension on the come alongs, some working of the rearward ratchet strap, and some prying with the 4' pry bar, she finally started breaking loose from the foam. What a PITA! Even once it was broke loose, it was still wedged in the tomb pretty well and was a fight to get it to move towards the rear of the boat to a point at which I should be able to attach it to the front end loader of the tractor and get it up and out of the boat.

So now with the tank out of the way I can get serious about measuring and cutting all the bulkheads out of the way and continue my search to see how far forward the rot actually goes.

I did do a little searching online last week/weekend for another Sea Ray within a couple years of this one with twin engines like this and I didn't find a single boat for sale like it. I found some Sea Ray 260 Weekenders, but they were all single engine boats with either a small block 350 or a big block. In a boat this size, I prefer the twin engine setup pretty much as I said before, you can go off shore and if for some reason one engine has issues you can limp home on the 2nd engine.

On with the pics...


White90GT

Petty Officer 2nd Class
Joined
Jul 5, 2011
Messages
161
Well, where I left off I had the fuel tank at a point where I thought I could just grab it with the front end loader and pull it out...nope, not happening. I couldn't get it out of the engine bay hole. It was wedged hitting the front and rear of the opening. I ended up notching the rear of the opening as it looked like it would be easy enough to rebuild. I got it loose enough to get above the engine bay hole, then it become wedged between the front of the engine bay opening and the rear wall/rail and I'm not cutting that area. So that brings us to today. I looked further into the deck that is just above the engine bay and determined it is a separate piece from the front deck and I needed to remove that. Not just to get the tank out, but to get a new one piece transom in. No way the transom was going just through the engine bay hole.

So I dug in today finding the support rails on port and starboard sides that are fiberglassed to the sides of the hull and found that it looked like it was just resting on those, but had glue/glass on the sides which held it in place. So I whipped out the Dewalt 4" grinder and went to town on the port side between the deck and the side of the hull. There was close to a 1/2" gap there that was filled with glue/epoxy. The 4" disc without the guard on was just large enough to cut through the epoxy and I'm able to lift the deck up on that side about a 1/2"-1" at this point at the front, still something holding it and I haven't gone to cutting on the other side or the rear yet.

It started getting dark, so I spent a little time wrestling with the fuel tank by hand and it wasn't as heavy as I thought. Still probably 70-80 lbs, but I was able to pry up from the bottom to get it raised in the front enough that it opened up the gap at the rear enough to clear the wall/rail/gunnel (is gunnel the proper term for the sides of the boat from the deck up to the top of the sides)? So now the tank is completely loose and out of its coffin. Just too heavy for me to completely lift up over the gunwale and throw out of the boat. That's where I stopped for the evening. Enjoy the pics below:

A shot from the rear of the rear deck area above the engine bay with the fuel tank cocked and wedged...


Port side look at the raised lip of the engine bay cover...


Starboard side look at the raised lip...


This is the front of the raised lip with a Teak facia board removed. Surely SeaRay didn't put this together with scraps of wood like that? Looks like someone else tried to reinforce it or something???


Overview shot of the lip of the engine bay deck cover...


This is the port side a closer look at how the deck is mated to the hull...


A shot just below the above so you can see whats underneath...


A shot of the bulkheads around the fuel tank aka the fuel tank coffin now that its removed...


The fuel tank standing up against the starboard side of the engine bay opening...


Specs on the fuel tank...
 

Rick Stephens

Admiral
Joined
Aug 13, 2013
Messages
6,118
WOW. Stuck in there before the deck installed. I still can't believe they glued the damn thing in. What a job getting it out.
 

White90GT

Petty Officer 2nd Class
Joined
Jul 5, 2011
Messages
161
Well, tank is completely out. Foam from around the tank has been removed from the coffin. Removed the fiberglass skin from the sides of the coffin to see how far the rot goes. Unfortunately for me it looks like there is rot extending into the cabin. Once I started cutting the forward bulkhead out that is in front of the tank, I started stabbing into the sole/floor between the fiberglass layers and it looks like some of that is wet. Then I drilled another couple of core samples on the port side under the stairwell just forward of the tank bulkheads and found wetness there. The samples I had drilled up in the front under the benches both port and startboard had looked good, but not far back from there it looks wet.

I looked at what it would take to pull the shower stall out and it looks like the entire helm has to come out. It is a separate piece and looks like it is just screwed in, but it is pretty big. Kind of like a van, there is a big area in the middle that gives you head room for sitting up in the aft birth. That big center piece is all part of the entire helm. So I have to make a decision at how much further I want to take this. Right now I have basically zero dollars in it aside from a few sawblades for the sawzall and my own time/labor of deconstruction.

I sent another text message to the guy with the other sedan bridge boat thats here in my neighborhood, but he still hasn't responded. I guess I'm just going to have to stalk him and drive by his house a couple times a day to try and catch him home. I don't really like the sedan bridge style for a family cruiser boat, but if the hull and structure is all good in that boat, its the only one I've found in Texas that has the exact same twin motors in it.

Here are a couple of pics after the tank was removed.

The coffin looking into the cabin/bow...


The starboard side stringer/tank bulkhead...


Port side stringer/bulkhead...
 
Top