1985 Bayliner 2450 Ciera Sunbridge Restoration underway!

Status
Not open for further replies.

Ciera2450

Lieutenant Junior Grade
Joined
Apr 8, 2011
Messages
1,049
Thanks oldrem!

Zool, I grew up northern Illinois. I can’t fathom going back to he cold again. The south spoils ya!
 

Ciera2450

Lieutenant Junior Grade
Joined
Apr 8, 2011
Messages
1,049
I really wanted to try and hang the tank up to get The Whole thing at once. I quickly decided it was too cumbersome and will just flip her over tomorrow and get the top side. The bottom is the critical side to prevent corrosion. The top was darn near perfect minus the glob of poly resin.
 

Ciera2450

Lieutenant Junior Grade
Joined
Apr 8, 2011
Messages
1,049
So..... the fun started today. I’ve been putting it off but gotta do it. Suited up and went to town.

AACE67F0-6105-4C3A-9BC1-B3BDBC413EA4 by Ciera 2450, on Flickr

5BB19A53-ABBC-418C-AD7A-3AB86B3A20C2 by Ciera 2450, on Flickr

you can see this area that is dry. I tried grinding down in a few spots but don’t wanna go through. Any ideas?

0138C9EC-008A-4341-8474-988A886D78A3 by Ciera 2450, on Flickr

D0595119-2FB7-49B2-A88A-3EB6DC485DC3 by Ciera 2450, on Flickr

ankther day or two and I hope to be done with grinding! This is always to me, one of those things you just get freaking done. I try not to drag it out once I get started.
 

Ciera2450

Lieutenant Junior Grade
Joined
Apr 8, 2011
Messages
1,049
After work today willl be another few hours of wonderful grinding. I really want to get that part done. Goal for the weekend is to get transom core templated, cut out, and glued together. If time allows, I’ll address the aft berth and bulkhead cut outs.
I will also be placing my glassing supplies order from USC on Friday! Woohoo! Temps are warming enough to get to glasswork very soon.
 

Ciera2450

Lieutenant Junior Grade
Joined
Apr 8, 2011
Messages
1,049
Hoping for some opinions on that dry glass spot in the picture above.... I tried grinding into it searching for good glass but I’m nearly through in spots. Should I cover the area in PB before installing the transom core? A layer of matte? ( I plan to use 1708 almost exclusively for the rebuild)
 

tpenfield

Moderator
Staff member
Joined
Jul 18, 2011
Messages
18,156
Hoping for some opinions on that dry glass spot in the picture above.... I tried grinding into it searching for good glass but I’m nearly through in spots. Should I cover the area in PB before installing the transom core? A layer of matte? ( I plan to use 1708 almost exclusively for the rebuild)

I would use some CSM and put some glass filler in the resin to give it a bit more body and fill in the 'dry' area to a point where it is about the same thickness as the surrounding areas.
 

Ciera2450

Lieutenant Junior Grade
Joined
Apr 8, 2011
Messages
1,049
Got in some more grinding fun on my lunch break. Stupid me.... I didn’t notice that I’d accidentally ripped down part of my plastic that was blocking off the interior cabin. I guess I stepped on part of it, it stuck to my sticky shoe and I was facing aft just grinding away like a madman and didn’t notice. Yep, it’s covered in nice thick layer of dust now. Ugh!

Even with a shop vac right on th grinder, a fan on the deck blowing aft and another fan in th keyhole with an ac filter on it, the dust still goes everywhere. How I have missed grinding. Lol

i will get back at it later tonight and hope to have a big portion of the grinding done. I do have some spots I need advice on. When I was grinding just now, in between the engine mount stringers, I found several large voids With dry glass. I ground all around them until I could see the woven roven pattern of what I believe is the outer layer of the hull! Not sure how to address these properly. I’ll get some pics of the areas later today.
 

Ciera2450

Lieutenant Junior Grade
Joined
Apr 8, 2011
Messages
1,049
Thank you tpenfield! Looks like I have several areas to address before sticking the transom core. How much tolerance is acceptable for “flatness” across where the transom core will be? I know the PB will allow a bit of tolerance...
 

Ciera2450

Lieutenant Junior Grade
Joined
Apr 8, 2011
Messages
1,049
Got a few more hours grinding! Yay! Not really, this is the worst part of a rebuild. I’ve got a few more days of it if I keep going a few hours each day. Really aiming to have it done by he weekend to start template and core build for the transom and bulkhead. The engine stringers will be done last as they fit in between th bulkhead and transom.

Here is is where I’m at. Getting there.... please look at the few close up shots of some questionable factory chopper gun crap. They must’ve run out of resin or something in the spray. I’ve ground pretty deep into them and reached much more solid glass. Thoughts? Keep grinding into them?
being as this is the engine bay, I don’t care if the floor is bumpy. I’ve hit good glass in most areas and don’t see the need to find it super flat/smooth. You can see the bumpiness of the factory glasswork, the transom is fairly flat where the original double layer core was. I will be gong double layer all the way to the outer lines you can see ( just outboard of the actual hull stingers) I’ve ground about 8” past them for tabbing.

8CCB204F-97A0-4A2B-BE5E-1216FA7A4CA2 by Ciera 2450, on Flickr


E9F0F3A3-2B39-4D4F-825B-3EA7A69A1317 by Ciera 2450, on Flickr


Here is is a close up of the starboard area bottom hull next to engine stringer position

3BACB13E-91FE-4D5F-87DB-21C604526246 by Ciera 2450, on Flickr

this is the area pot side upper on the transom area. You can see I’ve ground pretty far looking for good glass. I’m hesitant to go much more. I’m maybe an 1/8” thickness left around that hole.

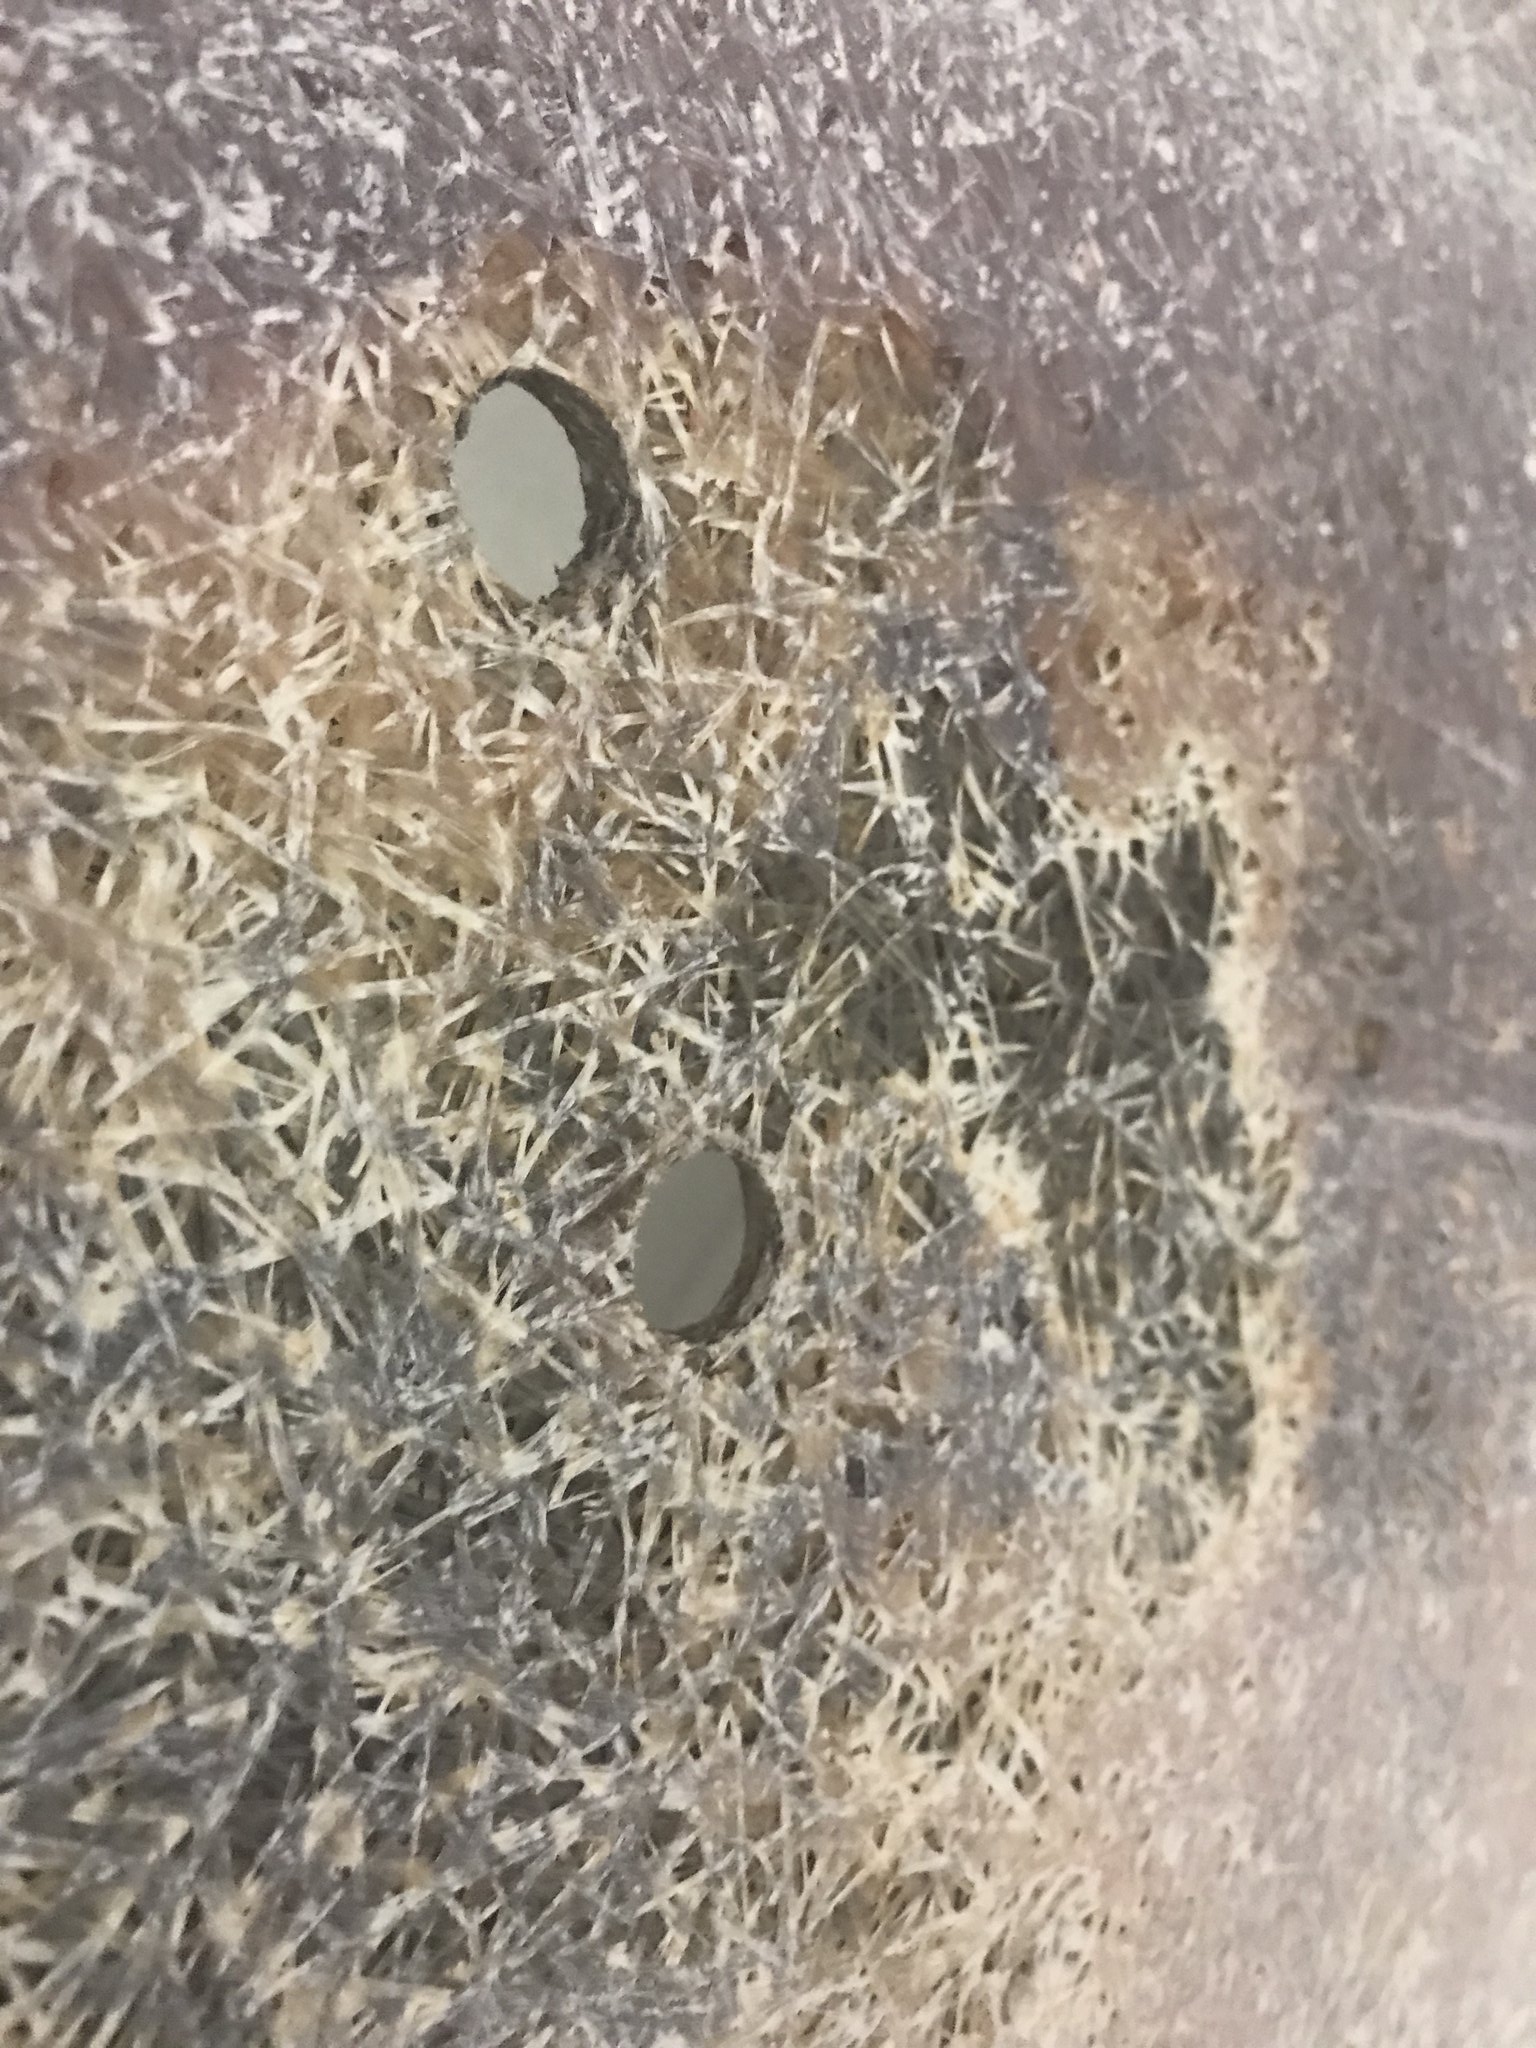
CC84578D-A9C6-4817-AACC-46F4CB34C077 by Ciera 2450, on Flickr


and of course, the deck the tank sits on had no protection on the bottom and barely a layer of glass on top. It’s rotted about half way back. I will be cutting this out for replacement and grinding the fuel tank area tomorrow. I’m wondering if several horizontal slats wouldn’t be better. Allowing the tank to have airflow around it? Or just throw some ply back down as it was?

E1009AA3-7DBB-4182-8BF0-0D85035B6483 by Ciera 2450, on Flickr
 

kcassells

Fleet Admiral
Joined
Oct 16, 2012
Messages
8,738
A tank "coffin" is an enclosed box. If tank leaks and has a channel of water under it then it goes back to bilge/batteries and kaboomy.
 

Ciera2450

Lieutenant Junior Grade
Joined
Apr 8, 2011
Messages
1,049
Thank you! That makes sense. I will try to get a pic tomorrow but the very forward part of the tank coffin decking (the very front 8-10” or so”) appears to drop off into the actual keel bilge area...It’s not sealed off there. It’s a tight squeeze but will try to get a pic in there. I could cut more of the aft berth floor out to remedy this if necessary. I’d rather not... but we know how
that goes. :laugh:
 

kcassells

Fleet Admiral
Joined
Oct 16, 2012
Messages
8,738
This question comes up a lot and their are different opinions. Guys still throw the tank in just like you referred to on your prior post.
Anyone else have an opinion on tank installation?
 

tpenfield

Moderator
Staff member
Joined
Jul 18, 2011
Messages
18,156
The preferred option for the fuel tank bay is to not have it capable of leaking into the bilge. You would definitely want to have neoprene strips under the tank to give it an air gap.

As for the chopper gun voids, once you open them up, you should not need to grind too much into them, keeping in mind that the hull is probably thinner in those areas.
 

mickyryan

Rear Admiral
Joined
Apr 18, 2016
Messages
4,216
bayliner didn't use coffin they used 3 boards for support but the void for tank was not air tight. it was more to spread weight even on bottom .
 

kcassells

Fleet Admiral
Joined
Oct 16, 2012
Messages
8,738
I Understand the weight distribution so are you mentioning that the tank could leak to the bilge?
 

kcassells

Fleet Admiral
Joined
Oct 16, 2012
Messages
8,738
You will want to get rid of that loose crappy stuff. If you can pick at it and it pulls it should go. Ya see this is the critical bond you are going to make so the good glass is what needs to be exposed. :)
 

Ciera2450

Lieutenant Junior Grade
Joined
Apr 8, 2011
Messages
1,049
Thanks guys! The original set up for the tank was in no way sealed from the bilge. In fact the fuel fill, vent, pickup, etc sit directly in front of the alternator when the engine is installed. Maybe 12” away. I just went out and looked and the “deck” the tank sits on does stop and drop into the keel drain area in the forward area where the tank sits. I will be gluing the neoprene to the bottom of the freshly coated tank prior to reinstall. When removed the neoprene strips were just sitting there and not even in contact with the tank in most places. It was mainly resting on the deck.

The top of the tank area is directly open to the bilge and the bottom was not “watertight”. I guess replace as it was?

here’s a pic before everything was removed
EC77CD32-2472-4E3A-8F46-9EE79D78D0AD by Ciera 2450, on Flickr
 

Ciera2450

Lieutenant Junior Grade
Joined
Apr 8, 2011
Messages
1,049
You can also see in the above picture a thru hull sensor for something that wasn’t hooked up to anything. Upon removing it and the huge glob of adhesive it was stuck in, I discover d a drain hole in the bulkhead for the keel drain area that was basically blocked off!! That is likely what caused the aft section of the fuel tank deck to rot away. Luckily, the actual stringers in my boat sit much higher Above where water would accumulate. (Unless I took on a lot!) The only things that low were the engine mount stringers and fuel tank deck. Both being replaced.
 

Ciera2450

Lieutenant Junior Grade
Joined
Apr 8, 2011
Messages
1,049
I spent my lunch break tearing out the entire fuel tank deck. To do this, I had to cut a much larger section of the aft berth floor out. Figured I’m this far. Rip it all out and replace. I’m leaning toward just replacing the fuel deck as it was. Meaning no coffin set up.

Here you can see the tank deck stops 7-8” before that forward bulkhead. Please don’t mind all the dust. Lol

46105474055_517effb161_k.jpg
CC769A36-079B-468F-8522-CE7874DC0D5F by Ciera 2450, on Flickr

here is the fuel tank deck all cut out. Guess what? More stuff to grind now! Woo freaking hoo. :facepalm:
5D0135B8-BC84-45B4-83B7-E2944FD8A9DB by Ciera 2450, on Flickr
Cooler temps expcted tomorrow. It was hot today all suited up and full face respirator on. On another note, I’ve got to start thinking of how the aft berth floor will go back. Hopefully there is enough room with the tank in for some cleats for it to sit on. Otherwise, I’m thinking to widen either side to let it rest half way on the stringer.
hope y’all are having a great day! Shower and back to work for me.
 

kcassells

Fleet Admiral
Joined
Oct 16, 2012
Messages
8,738
Can't really tell you which way to go cause it's your boat. But whatever insurance you buy are wasted dollars in the event of an accident that remotely ties into your boat.
Guys please chime in I feel like I'm alone in this advice. zool wog mickyryan gm280 archbuilder
 
Status
Not open for further replies.
Top