1985 Bayliner 2450 Ciera Sunbridge Restoration underway!

Status
Not open for further replies.

Ciera2450

Lieutenant Junior Grade
Joined
Apr 8, 2011
Messages
1,049
Thank you sir!

Well, the deck of the berth area that covers the tank is glassed back in and the upper part of the bulkhead that blocks off the berth from engine room is glued and clamped in place for the night. Tomorrow I will grind it all down and tab and glass it in place.

The deck was tabbed in with 1708, then a full over lap of 1.5oz csm. It’s pretty darn stiff. There wasn’t any glass previously. Just super thick texture like layer of gelcoat. (The remnants of that globbed on gel is some of the white you see thru the glass)

Question.... when mounting the new fuel sender,I found one of the screws is stripped. How can I address this the best way? The tank isn’t that thick and tapping a larger hole might be tough. Ideas???

8A76B0C2-8CD0-41DB-ABF2-E2E0EDC38619 by Ciera 2450, on Flickr

68E0CB62-5DE5-4E07-B6F6-3CE98C790DB9 by Ciera 2450, on Flickr

1736AE80-3EC0-40F8-B6CF-6553D31BE95B by Ciera 2450, on Flickr
 

Ciera2450

Lieutenant Junior Grade
Joined
Apr 8, 2011
Messages
1,049
I’ve been looking at the little split ring inserts for the stripped screw. May go that route and it would give the other screws something more to bite into.

today I got the bulkhead that sits in front of the tank templated and cut out of 1/2” ply. Fits perfect!

i coated both sides with resin and will glass the back (fwd) side of it tomorrow. Hopefully get it PB,d in place and glassed in too.

Im going to have to order more resin, I’m about a gallon left from the initial 5 gallon order and still have the engine stringers to do. Not to mention the swim platform I have envisioned. Speaking of that, my thought is to build a plywood core for the shape and encapsulate the crap out of it in glass. Will that work?
I haven’t really put much focus on it until I get the boat itself done but I’ve got the ideas churning around about it.

Update with pics of progress tomorrow. Supposed to be 75f!
 

Ciera2450

Lieutenant Junior Grade
Joined
Apr 8, 2011
Messages
1,049
Upper bulkhead I cut out to remove tank is tabbed back in and the new lower 1/2” ply bulkhead is double tabbed. I glassed the back side of it with 1.5oz matte and wrapped around the edges. Per a tip on this forum, I tore the glass instead of a cut edge and it worked pretty well wrapping around the 1/2” ply.
Hope I can fully overlay both in 1708 them this evening. I spent hours driving around trying to find kiln dried 4x4 for the engine stringers. Finally found a place 20 minutes away but they are closed until Monday. Really wanted to get those built. I don’t have enough resin to glass them in but dang it... I had goals.

Look ok at the left/port side tab on lower bulkhead.... it stayed white after tabbing no matter what I did... seemed like I was pushing globs of Matt around underneath he cloth. It’s wet out, I promise. Anyone else experience this? I didn’t keep dumping resin on... not sure. I did work it with bubble roller after this pic, but still never cleared up. Thoughts?

also, in one pic you’ll see little bits of plywood with screws thru them... I saw WOG post about the little triangle things to hold things up so you can paint, resin, etc both sides at once. These worked perfect!!!

C96B5D2C-0130-4839-BE7F-C743D19D3D98 by Ciera 2450, on Flickr

047754B4-8424-4C7E-BC0D-62C8F3B5D9D4 by Ciera 2450, on Flickr

11049EE9-B87E-4ABB-AF13-445B96003E3C by Ciera 2450, on Flickr

2C59A82B-0707-4C30-BE0C-510967B8A43D by Ciera 2450, on Flickr


CDCFA965-C4C7-4495-93C0-94A00B335D8C by Ciera 2450, on Flickr
 

froggy1150

Master Chief Petty Officer
Joined
Nov 3, 2017
Messages
861
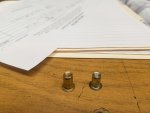
Never used one of these in a fuel tank enviormental and not sure if they come in stainless but they work like a rivet with a rivet gun or you can get a small setup where you use a Allen and a wrench. They are called Nutsert. You have to order for the right material thickness or it won't mushroom out and bite right.
 

Attachments

  • photo308844.jpg
    photo308844.jpg
    502.1 KB · Views: 1

Ciera2450

Lieutenant Junior Grade
Joined
Apr 8, 2011
Messages
1,049
Thanks froggy.. does it mount flush? There isn’t room for it to sit proud
 

kcassells

Fleet Admiral
Joined
Oct 16, 2012
Messages
8,738
That white won't go thingy...the neighbors cat pissed on it. IDK? is it possible it got wet?
 

Ciera2450

Lieutenant Junior Grade
Joined
Apr 8, 2011
Messages
1,049
It comes with longer threaded rods to hold in place during installation... get another couple screws in and remove threaded rods and replace with proper machine screws.
 

Ciera2450

Lieutenant Junior Grade
Joined
Apr 8, 2011
Messages
1,049
Lol @ kcassels, I dunno... it was weird. It just never cleared up. When I was working it, it seemed like I was moving globs of the white (which I assume is csm) around. It’s cured now and solid as far as I can tell. Clearer, but still not translucent.
 

Ciera2450

Lieutenant Junior Grade
Joined
Apr 8, 2011
Messages
1,049
If it matters, these were all scrap pieces of 1708 from other things I used for tabs. I’ve kept it wrapped in the construction paper tho so shouldn’t be a contaminant issue
 

Ciera2450

Lieutenant Junior Grade
Joined
Apr 8, 2011
Messages
1,049
I’m going to try tapping a size over the 10-32 threads and see what happens. I’ll get the ring deal posted previously if it doesn’t work. I’ve read that all 5 screws need teeth for a good seal. I’ve gone this far, hate to have a fuel leak over one darn machine screw.
 

Ciera2450

Lieutenant Junior Grade
Joined
Apr 8, 2011
Messages
1,049
Btw, aggravated I have to wait until Monday for the 4x4. Really wanted to build the engine mounts this weekend. Storms tomorrow so it may be for he best. Don’t forget to spring ahead!
 

kcassells

Fleet Admiral
Joined
Oct 16, 2012
Messages
8,738
I’m going to try tapping a size over the 10-32 threads and see what happens. I’ll get the ring deal posted previously if it doesn’t work. I’ve read that all 5 screws need teeth for a good seal. I’ve gone this far, hate to have a fuel leak over one darn machine screw.

LOL and thanks! I installed my sender this morning and came up with a screw hole that was striped out. I went to the next size I had laying around and it tapped just fine. Being alum. is pretty soft. I was surprised the screws held nice and tight.
With the new sender the screws also from factory had a blob of sealant under the head.
 

Ciera2450

Lieutenant Junior Grade
Joined
Apr 8, 2011
Messages
1,049
Silly me.... flip the thing over so the angle isn’t so steep for the saw. Worked fine. Guess my brain wasn’t working this morning. I’ve got the 4x4’s both cut, the 3/4” top, and 3/4” ply mounting pad for engine mount. All three are glued with TBIII clamped and screwed to set up.

These pieces will take a fair amount of sanding and test fitting to get them just how I want them. I’ve got the 4x4’s pretty close before I glued it all together, but will take a little tweaking to get just right.

Nothing on boats is square. Lol
 
Status
Not open for further replies.
Top