1986 Force 125hp Trim Tilt images

90bay

Cadet
Joined
Jul 23, 2010
Messages
7
Re: 1986 Force 125hp Trim Tilt images

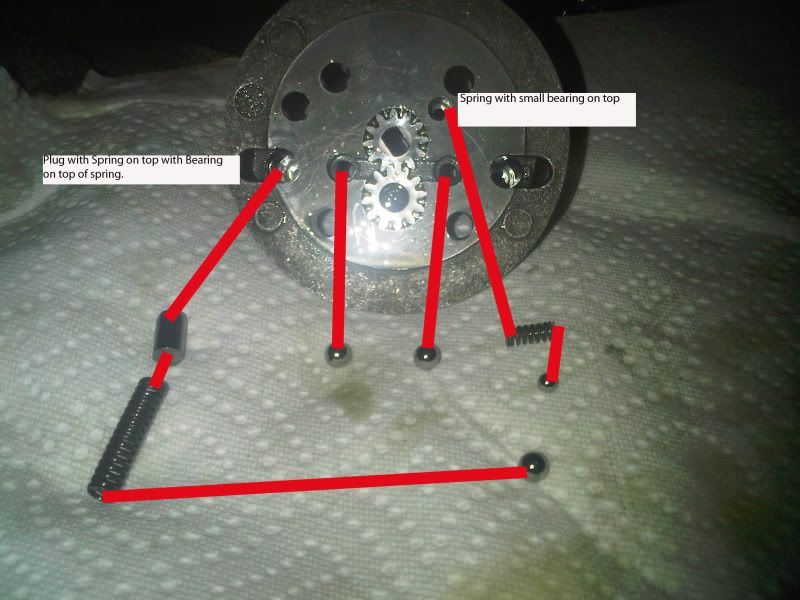
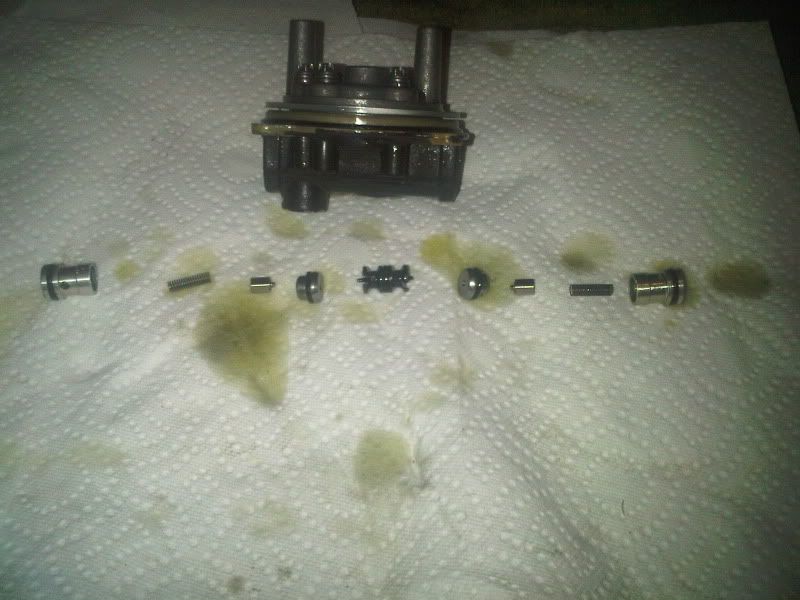
RRIT, I have just disassymbled my pump. Before realizing it there was a nut on top of the case half of the valve assymbly where the four bolts hold it together and I removed it. Now I can see that it was for the pressure adjustment. My question is can this be reset with any accuracy or have I ruined my internal pressure?
 

RRitt

Captain
Joined
Mar 30, 2006
Messages
3,319
Re: 1986 Force 125hp Trim Tilt images

put it back to where it came from as best you can. after reassembling push down on your prop with engine in fully tilted position. it should take about 50-60 Lbs at prop to pop open the valves in a long shaft engine, 70-100 in a short. See how it measures up. Tighten or loosen 1/2 turn and do it again. repeat until you got it. 1/2 turn in middle portion of spring travel is about 10lbs. Either that or go buy a pressure gauge and set the output on bench.
 

90bay

Cadet
Joined
Jul 23, 2010
Messages
7
Re: 1986 Force 125hp Trim Tilt images

Thank you so much for the help all back together and working great.:D
 

idaharoam

Cadet
Joined
Jul 30, 2010
Messages
15
Re: 1986 Force 125hp Trim Tilt images

New to forum here. Great place. Where the control valve exacctly?? Mine bleeds down exsessive also. it does not point it out in my manual. It sounds like I need to do the same thing. Any help would be appreciated thanks.


Ryan.

Is all I need is the two briggs reduild kits? They have all the orings I need??
 

jkoppe73

Petty Officer 3rd Class
Joined
Mar 17, 2010
Messages
79
Re: 1986 Force 125hp Trim Tilt images

so if you take out the two c-clips from each end, just exactly how are you getting the two end caps out?? they are recessed in there about a quarter inch, no way you are using any kind of pliers to get a hold on those to remove them, you can't possibly get any kind of pliers in there to pull them out....
 

my1stboat1

Petty Officer 1st Class
Joined
May 31, 2010
Messages
307
Re: 1986 Force 125hp Trim Tilt images

some will tell you to hit the up or down switch to pop them out.. ( very messy ) i replaced the valves so i drilled a 3.16s hole in the top threaded a screw into the top and pulled them out like that...
 

jkoppe73

Petty Officer 3rd Class
Joined
Mar 17, 2010
Messages
79
Re: 1986 Force 125hp Trim Tilt images

where are you getting replacement valves??
 

RRitt

Captain
Joined
Mar 30, 2006
Messages
3,319
Re: 1986 Force 125hp Trim Tilt images

do you have them yet?
drilling holes in your valve body is almost always a good way to ruin it.
 

jkoppe73

Petty Officer 3rd Class
Joined
Mar 17, 2010
Messages
79
Re: 1986 Force 125hp Trim Tilt images

did not find anything on Ebay, not going to drill them out and ruin them. Tried to get parts from the boys at Mallory, no such luck. never had one of these apart, thats why I would like to set up a cad drawing so everyone would finally have an idea of what the parts are, and the replacement oring sizes, etc...
 

iyaoyas

Recruit
Joined
Aug 6, 2010
Messages
2
Re: 1986 Force 125hp Trim Tilt images

I need to do this to mine. I am waiting for my manual to arrive.

Where exactly is the control unit that I have to remove? Also, on mine I can see the shock absorber looking thing on the left (looking from the back of the boat) leaking fluid, can it be rebuilt as well?

Thanks for any help.
 

idaharoam

Cadet
Joined
Jul 30, 2010
Messages
15
Re: 1986 Force 125hp Trim Tilt images

I plan on doing mine also and when do I will take pictures or video. So far it sounds like I am going to do the blow the end caps out with the trim motor after I remove the c clips.. but I am going to wait until october to do it. That's when the boating season is pretty much over here.

Where is it??? It on the back of your boat beside the motor on the outside of your hull. An electric motor that is atatched to your hull. If you look at it. There are 4 small lines threaded into the bottum of it. Then if you look just above the bottum you will see where a c clip is in the houseing. I believe its the same between the hull and the valveing onthe other side. Nobody has really told us how to get the parts out. Or should I say (we don't understand how). Once we get some clarity on that it should be relitively easy to get back together. I just wish someone would exsplain that step for us.

As far as a manual???? It really is not going to help you.

Ryan.
 

RRitt

Captain
Joined
Mar 30, 2006
Messages
3,319
Re: 1986 Force 125hp Trim Tilt images

I need to do this to mine. I am waiting for my manual to arrive.

Where exactly is the control unit that I have to remove? Also, on mine I can see the shock absorber looking thing on the left (looking from the back of the boat) leaking fluid, can it be rebuilt as well?

Thanks for any help.

better double check that. if shock really is leaking fluid then you need to resolve this before spending any more money on tilt system. where oil comes out - water goes in. If you rust out the guts then it may cost more to fix than you want to spend. Better to know that kind of thing BEFORE you drop $200 on a new pump.
 

iyaoyas

Recruit
Joined
Aug 6, 2010
Messages
2
Re: 1986 Force 125hp Trim Tilt images

I know this is an old thread but I finally got around to fixing mine.

I ordered the trim/tilt O Ring kit with bolts from RRitt and 2 of the Briggs and Stratton kits from Ebay. I got all the O Rings swapped out and replaced all the fluid, now everything works great with zero leak down. Luckily my boat had never been in saltwater so nothing internal was messed up. It also doesn't pop up in reverse anymore.

I wanted to thank all you guys for your help in rebuilding mine. Without your informative posts, I would have never been able to do this. And thanks to RRitt for a great kit and instructions.
 

uthornsfan

Cadet
Joined
Mar 6, 2011
Messages
8
Re: 1986 Force 125hp Trim Tilt images

I am trying to figure out my issue right now. I solved my leak down issue but now the motor wont go up..

These might help someone if they do what I did which was take the top plate off. I believe all the bearings/springs/plugs are in the correct place. I will edit the picture/post if I find out otherwise.


IMG-20110316-00232-1.jpg

IMG-20110316-00234.jpg

IMG-20110316-00230.jpg
 
Top