1986 Sea Ray Seville Restoration

SDSeville

Lieutenant
Joined
Mar 19, 2010
Messages
1,481
Back on the water again!!!

Back on the water again!!!

Finally got her back on the water. Here is a pic as I was leaving for the lake.

IMG-20110514-00306.jpg
 

SDSeville

Lieutenant
Joined
Mar 19, 2010
Messages
1,481
I Was Wrong and You Were Right

I Was Wrong and You Were Right

Uh ohhh....everyone was right... Go ahead, say it... "I TOLD YOU SO!"

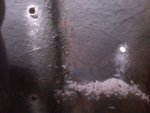
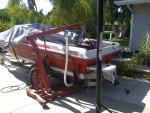
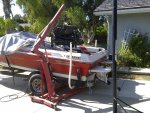
My original plan was to do the stringers, deck, and upholstery and hit the water. I was going to do the transom next winter. What the heck, only the bottom 1/3 was rotten and I never had any leaks, cracks, or other signs of stress. I know, I know, several of you told me the transom should come first, but 2/3 of it was still good. Yeah, it was all good except at the bottom...where the transom plate bolts are and where all the weight rests.

Anyway, so I get the boat out on the water and all is great. Fifteen minutes on the water and she was running perfect. All my hard work done (at least until the winter) and she looks and runs perfect. I thought I might shut her down and took a look in the bilge to make sure my few very small patches were holding up. The patches held perfect. ...only problem was that water was now leaking at the bottom of the inner transom plate.

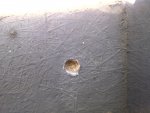
We made it back to the launch ramp pretty easily (wasn't leaking anywhere near as fast as the bilge pump could pump) and pulled her out of the water. I took a look, and one of the bolts on the transom plate was loose. I know, they never come loose unless something is wrong, but I tried to tighten it anyway so I could at least spend the rest of the day on the water.

A couple of turns and it snugged right up. Just one more 1/4 turn to make sure it was tight enough...CRACK! The bottom of the transom was so soft that the corner of the transom plate cracked all the way through as I tightened it.

Well, time for a transom replacement. Stay tuned for pics as I start this week. I think I am going to go with Arjay or Nida-Bond. It won't be too expensive for the small transom on this boat and it seems like a lot less grinding than replacing with wood. I really hated grinding. Also, if I read the instructions correctly, I won't have to worry about trying to stay within the small tolerances for the thickness of the wood and glass (is this correct?).

Plenty of good news here: 1) I decided to leave the family at home for the maiden voyage in case something went wrong. 2) It happened in a lake a mile from the ramp instead 10 miles out in the ocean. 3) It happened before any movement caused coupler failure. 4) I still have a few weeks before my first planned family boating trip -- I better get to work.
 

Woodonglass

Supreme Mariner
Joined
Dec 29, 2009
Messages
25,929
Re: I Was Wrong and You Were Right

Re: I Was Wrong and You Were Right

Upholstery Looks GREAT!
Do some investigating on Composite transoms for I/O's. You still have to be Flat and parallel and + or- 1/4". You also may have to fabricate an inner transom wall if your boat does not already have one.
 

SDSeville

Lieutenant
Joined
Mar 19, 2010
Messages
1,481
Re: I Was Wrong and You Were Right

Re: I Was Wrong and You Were Right

Thanks Woodonglass. Dumb question, but what is an inner transom wall? Here is a pic of part of the transom. The lump to the left is where the transom begins. The hole to the right was where I drilled through the hull last year when testing the transom, ooops. I have since patched that of course.
 

Attachments

  • 3 holes in transom 1.jpg
    3 holes in transom 1.jpg
    114.2 KB · Views: 0

Woodonglass

Supreme Mariner
Joined
Dec 29, 2009
Messages
25,929
Re: I Was Wrong and You Were Right

Re: I Was Wrong and You Were Right

Just like the Outer skin of your boat if you want to Pour a composite transom you will need an inner wall to contain the composite material. It appears that your inner transom is Woven Roven or Blown in glass and is probably not of sufficient thickness to allow you to remove the wood and have an outer an inner wall to pour the composite material. Check out this thread and you will see what is required.

http://forums.iboats.com/showthread.php?t=364284&highlight=archbuilder
 

SDSeville

Lieutenant
Joined
Mar 19, 2010
Messages
1,481
Re: I Was Wrong and You Were Right

Re: I Was Wrong and You Were Right

Having to build an inner wall would defeat my reason for using pour-in transom material -- saving time and less grinding. I just checked and the glass is a solid 1/8" to 1/4" of glass. I drilled 1/2" hole and took a picture. Can I reinforce what I have to work with the pour-in stuff or would it put me over the 1/4" tolerance?


The Seacast instructions for top accessible OBs and IOs (see pic) mention plywood supports (see #2 below).

  1. Cut the top open and chip out the rotted wood.
  2. Screw a piece of plywood outside and inside the transom to maintain the shape, leaving excess plywood at the top to act as a backstop for pouring.
  3. To avoid spillage from the motor well: Wax, lockout, and clamp the sides of the motor well.
  4. You are ready to pour!

It seems like the skin would not need to be as thick if you use the plywood supports. What do you think?
 

Attachments

  • IMG-20110515-00317.jpg
    IMG-20110515-00317.jpg
    68.4 KB · Views: 0
  • seacast plywood supports.JPG
    seacast plywood supports.JPG
    15 KB · Views: 0

Woodonglass

Supreme Mariner
Joined
Dec 29, 2009
Messages
25,929
Re: I Was Wrong and You Were Right

Re: I Was Wrong and You Were Right

Yep, if the inner wal is that thick, and it appears it is, you should be able to to the deed. Arjay is basically the exact same product and MUCH less expensive.
 

AMD Rules

Lieutenant Commander
Joined
Sep 23, 2004
Messages
1,707
Re: I Was Wrong and You Were Right

Re: I Was Wrong and You Were Right

Wow... so sorry to hear of your bad luck. Wish you all the best on the next stage of your rebuild. Given what you accomplished so far, I think you're up to the task and then some. You'll be back on the water in no time.
 

SDSeville

Lieutenant
Joined
Mar 19, 2010
Messages
1,481
Re: I Was Wrong and You Were Right

Re: I Was Wrong and You Were Right

Thanks AMD. I was pretty upset at first. However, I knew it needed to be done. Now I will just have to do it sooner than later. I am actually pretty excited to jump back in and get this done. The only thing I am really worried about right now is reassembling the outdrive and motor and getting everything to line up correctly. However, with the help of everyone here, it shouldn't be too bad.
 

SDSeville

Lieutenant
Joined
Mar 19, 2010
Messages
1,481
Re: I Was Wrong and You Were Right

Re: I Was Wrong and You Were Right

Going to order Nida-Bond tomorrow. It is $135 for 5 gallons plus $95 shipping -- ouch. Luckily, with my transom design, I only need 5 gallons.

I don't think I will go with the chainsaw method though. I plan to cut the inner skin off, chisel out the old wood, clean it up real well, and glass the skin back on. ...then pour. There appears to be plenty of room to do this without even removing the cap.
 

SDSeville

Lieutenant
Joined
Mar 19, 2010
Messages
1,481
Pourable Transom Material

Pourable Transom Material

A local composites rep said he could save me some money on the transom material by selling me 5 gallons of Divilette (by Diab) core bedding adhesive and the proper ceramic and other fillers. He said that according to the Nida-Bond technical spec sheet, this would be almost exactly the same as Nida-Bond and Arjay. Has anyone ever heard of doing this?

Here is the link -

http://www.diabgroup.com/americas/u_products/u_prods_5.html
 

SDSeville

Lieutenant
Joined
Mar 19, 2010
Messages
1,481
1986 Sea Ray Seville Restoration

Didn't order the Nida-Bond. I called a bunch of fiberglass/composite suppliers and boat builders around here to see if they might be able to save me some of the shipping costs on either coosa board or pourable transom material. Every one of them recommended I just use plywood. Looks like plywood then. If all the experts say plywood, who am I to say different? I am an accountant, not a boat builder.

I just borrowed this cherry picker from my buddy. I am going to pull the motor tomorrow. I am not too sure what I am doing, but it doesn't look too bad. I have searched quite a bit and can't find a good thread on pulling an engine. Can anyone recommend one?
 

Attachments

  • IMG-20110518-00320.jpg
    IMG-20110518-00320.jpg
    62.8 KB · Views: 0

tinkeringwackyone

Chief Petty Officer
Joined
May 2, 2008
Messages
415
Re: 1986 Sea Ray Seville Restoration

Sorry to hear about the transom.

If yours is like mine, which I believe it is, 2 or 3 pieces of external plywood, laminated together, and sealed, glassed in would work. Did that on mine and it worked great. 2" thickness is the overall thickness of the main transom area to be for your engine. Good luck and I will keep an eye on your post.
 

SDSeville

Lieutenant
Joined
Mar 19, 2010
Messages
1,481
Re: 1986 Sea Ray Seville Restoration

Thanks Tink. I will be removing the engine in about an hour or so and hope to be grinding again (yeah!!) this weekend. I will not miss another season. I have a few quick questions for you --
1. Did you have any trouble getting to the exact thickness?
2. How many coats of mat and glass did you use?
3. What did you use to glue the pieces of plywood together?
 

tinkeringwackyone

Chief Petty Officer
Joined
May 2, 2008
Messages
415
Re: 1986 Sea Ray Seville Restoration

Glen,

I did not have trouble getting it to the thickness I needed. I believe I used 1 piece of 1/2" plywood and 2 pieces of 3/4". I used PL premium ( construction adhesive to bind them together, but a mixture of thickened resin would do the trick as wellif not better). I used a 1/4" trowel and troweled the PL between and used clamps to clamp it together. This gave me a transom thickness of just under 2". I then sealed the proper size cut piece with three coats of resin (I had epoxy but polyester works good, just make sure it is unwaxed or you'll have to sand between coats. use a laminating resin)

Make sure you have nice round corners for the fiberglass to go over when you glass it to the transom.

I used PL to adhere the wood to the transom as well by using the 1/4 trowel (thickened resin works great as well) I cut a hole big enough for a 1/2" bolt to go through and made a make shift clamp out of 2x4's and a through bolt. (see my thread for pics).
cinch it up tight and let it cure.

I glassed over it with enough layers (4) 10oz. glass to make up the 2" thickness of transom. basically tabbed it to the hull an to the other pieces as well, multiple layers. 10 oz glass was what I had. you can use heavier if you have it. just remember the 2" as that is important.

I then overdrilled all of my holes and filled them with thickened resin. This way when I drill the correct size holes they were surrounded by resin and not wood.

Last I cut the transom holr out with a sawzall and ground out the relief for the steering arm.

Good luck my friend.

sail on.....tink

P.S. I used epoxy resin so I could not used CSM.
 

SDSeville

Lieutenant
Joined
Mar 19, 2010
Messages
1,481
Re: 1986 Sea Ray Seville Restoration

Thanks for the great info Tink. That really helps.

I just pulled the engine. I can't believe how easy it was. I did it by myself and it took less than 2 hours, including disconnecting everything.
 

Attachments

  • IMG-20110519-00338.jpg
    IMG-20110519-00338.jpg
    114.6 KB · Views: 0
  • IMG-20110519-00342.jpg
    IMG-20110519-00342.jpg
    81.7 KB · Views: 0
  • IMG-20110519-00335.jpg
    IMG-20110519-00335.jpg
    123.9 KB · Views: 0
  • IMG-20110519-00339.jpg
    IMG-20110519-00339.jpg
    129.7 KB · Views: 0

SDSeville

Lieutenant
Joined
Mar 19, 2010
Messages
1,481
Re: 1986 Sea Ray Seville Restoration

Thanks RIDEPATE. Glad to get that thing out. I never pulled an engine before, but the manual and a couple youtube videos made it pretty simple. I hope to get the gimbal housing out today and be grinding by Saturday or Sunday. Woohoo! Grinding again, can't wait. The neighbors will love it too...again.
 

SDSeville

Lieutenant
Joined
Mar 19, 2010
Messages
1,481
Re: 1986 Sea Ray Seville Restoration

Thanks Woodonglass. Lots of good info.

I am trying to take my gimbal housing off and can't get this bolt (clevis pin) out of the steering system. There is no nut, just a cotter pin. The cotter pin is out, but the clevis pin is frozen. I am ready to drill this darn thing out. How can I get it out?

NEVER MIND -- DRILLED IT OUT.
 

Attachments

  • Steering prob.jpg
    Steering prob.jpg
    121.8 KB · Views: 0
Top