1986 Sea Ray Seville Restoration

SDSeville

Lieutenant
Joined
Mar 19, 2010
Messages
1,481
Re: 1986 Sea Ray Seville Restoration

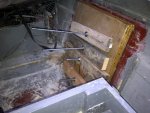
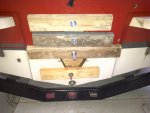
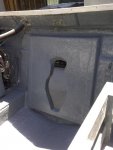
I have 2 layers of 1808 glassed to the transom and I am ready to PL it to the hull. Since I am using poly resin and not epoxy, do I need to coat the back of the transom before I PL it to the hull? It seems that since poly doesn't have much strength on its own, it may be better to just PL the wood straight to the hull.
 

SDSeville

Lieutenant
Joined
Mar 19, 2010
Messages
1,481
Re: 1986 Sea Ray Seville Restoration

Put 2 thick coats of resin on tonight. The marine grade plywood did not really soak much up. I will PL to the hull tomorrow.
 

SDSeville

Lieutenant
Joined
Mar 19, 2010
Messages
1,481
Re: 1986 Sea Ray Seville Restoration

Well, you know what these pictures mean. I finally PL'd the new transom to the hull. I am getting there.
 

Attachments

  • glued in.jpg
    glued in.jpg
    94.2 KB · Views: 0
  • glued in1.jpg
    glued in1.jpg
    74.3 KB · Views: 0

AMD Rules

Lieutenant Commander
Joined
Sep 23, 2004
Messages
1,707
Re: 1986 Sea Ray Seville Restoration

Looks great SD! I'll eventually be following in your footsteps. Appreciate all the info you re sharing along the way.
 

SDSeville

Lieutenant
Joined
Mar 19, 2010
Messages
1,481
Re: 1986 Sea Ray Seville Restoration

Thanks AMD!

Just measured and with the two pieces of 3/4" plywood and the 2 layers of 1808, the transom measures 1 and 7/8" after installed -- exactly the same as the original. After I tab it in, I will add 1 more layer of 1808 to get it to the minimum 2" the manual calls for.
 

tinkeringwackyone

Chief Petty Officer
Joined
May 2, 2008
Messages
415
Re: 1986 Sea Ray Seville Restoration

looks great man, keep up the good work, you'll be on the water in no time.

sail on.....tink
 

SDSeville

Lieutenant
Joined
Mar 19, 2010
Messages
1,481
Re: 1986 Sea Ray Seville Restoration

Tabbed in the transom this morning. Woohoo! I think I am done with resin for good. After measuring again, I decided not to go with another layer of 1808. Measurements were between 1 and 15/16" and 2" all the way around.

A little grinding tomorrow (just to smooth some less than perfect glass work) and maybe some bilge paint and I am ready to get the motor and drive back in. Too bad I am going to Chicago for business on Monday -- engine will have to wait till next weekend.

I have been shopping around for the engine alignment tool and I think I will just have the local shop align it for me. The tool is $95 at the local shop and $45 to $60 on line (with shipping). The shop said they would align it for $75. What do you guys think?

...anyone in San Diego have an alignment tool they would be willing to loan (or rent) me?
 

69rrvert

Petty Officer 1st Class
Joined
May 9, 2010
Messages
211
Re: 1986 Sea Ray Seville Restoration

Looking good SD. I'm not too far behind you. I still have a little grinding left to do. Thanks, Steven
 

SDSeville

Lieutenant
Joined
Mar 19, 2010
Messages
1,481
Re: 1986 Sea Ray Seville Restoration

Sitting on a plane waiting to take off for Chicago. Already thinking about working on the boat when I get home.

Original motor mount bolts were just lags. Should I go with the same or use through bolts with washers, nuts and lock washers?
 

tinkeringwackyone

Chief Petty Officer
Joined
May 2, 2008
Messages
415
Re: 1986 Sea Ray Seville Restoration

The originals were lags, as were mine, I am going to go back in with lags and make sure they are not long enough to go all the way through, seal them with 4200 and, btw, I'm going with S.S. lags. Probably 3/8" lag bolts 2 1/2" long or a little longer should work great.
 

tinkeringwackyone

Chief Petty Officer
Joined
May 2, 2008
Messages
415
Re: 1986 Sea Ray Seville Restoration

Yes 5200 would work as well if that's what you have on hand. Good luck my friend

sail on.....tink
 

RIDEPATE

Petty Officer 1st Class
Joined
Jul 8, 2001
Messages
324
Re: 1986 Sea Ray Seville Restoration

Looks great SD!!! You'll be float'in before ya know it.
n49i5h.gif
 

SDSeville

Lieutenant
Joined
Mar 19, 2010
Messages
1,481
Re: 1986 Sea Ray Seville Restoration

Here is a picture of the finished transom. I got the gimbal housing and transom plate in today. Motor tomorrow.
 

Attachments

  • new transom installed.jpg
    new transom installed.jpg
    57.1 KB · Views: 0

AMD Rules

Lieutenant Commander
Joined
Sep 23, 2004
Messages
1,707
Re: 1986 Sea Ray Seville Restoration

Schweet. Looks better than new.
 

SDSeville

Lieutenant
Joined
Mar 19, 2010
Messages
1,481
Re: 1986 Sea Ray Seville Restoration

Thanks AMD!

Just got the engine back in. I am almost there. Now I just need to align it. I know, I know, I should have made it look a little more pretty before I put it back in, but I am up against the clock here. I am supposed to be on the lake with the family by Thursday.
 

Attachments

  • Engine back in.jpg
    Engine back in.jpg
    109.8 KB · Views: 1

AMD Rules

Lieutenant Commander
Joined
Sep 23, 2004
Messages
1,707
Re: 1986 Sea Ray Seville Restoration

Looking good SD. Believe me, I can appreciate your tight schedule and anxiety to get it wet. I bought my boat last year without a reverse speed and had two week-long boating trips planned within 1 weeks afterward. I made it in time, after having R&R the bellows, gimble, shift cable, and shift interrupt switch. Alternator bracket broke during the first trip and ran 4 days with a wratchet strap holding my alternator in place...lol

Hope to see pics of you on the water shortly!
 

SDSeville

Lieutenant
Joined
Mar 19, 2010
Messages
1,481
Re: 1986 Sea Ray Seville Restoration

Found a shop that would loan me their alignment tool -- couldn't believe it. Too bad I was too lame to actually use it. I worked for 3 hours and couldn't get it more than halfway into the coupler. I will take it in to the shop in the morning and have a professional do it.
 

tinkeringwackyone

Chief Petty Officer
Joined
May 2, 2008
Messages
415
Re: 1986 Sea Ray Seville Restoration

keep going bud, your doing great, I had trouble aligning mine at first, but when I got close it started to fall together (so to speak.) water here he comes!!!!!

sail on.....tink
 

SDSeville

Lieutenant
Joined
Mar 19, 2010
Messages
1,481
Splash!!!

Splash!!!

Just got the boat back from the shop. They only charged me $50, instead of the $150 they had estimated, since I had the alignment so close already. They said I was just a couple turns away. I guess my patience ran out a few minutes early.

Now, I just have to install the drive and take care of a few loose ends. I hope to be on the water by tonight or tomorrow morning.
 
Top