1987 MirroCraft project - what did I get myself into?!?!

Status
Not open for further replies.

Watermann

Starmada Splash of the Year 2014
Joined
Jan 12, 2013
Messages
13,822
The gluvit goes on the inside in the seams and especially the keel area so there's no mess to worry about too. I usually just run a drill wire wheel over them first to clean them up and wipe clean with some solvent like acetone.

I've not had an issue with the stripper on seal sealer I found it didn't do much of anything to the seam sealer on my SC boats, I noticed some of the over flow sealer would get soft but it wouldn't come off/out with the paint as what was sealing is sandwiched between the panels.

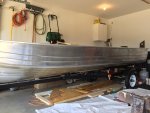
On the trailer, most of the boats weight is in the stern area with motor, battery and fuel. The bunks distribute that weight best so they should take 90% of the load rather than just a narrow keel strip. I use 2x6's for my bunks and have some info in my SS thread on how I made them up.
 

sberl

Petty Officer 3rd Class
Joined
Jul 15, 2017
Messages
97
Thanks again Watermann! Makes me feel a bit better about the seam where I damages the seal a little with the stripper. Like you said, it made it a bit soft but only affected the stuff on the outside of the seam.
Next up is fitting the boat to the trailer (or vice versa) and making adjustments where necessary.
I've started reading thru your restore thread, I'm only on page 10 or something but am amazed at the speed of your progress!

Edgepa, thanks for reading and the comment!

We're headed up north for the weekend so no progress will be made. I'm going to be cutting it close temperature wise for painting the hull since that will have to be done outside. Pretty sure we're going to leave the bottom bare. Still haven't decided on a color yet for the sides. I know there are many opinions about what to use to cover the inside with. I think I'm of the carpet opinion but not sure I've found what I'm looking for. I think I want something closer to AstroTurf with almost plastic like fibers instead of nice soft regular carpets. I have no experience but it seems like that would clean up easier because I know there will be fish blood, mud, etc that will get on it.
 

briangcc

Commander
Joined
Jul 10, 2012
Messages
2,397
A few things I've been pondering:

1) Electronics - These are the items I'm planning to install/power from the starting battery (separate battery for trolling motor):
Lights (bow and stern)
live well pump
live well aerator (maybe? is that a good idea or better to just keep the pump running fresh water in?)
Bilge pump
Depth finder

Installing this switch on the console to control the lights, pumps and aerator.


The boat currently (from the factory I assume) has 0 fuses. Well, the live well pump has an inline one but that's it. Would it be wise of me to install a fuse block or just wire straight to the battery? If a fuse block is the smart thing to do, what would be the recommended one for the above equipment?

Didn't see you got an answer so...yes fuses. I'd run a buss wire from the battery to a fuse block. I'd recommend fusing the buss wire from the battery to the fuse block as well since you're in an aluminum boat and bare power wires can become a toaster in a hurry. You can get large amperage fuses in larger sizes. Competitive Automotive Audio gurus do it all the time. You would fuse to the size of the wire you use to run your buss.
 

sberl

Petty Officer 3rd Class
Joined
Jul 15, 2017
Messages
97
Briangcc - nice list of boats! Sheesh, I'd have a sell a kidney or something to be able to afford those. Anyway, I kind of worked it out in my head and I think you confirmed what I was thinking. So, in plain English (because wiring/electrician isn't my native language) I should run the pos and neg from the battery to the fuse block with a large inline fuse on the pos somewhere near the battery? As you can see from my list, there won't be a lot of items connected. Can you recommend a gauge wire to use or point me to someplace that has a guide? This is one area that I've been putting off researching because I don't know much about it and when I start reading about it, it may as well be in Chinese. :confused:
 

Watermann

Starmada Splash of the Year 2014
Joined
Jan 12, 2013
Messages
13,822
Most of us Starcrafters use Nautolex marine vinyl for deck covering over carpet of any kind.
 

sberl

Petty Officer 3rd Class
Joined
Jul 15, 2017
Messages
97
That stuff looks pretty nice! This may be a dumb question but is it just for flooring or can it be used on all surfaces that need covering? Like on hatches and such where it would need to be wrapped around the edges and attached on the underside as well?
 

Watermann

Starmada Splash of the Year 2014
Joined
Jan 12, 2013
Messages
13,822
Yeah you can use nautolex anywhere you want, some guys even glue it to their gunnels too. Most of us buy it from defender dot com. (we're not supposed to mention other vendors here). There's some tutorials around the forum and I have a video on YT showing how I do corners on nautolex vinyl which would work for other materials as well.
 

sberl

Petty Officer 3rd Class
Joined
Jul 15, 2017
Messages
97
Nice tutorial on how to do corners! I actually came across it a month or so ago as well in my research. I will definitely give it a shot.

Because this is my first, I don't plan to change anything on the decking/platforms. Since the original wood pieces were covered with a sort of AstroTurf the hatches (or doors) are quite a bit smaller than the opening they go in. Not having them in front of me at the moment, I would guess there is a 1/2" gap on all 4 edges. That allowed for the thickness of the carpet on both mating surfaces where the carpet sort of "meshed" with each other. Hopefully that makes sense.
I have 2 hatches/doors, one is just a storage compartment and the other is the lid on the live-well. Any suggestion on how to cover those and have a nice tight gap between the door and frame if I use vinyl? Obviously I can cut new, larger doors to accommodate the thinner vinyl but just not sure how it would look.
Maybe some sort of rubber/vinyl "T" molding used to hide the gap?
 

Watermann

Starmada Splash of the Year 2014
Joined
Jan 12, 2013
Messages
13,822
Inside corners are a tough one with anything, it's best to trim out the opening with some aluminum angle material if it's a rectangle or square opening.
 

sberl

Petty Officer 3rd Class
Joined
Jul 15, 2017
Messages
97
Hey Watermann (and everyone else) thanks for sticking with me on this! I really appreciate the guidance!

Ann Murray and I spent some quality sealing time tonight - thought I'd change it up and listen to "80's and 90's" country. Brought me back to when I was a kid and how I loved to watch my dad work on his projects. He restored a 67 Camaro and I'm positive he would have enjoyed this little adventure too.

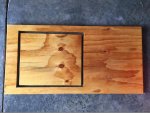
Back to my previous question, I'm not sure I explained my issue clear enough. The larger piece of wood below sits on top of my livewell, the smaller wood square piece covers the opening. The old wood pieces were covered with carpet that had a fairly long pile which took up the space between the two pieces on all four sides. I can cut a new door to that fits a little more snug but if I use the nautolex, I'm not sure I can completely eliminate a gap. I do like the idea a trimming out the opening but have no metal working tools/skills to make that happen.

If, on the other hand, you did understand my question feel free to completely ignore this post haha :facepalm:

IMG_5992.JPG
 

Watermann

Starmada Splash of the Year 2014
Joined
Jan 12, 2013
Messages
13,822
Do you have a chop saw that does miter cuts? All you need to do the trim work with it is a metal cutting blade and a sander to smooth the cut. Post a pic of your livewell tank, does it have a lip that sits on top of the cutout?
 

sberl

Petty Officer 3rd Class
Joined
Jul 15, 2017
Messages
97
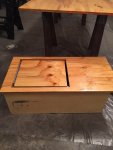
Yep, I have a chop saw. No lip on the tank however. I had to dig it out from the pile of stuff I've removed and kinda forgot what it looked like. If it matters, I don't remember if the hinge goes on the left or right side of the door (I'll have to find the old wood piece and look at where it was at). The only thing I can imagine is to just trim it out like you would on a house window/door but attach the metal trim to the door in this case.

tank.JPG

tankandtop.JPG
 

Watermann

Starmada Splash of the Year 2014
Joined
Jan 12, 2013
Messages
13,822
You could also trim the cut out as well. I would put the hinge on the outside of the hatch to open out towards the side of the hull or back towards the stern. What sort of hatch pull/latch do you have?
 

sberl

Petty Officer 3rd Class
Joined
Jul 15, 2017
Messages
97
Can you explain how you'd trim the cutout, I'm not sure I follow? The door will be hinged to open to the side of the boat.
The original door had about a 1" diameter thru hole lined with a flanged metal tube. I'm not crazy about that so plan on using a pull like below.

Snap1.jpg
 

Watermann

Starmada Splash of the Year 2014
Joined
Jan 12, 2013
Messages
13,822
Trimmed out something like this one.

fred_6.278153507_large.JPG
 

sberl

Petty Officer 3rd Class
Joined
Jul 15, 2017
Messages
97
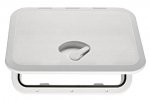
Ah - got it. That does look nice. Thanks for the pic! I also found pre-made covers that would solve the problem too. Wondering if anyone has any experience with something like this. It would need to be able to support someone standing on it.

cover.jpg
 

sberl

Petty Officer 3rd Class
Joined
Jul 15, 2017
Messages
97
I took the day off to work on the boat and actually accomplished quite a bit - Just taking a break for supper and I'll be back at it.
It only has one stringer made of wood that runs down the center of the boat above the keel. I thought it was ok but once I got looking at it closer I realized it needed to be replaced as well. Today I got the new one cut to size and put the first coat of the "Old Timers Formula" on it.
Then it was back to prepping the boat to be primed. I have one side mostly complete, just a few areas to touch up.
IMG_6011.JPG

Then I got to working on the gunnel - it's not perfect but shines up pretty nice! Is there anything I can put on it to keep it this shiny or is it just a matter of polishing it every so often?
IMG_6009.JPG

Time to get back at it! Thanks for reading!
 

Watermann

Starmada Splash of the Year 2014
Joined
Jan 12, 2013
Messages
13,822
Ah - got it. That does look nice. Thanks for the pic! I also found pre-made covers that would solve the problem too. Wondering if anyone has any experience with something like this. It would need to be able to support someone standing on it.


Yeah so I'm sitting here thinking someone needs to venture out into the world of iboats boat rebuilds and soak in all the information that abounds, it also helps one gauge if the guys coming around are the "reader" or the "doers" types. :D

http://forums.iboats.com/forum/owner...1#post10370161


sberl

Petty Officer 3rd Class
Joined
Jul 15, 2017
Messages
97
Soooo, just to clarify, that would be a "yes, they do work"? :lol:
Seriously though, that's a nice looking boat! Nice work!

And trust me, if I'm not working on my boat, I'm browsing this forum LOL
 
Status
Not open for further replies.
Top