1987 MirroCraft project - what did I get myself into?!?!

Status
Not open for further replies.

Watermann

Starmada Splash of the Year 2014
Joined
Jan 12, 2013
Messages
13,822
Thanks, yeah I love my SS after a summer of fishing in her and the hatches work great so far and are designed to take foot traffic. I used the difficult to find and expensive Tempress cam lock hatches and liners except for that hole you see in the front of the deck that is, I made my own hatch and put a cam lock latch in it after that pic above was taken. I also made up a bump out for that fuel filler and vent hose mess, just so you can see things a bit more finished here's the after.

y4m88ekGAQfNEH7Udk9VFX683iYL3iwDEx5UULpqhqoSuCaN3KUqXN3HaepnmN_jloeyWIxTOEovAhbP5BuNR8f7aPk_BVlxr_4XaaiCuD8VeYXNOJoIqjCEC6duKtf0vpZpEwPekOV94Zq3YXQS2riXJpHXyL22Ro0BvwUQLtcC3ZLaAGKYUZUeqnE035hC9S2Y7HZYSYdDM_uBoDALDtvxw
 

sberl

Petty Officer 3rd Class
Joined
Jul 15, 2017
Messages
97
Thats some very impressive work right there! I love how you hid the hoses with that bump out.
I've been trying to figure out how and what to cover my vertical surfaces with. I really like the look of yours. My initial thoughts are to wrap some vinyl around some 1/4 inch closed cell foam and some sort of backer board. Then rivet those panels to my surfaces. Is that somewhat similar to what you did or am I way off?
If you have that info in your thread just tell me and I'll keep reading until I get to it haha.

I spent another entire day on the boat today, this time with my older son. We had to lift her back off of the trailer and flip her upside down again to get ready to prime the sides. In the process of lifting her off the trailer one of us (who will remain unnamed) started setting her down too soon and scratched the trailer fender. I wasn't ever crazy about those fenders though so I'm thinking of getting some diamond plate ones instead.
 

Watermann

Starmada Splash of the Year 2014
Joined
Jan 12, 2013
Messages
13,822
The side panels are part of the structure of the SC boats, it's sealed 1/2 plywood with 1/4" synthetic batting under wrapped marine vinyl. The bottom of the panels are riveted and screwed to the decking with angle AL and top of the panel is riveted to the gunnels also with angle AL. This ties the boat together and supports the gunnels too.

On the tops of my trailer fenders I painted on non-skid just like the gunnel tops so no future scratches show from climbing in and out using the fender tops.
 

sberl

Petty Officer 3rd Class
Joined
Jul 15, 2017
Messages
97
So we came up with a new plan for the back decking today which I'm pretty excited about. It will hide the livewell, gas tank, battery etc. The deck itself will be 3/4 ply but I have a 31 inch span that will need some support structure. I want the decking to feel solid. If I span that distance with some 1.5 inch x 1/8 wall square tubing would that provide a solid feel?
I know that may be kind of a vague question so if a picture is needed I can draw something up.
 

Watermann

Starmada Splash of the Year 2014
Joined
Jan 12, 2013
Messages
13,822
Good idea to add plenty of support. For my SS I used 5/8" ply on my raised casting deck supporting the rear deck with 2" angle AL 1/8 thick. For the upright supports I used 1" tube with a foot made of the same angle AL. Everything that could be is solid riveted together since I had a bunch of solids left over. It's very solid under foot and gives the boat more structure as well since it's tied into the side panels/decking.

No need for a pic with me, you may have seen the deck structure in my SS thread so are you thinking of something similar?
 

sberl

Petty Officer 3rd Class
Joined
Jul 15, 2017
Messages
97
I'm wondering how much flex a piece of 1.5 x 1/8 inch wall square tubing would have over a 31 inch span. I think it would be ok but just not sure. I'd have to order that as I checked our local lowes here and the largest they have is 1 inch tubing.

I tried to find your deck structure but was not able to find I it. If you could post a link or give me a page number I'd love it see it. It may give me other ideas for mine.
 

zool

Captain
Joined
Aug 19, 2012
Messages
3,432
If you thru bolt or weld 1/8 x 2" flat stock to 2 verticle sides of the sq tube, you will get an I Beam effect, and be more than fine....JMO
 

Watermann

Starmada Splash of the Year 2014
Joined
Jan 12, 2013
Messages
13,822
Here's a pretty good view of the rear deck skeleton in my SS.

y4mrBXOKoMXGzcs_fcKYEGaxAIIDrQMkj3tnt7peW9aHj4E-Nbz0We5lpq8r1dsC7QYfC36Qmpyae824ctlRARy2G2zWvE8XNWwr3bccJZsO326ADwWQhdKKclrdV3sBvFN2SWU_fBo4IDdxuiYyt3zzj77WWXIjszpgVF1TLF8VZNjz-gjQj8qoqnl2mxg0Kucepv4i7wQZG3RJqrL3Z0BnQ
 

sberl

Petty Officer 3rd Class
Joined
Jul 15, 2017
Messages
97
Zool, great idea I hadn't thought of thanks!

Watermann, thanks for the pic! Helps me visualize what I'm trying to accomplish.
 

sberl

Petty Officer 3rd Class
Joined
Jul 15, 2017
Messages
97
My next question is regarding the paint. We've applied the SE primer and will be spraying the paint in a couple weeks. From reading other threads on here I think the process is to wet sand the primer with 220 (that seems pretty course to me) and then the same between the coats of paint?

Next, we'd like to paint a stripe - I assume the process is the same. Tape off the area of the stripe and lightly scuff sand that in the same manor?

We're planning on using an HVLP gun but just having an issue getting a working gun (not looking to spend a ton on the gun). I've seen the purple gun at HF mentioned here but of all the ones we've tried (lost count of how many) we cannot get the spray tip removed. Any recommendations on a gun? Preferably under $100 but we could possibly go to $200 if needed.
 

Watermann

Starmada Splash of the Year 2014
Joined
Jan 12, 2013
Messages
13,822
My procedure is a bit less labor intensive and more geared towards a boat you use rather than a perfect trailer queen for parades. I use the wet on wet method of painting. After I sand the hull with 220g using palm sander to break the surface tension and create more area for the SE primer to grab I wash the hull down with cleaning vinegar then rinse well with clean water and wipe with lint free towels.

Once the hull is dried I start the process.

SE primer one coat to cover well. Clean HVLP gun and then shoot a nice coat of regular primer. Clean HVLP gun and have some refreshments. Mix paint with reducer and catalyst hardener, let cook 20 min and then shoot the first paint coat. Clean HVLP gun, relax for an hour or so and mix the second coat of paint up. When cook time is up I shoot the second and final coat of paint. Done in one long sticky day and NO sanding. If doing an accent stripe then the next day if the paint is set up good I tape off the area and shoot the stripe wait an hour, shoot the second coat and after 2 hours pull the tape.

I hate sanding and have never claimed my paint jobs are perfect but the results are tough as nails after total curing for a month or so and then the 303 quick wax goes on. You can check out my threads and see the results and make up your mind on how too proceed.
 

zool

Captain
Joined
Aug 19, 2012
Messages
3,432
I second staying within the recoat window per the tech sheets......the chemical bond you achieve is far superior to just the mechanical bond when you spread out coats over multiple days....
 

sberl

Petty Officer 3rd Class
Joined
Jul 15, 2017
Messages
97
Haha definitely no parades for this boat and that method sounds way more enjoyable. So since I've already got the SE on is it too late to do the above process? I guess I've got 2 options:

1) apply as you've both stated above (ignoring the fact that the primer will be a couple weeks old)

2) scuff sand the primer and then apply as you've stated.

Any tips on a reasonably priced hvlp gun?
 

chevymaher

Commander
Joined
Mar 29, 2017
Messages
2,932
The Harbor Freight gun isn't bad. Not the purple one but the little higher priced chrome one. It is 70 bucks. Check that one out see if you like it. My Harbor Freight lets you open things to look at them. It is really close the way it is made to my Snap On gun. Alot better quality than the lower model.

I had fits getting the tip out of my Snap on gun the first time to. I used a 6 sided socket to break it loose.
 

Watermann

Starmada Splash of the Year 2014
Joined
Jan 12, 2013
Messages
13,822
I got the HVLP I have form Home Depot, it's a Husky and works just fine. What sort of compressor do you have? These HVLP guns draw a bunch of air so make sure to check the rating so you don't over do what the compressor can handle..

The reason for sanding is to rough up a smooth surface so the next layer has more surface area to bond with. I bet that primer is pretty rough and sanding might even smooth it out. Personally I would blast that sucker!
 

sberl

Petty Officer 3rd Class
Joined
Jul 15, 2017
Messages
97
On my last trip to HF I opened that chrome one and tried to get the tip off but no luck. At that point I decided I was done with the HF guns. If they made the flat area on the tip a little wider so you could get an actual open end wrench on it that may help. The stamped "tool" that comes with it for tip removal is junk and bends out of shape by looking at it wrong.
Unfortunately we don't have a Home Depot. Maybe I'll give the silver one another shot.

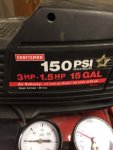
As for my compressor, too many variables for me to figure out if it will keep up so here it is haha

comp.jpeg
 

zool

Captain
Joined
Aug 19, 2012
Messages
3,432
That compressor will have a hard time painting a boat, especially with hvlp, it will run almost continously, and add alot of moisture....and you may not atomize properly with most guns..Eastwood makes a low consumption gun that may give you a shot..some of the purple HF guns draw 6 at 40 psi
 

Watermann

Starmada Splash of the Year 2014
Joined
Jan 12, 2013
Messages
13,822
Yeah you're cutting it close there with the oil-less compressor, 15 gal tank size and 4.9 CFM but I think it's doable. Don't worry about getting that gun it says it's average consumption is 15 CFM @ 40 PSI, nobody I know who's painted a boat here with an HVLP has a massive compressor that could keep that CFM going for long. :lol: I have a 20 gal oiled Industrial air that runs 6.2 @ 40 and it's just at the edge of 90 PSI where it won't shut off while I'm painting. My gun runs at 6 CFM and I have a water separator in the line..

So you may have to take a minute to let it catch up. That's best done to end your wet edge at a corner after painting one side. Also put your compressor where you can run a fan across it to cool the head down just not where the paint will get blown. Also I use a box fan with a furnace filter taped to it blowing out to keep the vapor down so it doesn't settle back on your work.

Oh yeah and strain your paint or primer!
 

sberl

Petty Officer 3rd Class
Joined
Jul 15, 2017
Messages
97
Well this is getting depressing. At least I found out ahead of time I guess. The silver HF gun says consumption is 12cfm@40.
Thanks for the links Zool! Unfortunately the $69 one is out of stock.
Which gun were you referring to Watermann that I shouldn't worry about getting? The purple or silver HF, or one of the Eastwood guns zool linked to?
 
Status
Not open for further replies.
Top