1987 STARCRAFT Transom repair

irish24

Seaman Apprentice
Joined
Jun 29, 2009
Messages
49
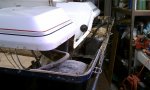
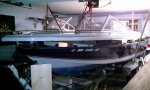
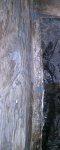
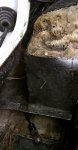
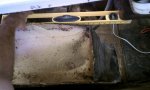
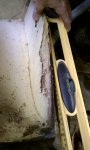
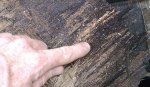
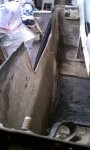
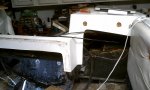
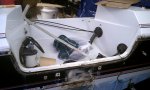
A bolt below the water-line rotted the transom on my 16' 1987 fiberglass Starcraft....USCG labeled as a CSS-160B. I only mention this because I've not been able to locate or identify this boat online anywhere....any ideas? But anyways, I drilled a few holes @ 3/16" in diameter from the inside of the boat to allow the transom to dry completely. After a few months in the garage with a fan, I thought it was time to attack. Epoxy injection seemed the least invasive procedure. I started by drilling holes @ 3/16" diameter about 1" apart. Then followed by injecting West Systems epoxy from the bottom up. Some areas took little and others took alot more. I found this curious. So I cut out a small section of fiberglass from the inside of the transom and found some really, really bad wood. This broke my heart as I've smoked many cigarettes while starring at this boat contemplating repair possibilities. So how can I access this transom from the inside for total Transom replacement? Unfortunately, there is simply no way. There are two "blocks" in the way not to mention the splash-well itself. On the inside of the transom are two supports, one on each side of the boat. They are nothing more than supports that tie from the transom, to the side walls of the boat and then back into the floor. I initially though I'd cut them out and simply glass them back in after the internal Transom replacement, but I'm no glass expert. How could I equal the factory glass strength? So I was thinking of popping the top half of my boat via come-alongs in the ceiling of my garage. Obviously I'd have to drill out all the pop rivets around the perimeter of the boat and pull the bump stripe. This seems the only viable way to access my Transom without seriously inhibiting factory integrity. Any suggestions or directions would be appreciated....Please see attached pictures. Note the support block in the first photo. The second simply shows the Transom from the back to note the splash-well.
 

Attachments

  • IMAG0204.jpg
    IMAG0204.jpg
    142.2 KB · Views: 7
  • IMAG0206.jpg
    IMAG0206.jpg
    142.6 KB · Views: 8

Bob_VT

Moderator & Unofficial iBoats Historian
Staff member
Joined
May 19, 2001
Messages
26,065
Re: 1987 STARCRAFT Transom repair

Removing the rub rail and drilling every rivet out is the way to remove the cap.

Once the cap is removed you will have full access to the transom.

Your only other alternative is to attack the problem from above by cutting the fiberglass open and using seacast or nidabond

Now .......if you remove the cap...... you will have full deck access and "should" investigate your stringer's and foam ;)
 

irish24

Seaman Apprentice
Joined
Jun 29, 2009
Messages
49
Re: 1987 STARCRAFT Rebuild

Re: 1987 STARCRAFT Rebuild

Thanks Bob. All foam has been pulled and stringers replaced and reglassed. I will be replacing the foam with a closed cell 2LB foam from US Composites. Once I get this transom cancer taken care of I can finish reinstalling the floor. I planned on cutting holes through the floor into each cell with a biscuit cutter to pour the expandable foam. At that point I can glass everything back in and maybe get my boat wet....for a change. So I suppose the next hurdle is to decide on a Seacast type product or making another wood transom. I never want to do this again so I'm tempted to use Seacast, but its soo expensive. I've already gone past my budget for this boat....haha I said budget and boat in the same sentence.

Has anyone ever separated the top and bottom of their fiberglass boat? Anything to be especially careful of????
 

Bob_VT

Moderator & Unofficial iBoats Historian
Staff member
Joined
May 19, 2001
Messages
26,065
Re: 1987 STARCRAFT Rebuild

Re: 1987 STARCRAFT Rebuild

Go with wood for the transom...... the transom will outlive the length of time you keep the boat ;) The money you save using wood and resin instead of seacast will be needed elsewhere in the project (you actually never save money).
 

irish24

Seaman Apprentice
Joined
Jun 29, 2009
Messages
49
Re: 1987 STARCRAFT Transom repair...pics

Re: 1987 STARCRAFT Transom repair...pics

Looks like a similar job there RedWing...well done.

So I've separated the top and bottom of the boat. It took some effort, but if I'm going this far the job needs to be done right. After separation, I began removing the Transom. Started with a battery powered saw-zaw, upgraded to a plugged saw-zaw and finally decided there is only one way to remove a Transom. Yep, Stihl Chainsaw baby. I would not recommend a chainsaw for anyone who has not used the tool, unless you're really good at fiberglass repair for when you cut through the boat.

I found a high density composite board. Costs about 70 bucks for a sheet of Celtec (pronounced "cell-tek") material. This is a very similar product to SeaBoard. I was considering replacing the transom with this product. Has anyone ever used this product before? The Celtec is subject to expansion and contraction due to heat. But it can be bonded to using West epoxies and fiberglass. My concern was actually not being able to form a true chemical bond verses a simple mechanical bond. Also, crush thresh-hold is a possible concern. Any thoughts on this particular application? Otherwise I'm just going to use wood.
 

Attachments

  • IMAG0213.jpg
    IMAG0213.jpg
    142.7 KB · Views: 6
  • IMAG0219.jpg
    IMAG0219.jpg
    147.6 KB · Views: 5
Last edited:

Wingedwheel

Lieutenant Junior Grade
Joined
Jun 16, 2009
Messages
1,071
Re: 1987 STARCRAFT Transom repair

Wood is probably your most viable option. A sheet of good quality BC or AC is all you need. Cut two pieces, coat the sides with resin, bond it together with 'peanut butter' ( resin mixed with fibers) and you'll get more years out of it than you'll own the boat. How are the stringers?
 

irish24

Seaman Apprentice
Joined
Jun 29, 2009
Messages
49
Re: 1987 STARCRAFT Transom repair..pics

Re: 1987 STARCRAFT Transom repair..pics

So after I bought my glass yesterday, I was talking to the "guy" and I think you're right WingedWheel. Too many questions and variables involved with composites, not to mention cost. I'm going to try and finish getting out the rest of the transom tonight and see where I stand. Fortunately, stringers are done already, but could use a bit more epoxy in a few places. The new transom will be an exterior grade ply, 2 layers, with a layer of glass between. Thru-holes will be drilled oversized and refilled with epoxy, then redrilled to size and filled with 5200. Is it necessary to put a layer of glass on the inside skin of the fiberglass hull/transom or just a very thick layer of epoxy? Any suggestions on what material to reseal the top and bottom halves of my hull with once the transom is finished? I was thinking of buying some Gluvit but would like to avoid having to buy M O R E stuff for this boat. Instead how about thickened epoxy and replacing the rivets with stainless? Thoughts or suggestions?
 

irish24

Seaman Apprentice
Joined
Jun 29, 2009
Messages
49
Re: 1987 STARCRAFT Transom repair

Update:

Got about 90% of the transom removed (pic 1). Setup for replacement was looking good. Hahaha....too easy right?! Well, there are these blocks in the back of the boat affixed to the transom in each corner. They tie the transom into the floor and back into the sidewalls of the boat. They were then backfilled with foam from the factory. My hopes were to not cut anymore factory glass. As I was deciding how exactly to bypass these blocks without interfering with the factory glass, I noticed some delamination from the surface on one of them. Curious, I poked with a finger and heard some glass crunch a bit. Then stuck it with a nail by hand.....right through (pic 2). So now I am going to have to remove and replace them too. Not to mention, on the other side I noticed the block support wall parallel to the transom is bowed as well (pics 3 & 4). That wood is all good but I think it should be redone anyways since I'm here. I'm a bit irratated about the condition of these blocks since the desire not to cut them out has added great delay to my project....:mad:. Oh well, at least I picked up the glass the other day and I feel like after this transom that this project should pick up pace. Here's something interesting too, I've had this boat in the garage for about 4-5 months with a fan and holes drilled from the inside of the transom. The hopes were to dry it out and inject epoxy...that went by the wayside due to previously unnoticed bad wood. Anyways, I pulled out a chunk of transom that was still moist...wow (pic 5)!

What's the standard on resealing the top and bottom halves of your fiberglass boat together besides stainless rivets? Any thoughts on my previous post?
 

Attachments

  • IMAG0230.jpg
    IMAG0230.jpg
    162.4 KB · Views: 4
  • IMAG0229.jpg
    IMAG0229.jpg
    152.4 KB · Views: 5
  • IMAG0227.jpg
    IMAG0227.jpg
    141.9 KB · Views: 5
  • IMAG0228.jpg
    IMAG0228.jpg
    144.6 KB · Views: 5
  • IMAG0225.jpg
    IMAG0225.jpg
    163 KB · Views: 5

Wingedwheel

Lieutenant Junior Grade
Joined
Jun 16, 2009
Messages
1,071
Re: 1987 STARCRAFT Transom repair

I wouldn't'glue' the top and bottom with the gluvit. Mine has a few rivits in key places and the rest of the rub-rail is attached with stainless screws.You probably should but at least one layer of glass on the inside of the transom and the blocks you show are strange to me as mine were made of wood filled with foam, covered with glass. I was pretty sure they were structural as far as giving support to the corners of the transom. Was the foam wet inside of them?
 

irish24

Seaman Apprentice
Joined
Jun 29, 2009
Messages
49
Re: 1987 STARCRAFT Restoration/Transom repair

Re: 1987 STARCRAFT Restoration/Transom repair

Actually, you described them exactly WingedWheel. However one block is rotten and the other is seriously bowed. The rotten one had a bit of moisture while the other was okay. Finally got out the blocks and the rest of the transom too. Below is the preferred transom removal tool and the cleaned out area. Heading to the hardware store tomorrow to get ext. ply for the transom. One layer of 3/4" and a layer of 5'8". Surprisingly the total transom thickness was only 1 3/8", to include a layer or glass in between.
 

Attachments

  • IMAG0235.jpg
    IMAG0235.jpg
    62.3 KB · Views: 4
  • IMAG0233.jpg
    IMAG0233.jpg
    114.8 KB · Views: 5
Top