1989 Sea Ray 180 transom replacement question

britisher

Petty Officer 1st Class
Joined
Feb 23, 2012
Messages
369
Re: 1989 Sea Ray 180 transom replacement question

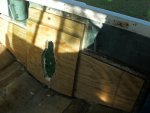
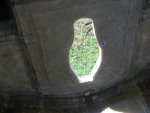
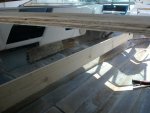
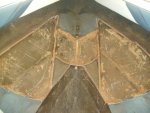
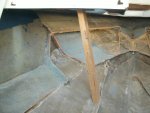
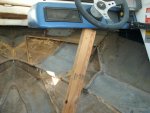
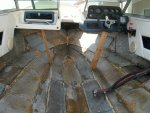
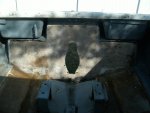
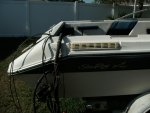
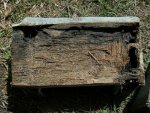
Well, another weekend and a little bit further forward. More sawing out to remove the rotten floor, stringers and bulkheads. This weekend it was the bow end and it was hard work. Very little work space and a lot of the wood was in good condition, but had to be removed to get at the rotten floor. Had an unfortunate oops moment today when I cut an 8 inch line through the hull!! Read on another thread, that it's not the end of the world and is an easy fix. I have a small crack on the hull to fix as well. There is a small amount of sawing still to do (more to reduce stringers that are still sticking up) and then I can begin the grinding. That's looking like next weekend and I don't really feel like starting work after work and getting all hot, dirty and itchy!
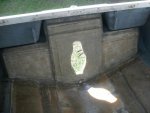
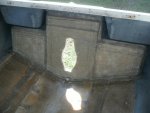
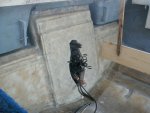
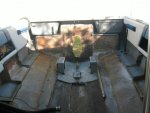
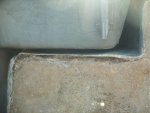
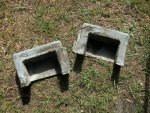
Couple of things I noticed about Sea ray construction, which is obtuse to say the least. The ply upright panels for the dash and which form the back reast for the bow seats are glassed in to the floor, yet bolted to the dash panel. A better design would have been a lower bulkhead and then bolt the panel to the dash and to the bulkhead panel. That way, replacing rotten wood is a quick fix. I may do a re-design on that when it comes to re-construction. It is the same with the box panel/seat bases at the back which go all the way to the transom and are glassed on yet bolted to small brakctes at the cap top.
Oh and one last thing. The cushions are attached to the dash and cap by blind stainless steel bolts tightend with stainless steel split washers and MILD STEEL washers. Guess what was all corroded. Talk about spoiling the ship for an hayporth of tar!!
 

Attachments

  • GEDC0024.jpg
    GEDC0024.jpg
    143.5 KB · Views: 8
  • GEDC0025.jpg
    GEDC0025.jpg
    138.1 KB · Views: 8
  • GEDC0026.jpg
    GEDC0026.jpg
    139.9 KB · Views: 8
  • GEDC0027.jpg
    GEDC0027.jpg
    147.2 KB · Views: 9
  • GEDC0028.jpg
    GEDC0028.jpg
    136 KB · Views: 9

britisher

Petty Officer 1st Class
Joined
Feb 23, 2012
Messages
369
Re: 1989 Sea Ray 180 transom replacement question

Well, another weekend and a little further on. Only got in a couple of hours Saturday, but made up for it Sunday with a good 7 hours. Wore the Tyvek suit and Respirator for the first time. Boy is that hard work. Sweated like I have never done before. Finished off the sawing, then reduced the hieght of some of the seams and edges with the grinder. Found a cutting disc worked great to cutback where I couldn't get with the saw. Used the flapper wheel on the transom and feel that it's looking OK now. Next will be the grinding & sanding and more sweaty days in the Tyvek suit!! I am taking a leaf out of friscoboaters book and have left the 'edging on the floor to gat measurements for the height of the new stringers. When I have those and the stringers cut out, then I can sand off the edges.
When I did the sanding on the transom, soon discovered what it is like to work in a snow storm! What I also learned was work right to left as the grinder spins clockwise and throws dust to the right. Cleaning up is taking longer and I finished off yesterday by hosing the hull out after sweeping and vacuuming.
I now need to turn my attention to sourcing the plywood) will get from Home Depot I think) and the Poly Resin and Fiberglass stuff. Need to do some local searching and price comparisons with US Composites.
 

Attachments

  • GEDC0004.jpg
    GEDC0004.jpg
    144.5 KB · Views: 7
  • GEDC0005.jpg
    GEDC0005.jpg
    139.9 KB · Views: 7

ShellBack89

Petty Officer 1st Class
Joined
Feb 18, 2012
Messages
211
Re: 1989 Sea Ray 180 transom replacement question

Looks good. Once the PIA grinding is over, then the fun begins. You'll start to see the skeleton (stringers and bulkheads) come together quick! Start glassing and then its deck time. That's when you start puffing out the chest a little and say "Yep, I did that! and oh, no you can't ride for free gas is expensive (thank you people who don't believe in supply and demand......). Kick down!" Looks great!!!!
 

britisher

Petty Officer 1st Class
Joined
Feb 23, 2012
Messages
369
Re: 1989 Sea Ray 180 transom replacement question

I have discovered and 'issue' with the boat rear end!
Sea Ray in their wisdom designed the back of the boat with 2 'platforms' which jut out from the rear end either side of the stern drive. The lower half is formed from the hull molding and the upper half from the cap molding. When I was grinding at the weekend I noticed that glassed in to the 'shelf of the lower half molding is a sheet of plywood. The gap between the two upper/lower moldings, as it stands, is micro and I can't even get my pinkies in, let alone a saw or anything. The ply sheet on the port side appears in good order, but the ply sheet on the starboard side I think hasn't weathered as well. Also on the port side the lower half molding has a pop down ladder attached (or was attached) and for the life of me I cannot figure out how I can reconnect it, due to a lack of finger space. I didn't take a pic but the ladder was attached by two SS plates with 2 lots of 4 rivets each plate by the look of it. The fasteners, whatever they were have rusted away to a solid blobs and is impossible to tell what the fastener was. However, looking at how the cap is attached to the hull, I suspect pop rivets.
Bold and clear thinking tells me the only way I can replace the ply AND re-attach the ladder (I would do SS nuts & bolts on this) is to remove the cap at the rear end and I think it was woodonglass who suggested on another thread to surgically remove the back of the cap. To a green newbie like me that is major surgery and would be honestly scared at cutting up the boat for fear I couldn't put it back together properly. One thought I had was to simply glass up the ply on the shelves as they are not structural (or so I believe) and are not connected to the transom in anyway and forget about them. With the ladder, seal up the holes and go ladder-less.
Thoughts and suggestions please?
 

Attachments

  • transom view.jpg
    transom view.jpg
    139.9 KB · Views: 8
  • Rear view.jpg
    Rear view.jpg
    140.8 KB · Views: 8
  • Side View-port.jpg
    Side View-port.jpg
    135.9 KB · Views: 7
  • Side view-starboard.jpg
    Side view-starboard.jpg
    137.9 KB · Views: 7
  • issue-port.jpg
    issue-port.jpg
    138.4 KB · Views: 8

britisher

Petty Officer 1st Class
Joined
Feb 23, 2012
Messages
369
Re: 1989 Sea Ray 180 transom replacement question

This week I managed a good full day on Friday and Saturday. only glitch was when I had to re-spliced the angle grinder cable after if flipped in front of the grinder when it was on got gashed. This weekend was sanding time and I took notice of woodonglass's advice on the sanding discs and rubber backing wheel from HF. They worked great, much better IMO than the flapper wheels. I did as much sanding as I considereed necessary to put back in the new transom and stringers. The deck lip is still there and will be until the new stringers are cut and in, then as per friscoboaters thread I will remove them when the deck height is a known thing. So the angle grinder is not in retirement just yet. The motor mounts had to come out too. I knew I would have to replace them as I detected a hollowness in one of them. It's only when you get them out that you can see how far the rot spread. Basically the wood was all gone inside. I'm done brushing, vacuuming and hosing down for now and am spending today with the family. I aim to get the wood bought and the poly resin and all the other good stuff ordered this week. Next weekend I become a woodworker.GEDC0015.jpgGEDC0016.jpgGEDC0017.jpg
 

Attachments

  • GEDC0018 (800x600).jpg
    GEDC0018 (800x600).jpg
    146 KB · Views: 7
  • GEDC0019 (800x600).jpg
    GEDC0019 (800x600).jpg
    138.4 KB · Views: 6

carlfarey

Seaman Apprentice
Joined
Mar 8, 2008
Messages
37
Re: 1989 Sea Ray 180 transom replacement question

Doing a great job there Chris, its coming on really well.
 

ncbovid

Seaman Apprentice
Joined
Jun 15, 2011
Messages
34
Re: 1989 Sea Ray 180 transom replacement question

I have discovered and 'issue' with the boat rear end!
Sea Ray in their wisdom designed the back of the boat with 2 'platforms' which jut out from the rear end either side of the stern drive. The lower half is formed from the hull molding and the upper half from the cap molding. When I was grinding at the weekend I noticed that glassed in to the 'shelf of the lower half molding is a sheet of plywood. The gap between the two upper/lower moldings, as it stands, is micro and I can't even get my pinkies in, let alone a saw or anything. The ply sheet on the port side appears in good order, but the ply sheet on the starboard side I think hasn't weathered as well. Also on the port side the lower half molding has a pop down ladder attached (or was attached) and for the life of me I cannot figure out how I can reconnect it, due to a lack of finger space. I didn't take a pic but the ladder was attached by two SS plates with 2 lots of 4 rivets each plate by the look of it. The fasteners, whatever they were have rusted away to a solid blobs and is impossible to tell what the fastener was. However, looking at how the cap is attached to the hull, I suspect pop rivets.
Bold and clear thinking tells me the only way I can replace the ply AND re-attach the ladder (I would do SS nuts & bolts on this) is to remove the cap at the rear end and I think it was woodonglass who suggested on another thread to surgically remove the back of the cap. To a green newbie like me that is major surgery and would be honestly scared at cutting up the boat for fear I couldn't put it back together properly. One thought I had was to simply glass up the ply on the shelves as they are not structural (or so I believe) and are not connected to the transom in anyway and forget about them. With the ladder, seal up the holes and go ladder-less.
Thoughts and suggestions please?

So it's interesting as I'm just slightly ahead of where you are. I didn't have to demo as far up front as you did though.

But I'm in agreement with you about the "platforms" on the back. I typically only use 'em to sit and drink beer on when the boat is parked. The only way to get to those voids in there completely is to remove the cap - which I wasn't willing to do anyway. Right or wrong, when I had some leftover PB, I just filled in those gaps like you suggest.

I also do not have the ladder underneath the platform anymore. I have one that has been mounted to the top of the platform and folds up onto it.
 

ncbovid

Seaman Apprentice
Joined
Jun 15, 2011
Messages
34
Re: 1989 Sea Ray 180 transom replacement question

Got another one for you - what was the measured height of your existing stringers?
 

britisher

Petty Officer 1st Class
Joined
Feb 23, 2012
Messages
369
Re: 1989 Sea Ray 180 transom replacement question

The problem I had was that the rot was so far on, the stringers just fell apart as I removed flooring etc. I am using Friscoboaters method which is to keep the very edge of the floor intact to the hull. The height of the new stringers will be that less the thickness of the glass on the top and the ply floor. I am also taking advice from another poster who is restringing using 3/4" plywood rather than the 1/2" Sea Ray used. I am also going to use 5/8" for the floor not 1/2". With all that, the old stringer heights are not important. Just so long as the new heights attain the same floor level as before, I'm happy.
 

britisher

Petty Officer 1st Class
Joined
Feb 23, 2012
Messages
369
Re: 1989 Sea Ray 180 transom replacement question

Another day, another dollar and this weekend was woodworking time. I bought my 3/4" plywood from HD for the transom as well as ordering my poly resin and fiberglass supplies from US Composites. I didn't order till early Thursday, so I won't get my stuff till early next week. Me, my 2 lads and the wife spent yesterday at an Annual Exotic car Show we have here. Nice to see more Ferraris's, Lambos' than you'll ever see in one place. They had a the new Aventador there (only 540,000!!) plus 2 McLaren MP4's. Astons, Jaguars, Bentleys and Maseratis and Rollers were also there. A great wish list day. Today was reality day. I cut out the two piece transom. I used some polystyrene sheeting to use as a template, then transferred it to the actual wood when I was satisfied with the dimensions. On my boat the transom inner piece is 65" wide and shaped like an inverted T. The second transom piece is simply a 2' x 2" piece that is attached to the center part. I got all those cut out out, without major issues, sanded them down and rounded the edges to make adding the CSM a little easier. I also measured and cut the 4 x 2's I bought to use as tie's when it comes time to mount the transom pieces and bolt them up tight while they cure. That's all I got achieved today. Onwards and upwards and feeling positive. I also bought a motor for the boat this week too. As a first boat purchase, I have bought poorly and besides a whole boat full of rot, the 4.3 V6 took my boat guy a good while to get turning and compression was low to non-existent. He reckons the valves may be stuck open. I decided that putting money into the engine was a bad idea. I came across another, newer Vortec 4.3 V6 bobtail unit. I have seen it run. It has 165 across all cylinders and pumps out 220 bhp. It has new exhaust manifolds and risers on and I got it for $1500.00, all in. I have managed to sell my old motor for $500.00, so my net cost is $1000.00. New manifolds and risers would normally hit me for about $700.00, so I'm feeling pretty pleased with myself on the engine purchase. That and the clean slate with the boat, gives me loads of enthusiasm to keeping going forward.
 

britisher

Petty Officer 1st Class
Joined
Feb 23, 2012
Messages
369
Re: 1989 Sea Ray 180 transom replacement question

Another weekend over with and a little more progress. During the week picked up some more ply from HD. Some 3/4" for the stringers and 5/8" for the above floor stuff. I also picked up some more supplies fom Lowe's including upgrading the PL to the big cartridges. At HD the big cartridge guns were $20.00. At Lowe's they were only $9.00 and the cartridges are 3 times bigger than the regular cartridges for only $2.00 more. Where I did get perplexed was trying to get 'advice from the staff at Lowe's. HD sell Loctite PL 300 & 400. I bought 400. At Lowe's they sell Loctite PL 375. Could I get an informed answer from the staff what the difference was? What do you think!
Saturday was poly resin time and I put on my very first ever poly resin coat. It took a while to go off, but did follow the instructions from US Composites. Longer I get is better than faster. Finished the day off by coating both sides of my transom and that was all I really got accomplished. my work area is the back patio and the weather has been all over the place this week. I had just got finished when it poured down. Today was more of the same really, though the weather was kind to me. Mixed some PB, which I now know was too thick (first ever mix). I sorted it out with some more wetting down, which helped enormously. I put on a coat of CSM on the tranom front and after that dried enough, turned it over and gave the back a coat. I used the bubble buster (great tool) and have some knurly bits on the edges to sand down, but apart from that all went well. Fixed several small jobs too as I was waiting for rsin to cure. Removed 2 broken screws that are part of the engine cover/sun pad screw set and me and my eldest son finally were able to empty the gas tank and I made a start on wirer brushing that down and getting that refurbished. Ended the day by gluing some wood pads to the ends of my 4 x 2' which I will be using as clamps when the transom goes on. Friscoboater used them as he has a stepped transom too. I also avoided one thing that he did on his refurbishment. p put a large sheet of heavy duty polythene on the floor and any resin, etc that drops goes on there and not on a garage or patio surface. I haven't included any pics as there isn't really anything worth showing. That said when the transom goes in, pics will be taken and I will finally feel she's making her comeback.
 

ShellBack89

Petty Officer 1st Class
Joined
Feb 18, 2012
Messages
211
Re: 1989 Sea Ray 180 transom replacement question

Nice job Brit. It's crazy how much that stuff adds up. I'm looking at my check book and it reads - Home Depot, Home Depot, Lowes, Home Depot, Fiberlay, West Marine, Home Depot and this was just in one day:cool: 
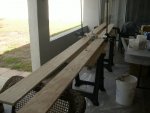
Couldn't get out of any of these places for less than $100. Told my wife Friday that no more big money on the boat, well except tomorrow buying another 5 gal of resin, 5 yds of 1708 and two large bottles of MEKP :facepalm:

Keep up the good work and post some pics. Love to see the progress.
 

britisher

Petty Officer 1st Class
Joined
Feb 23, 2012
Messages
369
Re: 1989 Sea Ray 180 transom replacement question

Got the transom in on Monday evening. Left it overnight with the 2x4 clamps holding it snug. Tuesday, removed them and I have a new transom attached to the boat. Boy was I happy to see that! Also Tuesday I started putting PB along the outer edges of the transom, but ran out of chopped strand. I had used the shopping list that is here on Iboats, but I think the 1 lb size needed is way out, unless I'm mixing the stuff wrong. Thankfully, I still had the very bottom of the transom to fill in and measure and cut the small PVC drain pipe that will butt up against the drain hole. Ordered a big 4 lb tub of Chopped Strand from US Composites, which should arrive tomorrow and can get that job finished and then start laying 1708 to complete the transom installation. I also used 'idle time' to build a stand for the rolls of CSM and 1708, like Friscoboater did. I'd muddled through at the weekend with the CSM roll loose and it was farcical. I am now a little better organized. Will have some pics to post shortly of progress, when the 1708 is on. Forgot to take a pic when the transom was clamped up. Hoping this weekend to get the 1708 out the way and stringers measured and cut. When they are in, I will feel that I have reached to hill top and the rest is down hill to the finish.
 

carlfarey

Seaman Apprentice
Joined
Mar 8, 2008
Messages
37
Re: 1989 Sea Ray 180 transom replacement question

Got the transom in on Monday evening. Left it overnight with the 2x4 clamps holding it snug. Tuesday, removed them and I have a new transom attached to the boat. Boy was I happy to see that! Also Tuesday I started putting PB along the outer edges of the transom, but ran out of chopped strand. I had used the shopping list that is here on Iboats, but I think the 1 lb size needed is way out, unless I'm mixing the stuff wrong. Thankfully, I still had the very bottom of the transom to fill in and measure and cut the small PVC drain pipe that will butt up against the drain hole. Ordered a big 4 lb tub of Chopped Strand from US Composites, which should arrive tomorrow and can get that job finished and then start laying 1708 to complete the transom installation. I also used 'idle time' to build a stand for the rolls of CSM and 1708, like Friscoboater did. I'd muddled through at the weekend with the CSM roll loose and it was farcical. I am now a little better organized. Will have some pics to post shortly of progress, when the 1708 is on. Forgot to take a pic when the transom was clamped up. Hoping this weekend to get the 1708 out the way and stringers measured and cut. When they are in, I will feel that I have reached to hill top and the rest is down hill to the finish.

Well done mate, very much looking forward to seeing this.

Carl.
 

ShellBack89

Petty Officer 1st Class
Joined
Feb 18, 2012
Messages
211
Re: 1989 Sea Ray 180 transom replacement question

Nice job Brit. Post some pics of the transom.
 

Woodonglass

Supreme Mariner
Joined
Dec 29, 2009
Messages
25,929
Re: 1989 Sea Ray 180 transom replacement question

For a Quart of Resin, how much Chopped Strand are you adding? Should be about a 1/4 cup. Then cabosil until you get the consistency you want.
 

britisher

Petty Officer 1st Class
Joined
Feb 23, 2012
Messages
369
Re: 1989 Sea Ray 180 transom replacement question

Another week of rebuilding over and here's what I accomplished. The main work days were Saturday and today. Yesterday was a late start as I had to help the missus on house duties. Did the tabbing on the transom this weekend. 2 layers of 1708 all round and late today I put on the panels of 1708 on the 3 parts of the transom. Tomorrow, in the evening I will put on the last panel layers of 1708 and apart from a final sanding down, the transom will be done. I will take a pic of it finished. I also measured out for the stringers and cut the 3/4" ply that I will be using. I measured stringers height at the rear as 6" reducing down to about 5" at the front. I have decided to sister the ply as the total stringer length is 12'. I cut the stringers at 45 degrees, bonded with PL and sandwiched with 1/4" ply either side. Not totally convinced it will work. I will know more Tuesday when the job cures and I can remove the heavy cinder blocks I used as weights. If it doesn't work, I'll do what Friscoboater did and substitute solid wood stringers. I'm also starting to build up my shopping list of parts I will need for when the rebuild is near to installing the motor back in. I need 2 new seats, and the manufacturer I'm buying from has a 7 wk production cycle right now. So I'll order this week and get them early June. Also the trim pump bracket on my mercruiser motor was all corroded, so I bought a S/S on Ebay for $55.00. I couldn't have made a S/S one for that price. My motor, sterndrive and gimble are stored at the boat shop that removed the motor for me. I'll go up this week and get the gimble and try a fit on the new transom. If it's a nice fit, great. If there are edges that need grinding a little, I can do that now and everything should slide into place later. Will post pics this week..promise!
 

britisher

Petty Officer 1st Class
Joined
Feb 23, 2012
Messages
369
Re: 1989 Sea Ray 180 transom replacement question

Well, I do believe the transom is finished. Image 0002 shows it just after installing, when it just poly resin and a layer of CSM. The later pics show it after the various layers of 1708 had been attached. The thickness now sits at 2.0" and I am happy. My boat guy said 2", so he got what he asked for. The black lines on the transom are the marker lines. They'll go when painted. I am now on the stringers and I am now having to go to Plan B. My original plan was 3/4" ply stringers, but as they are 12' long and ply is only 8' long, I would need to join them. I tried an angle joint with 1/4" ply as outer sandwiches, all held together with PL. However, the finished result was far too bulky and didn't fit in the space I had. The next revision was to replace these sandwich joints with a lap joint further strengthened with dowels across the joint, again all held together with PL. They have been sat in the clamps for 2 days and today I removed the clamps and moved the stringers (which are very long and need cutting back to 12' lengths. Unfortunately, as I handled one of them I heard a loud crack and the ply broke at the base of one of the lap joints. Shoot or words to that effect! My Plan B is to ditch the idea of using plywood for the 2 long stringers and do what friscoboater did and use solid timber. I can buy 12' lengths at Lowe's or HD. I would prefer ply, but I can't afford to waste anymore time on these stringers.
I feel happy that the transom is finished. It was beginning to get me down as I seemed to be spending an inordinate amount of time on the thing, with little to show by way of progress. that said, the transom is a complicated piece of wood, has many layers of resin and FB to get it to required thickness and like some things in life, can't be rushed.
Stringers, here we come!
 

Attachments

  • GEDC0002.jpg
    GEDC0002.jpg
    140.2 KB · Views: 9
  • GEDC0019.jpg
    GEDC0019.jpg
    136.4 KB · Views: 11
  • GEDC0024.jpg
    GEDC0024.jpg
    142.4 KB · Views: 11
  • GEDC0026.jpg
    GEDC0026.jpg
    141.1 KB · Views: 11
  • GEDC0025.jpg
    GEDC0025.jpg
    144.1 KB · Views: 10

britisher

Petty Officer 1st Class
Joined
Feb 23, 2012
Messages
369
Re: 1989 Sea Ray 180 transom replacement question

Phew! A very hot weekend for working outdoors, over 90 each day. Worked on several jobs. Dry fitted the transom unit, which highlighted I needed to do some more sanding of the hole to get a good fit. Achieved that and also marked for the sawing to allow the steering rod to clear either side. Will saw during the week. Sanded down and repainted both the inner transom bracket and the gas tank. Used Rustoleum rattle cans. Worked fine. Need to do one last coat of gray gloss on the gas tank during the week. Finally got in the boat with the stringer timber to mark out the curve of the hull. Of all the jobs, it was the most perplexing and boy was I glad when it was done! Am umming and rring about the condition of the transom unit. The trim switches are shot (one is missing). I noticed that of the 4 screws for them, 3 have broken off in the transom unit. Ugh! The exhaust bellows has split and the main bellows is warped. My boat guy said the bearing needed replacing too. I don't feel confident enough to handle the whole job myself, so will talk to my boat guy and see what he will charge me to do the whole refurb or if he'll he'll split some of the tasks with me to keep costs down.
Am also slowly working on buying bits and pieces that need replacing on the boat. Both windshield support struts are broken at the plastic ends. I found replacement ends from here on Iboats for just over a buck apiece, so saved a nice chunk against replacing the whole struts. My local Walmart also has some Type 11 life jackets (Stearns brand) for $5.58. That's real cheap, so I'll likely go buy 4 and put on one side.
Now I have the stringer shape and can get them cut out and installed, I will really feel that things are moving ahead. Next weekend is Mothers Day weekend, so I'm guessing may not get much work done then!
 

Attachments

  • GEDC0018.jpg
    GEDC0018.jpg
    142.3 KB · Views: 8
  • GEDC0020.jpg
    GEDC0020.jpg
    138.8 KB · Views: 10
  • GEDC0019.jpg
    GEDC0019.jpg
    139.9 KB · Views: 9
  • GEDC0023.jpg
    GEDC0023.jpg
    133.5 KB · Views: 9
  • 019 small.jpg
    019 small.jpg
    108 KB · Views: 8
Top