1990 4.3 Century 2000 - Floor,Transom,Stringer,Upholstery Project

Mechanicalmike08

Petty Officer 1st Class
Joined
Aug 29, 2018
Messages
308
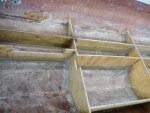
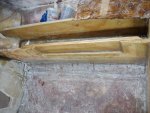
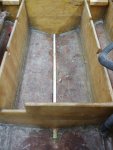
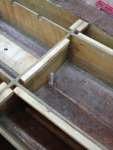
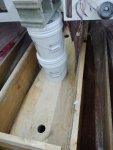
I did a 1-2" overlap of the tabbing, I folded and kind of broke up were it would be making the bend. I wet the stringer first then wet the backside of the csm. Then put it in place. Worked it in and found a chip brush to work better than a roller after it's all wet out. A roller can lift the up and over even if you keep it clean, a brush you can control a little more. Always roll or brush down the stringer. I kept an eye on that section until it was basically kicked. I had very little bubbles but did have a few. I cut them out after and added some broken up csm.
 

kcassells

Fleet Admiral
Joined
Oct 16, 2012
Messages
8,738
csm blows to work with try out the HD stuff just for fun. Its a no brainer.
 

Chris51280

Ensign
Joined
Jan 24, 2018
Messages
932
kcassells .
i have alot of csm still that i haven't used. I tried it today and it is not as painful as I thought. You wet out the stringer and then place the csm on top. Start soacking it from top down and work around until all the mat is on the stringer. Eventually it will suck it up and get sucked on the stringer. Make sure you have a vood changer or radius in the top. Minimum of about 1/8. One stringer takes about 1qt.
I cut the deck lips off and hopefully by the end of the week I will be cutting the deck.
placed another order with us composites on Friday and should be here by Monday or tuesday the following week. Paid trucking fee to a shop that can unload it. Another 15 gallons and 13yd 6oz woven for the deck. 7yd 1708 and another 20yd csm. 2 gallons of gelcoat. That makes it 3 gallons. Hope it will be enough.
the cutout on the stringer is for routing my fuel fill hose. I will attach a board behind it to make the stringer full again and tab it in.
The bracket for the alternator was pinching the hose and I wanted to give it more clearance.
I'm loocking how to make the engine mounts. The old ones were made with 2x10 or something. What is the predrill size for 3/8" lag bolts?
 

Attachments

  • photo302176.jpg
    photo302176.jpg
    151.6 KB · Views: 5
  • photo310669.jpg
    photo310669.jpg
    284.8 KB · Views: 5
  • photo310670.jpg
    photo310670.jpg
    381.3 KB · Views: 5
Last edited:

Chris51280

Ensign
Joined
Jan 24, 2018
Messages
932
I feel like karate kit with the wax on wax off stuff. The csm sure makes a good workout out of my right arm. It will lay down eventually with enough resin and I mean a lot. Its very thirsty.I can do a 50x12" with about 0.5liter. I have half of my last bucket left and the two center stringers with all bulkheads. Not sure if it will be enough but like I said, more is on the way.
 

Chris51280

Ensign
Joined
Jan 24, 2018
Messages
932
With all the brush tabbing to lay down the csm. Have to imagine miaggi voice. No brush....... tap tap tap. You do whole boat. Tap tap tap.
and by the end of the day I need his magic touch to fix my arm.
 

Chris51280

Ensign
Joined
Jan 24, 2018
Messages
932
Question about the transom mounting.
Drilling the transom holes, what size drill did you use and how did you seal the holes on the inside.
I assume the key hole will be covered with csm.
 

chevymaher

Commander
Joined
Mar 29, 2017
Messages
2,932
I csm'ed the keyhole and ended up filing parts to get the outdrive parts to fit. The holes I made the same as the gimbal ring I dont know it is over and I forgot. I made peanut butter and put it in the holes with a dowel the same size. I had to lightly drill a couple for the bolts to fit.
 

Mechanicalmike08

Petty Officer 1st Class
Joined
Aug 29, 2018
Messages
308
The drill size is 9/16. Not sure what you mean by sealing them, are you talking when you install the unit back on the transom? The unit has a foam seal outside the bolts so you theoretically should not have to seal the holes. I drilled mine slightly over and gel coated the inside with a pipe cleaner. I also added a dab of calk when I installed the unit around the bolts just for CYA.
 

AShipShow

Lieutenant Commander
Joined
Jul 8, 2016
Messages
1,803
What Mike said is what I did.. I have a youtube video on installing the transom plate and gimbal housing and I struggled lol... Not that it was difficult, but I mixed up the stud length since I replaced the studs on the gimbal housing. I also originally drilled the transom holes at 1/2" because they are 7/16" studs, but once I added resin and gelcoat to the holes to seal them, it wasn't having it. I had to take it back off and drill them out to 9/16" and re-gelcoat them. Then all was well. Just make sure if you are replacing your trim senders and stuff like that, you have everything routed correctly.
 

Chris51280

Ensign
Joined
Jan 24, 2018
Messages
932
Cut my cleats and coated the half side with resin. Fixed a couple spots that were uneven and I had to grind that off on top of the stringers. Cut my battery box plate and trim plate. Figured out where I need supports for the ski locker area and avoer the tank. Its a 22" span with 5/8 plywood. I will fit a 2" tall brace in easily.
 

Chris51280

Ensign
Joined
Jan 24, 2018
Messages
932
Fixing little things here and there. Got some cleats installed. Got my ski locker drain pipe in. Coated the tank board that will go over this. Cut out the center supports for the tank. I made them out of 2 layers of 3/4 ply 2" tall. I will do the same with the front ski locker since the plywood will cover half length and needs support at the split line. Tabbed in my fill hose relieve and covered my last stringer.
i think wrapping the supports with cam will be enough. Not sure if I should wrap them in 1708
 

Attachments

  • photo311349.jpg
    photo311349.jpg
    313.5 KB · Views: 5
  • photo311350.jpg
    photo311350.jpg
    278.3 KB · Views: 5
  • photo311351.jpg
    photo311351.jpg
    304.5 KB · Views: 5

chevymaher

Commander
Joined
Mar 29, 2017
Messages
2,932
When I did mine. I wrapped it all with CSM just to seal everything. I did this before it went in. But if you go nuts like I did. Once it is tabbed in it basically has 2 layers of 1708 on everything anyway.

To me sealing it all was the most important thing.
 

Chris51280

Ensign
Joined
Jan 24, 2018
Messages
932
Installed the tank board with the drain from the ski locker going underneath. I drilled the foam filler holes beforehand. Addwd csm under the ski locker board and glued it in place with pb. I hope that by the weekend I will have my deck cut out. What should I use to seal the top of the boards. Should I tab these in with 1708? I think the pb will hold it pretty good. I know there are more ways than one. A cheap solution, a decent solution and then the overkill solution. Which one should I go?
 

Attachments

  • photo311609.jpg
    photo311609.jpg
    273.2 KB · Views: 4
  • photo311610.jpg
    photo311610.jpg
    286.2 KB · Views: 4
  • photo311611.jpg
    photo311611.jpg
    259.4 KB · Views: 4
  • photo311612.jpg
    photo311612.jpg
    223.7 KB · Views: 4

kcassells

Fleet Admiral
Joined
Oct 16, 2012
Messages
8,738
HD has the auto glass from bondo like 6 oz. draps right on. CSM is a pia to me.


c267a41d-d420-4929-b292-330647144486_1.700357c8785222d5dbe0c3c1188351e0.jpeg
 

chevymaher

Commander
Joined
Mar 29, 2017
Messages
2,932
I like overkill csm and layers of 1708. I like strong boats. If it rots again the glass alone is stronger than it was originally.
 
Top