1990 Larson All American floor and stringer replacement

brian36578

Seaman
Joined
Feb 1, 2016
Messages
59
No Title

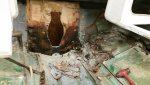
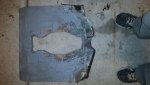
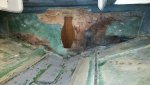
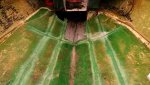
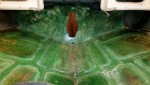
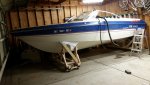
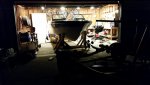
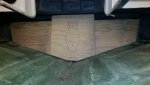
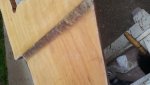
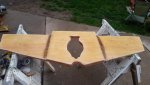
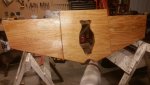
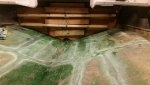
Last night since it was 33? and windy with snow, I decided to stay in the cozy garage and start pulling the transom instead of getting the boat onto the cradles which would involve being outside. I got most of the transom out last night and you guys were right and I'm happy I didn't decide to leave it because it was pretty rotten. I was able to pry the middle section out to be able to use as a template and I should have the rest of it out tonight. Dry wood is hard to get off the fiberglass! When I rebuild the new transom, I was thinking of making the whole thing 2" thick. On the wishlist for in the future, I would like to put a larger motor in so having a more robust transom would be nice. What are your guys thoughts, would this be overkill?

My plan for this weekend is:
finish removing the transom
grind/sand down the motor mount areas
get the boat on the cradles
buy wood and order fiberglass materials

Unless I put 12 hour days on it, I don't think I will be done my start of May like I originally wanted which is fine because with the way the weather is going in Michigan it will still be too cold to go out on the water then anyways. New target date is memorial day weekend.
 

Attachments

  • photo241330.jpg
    photo241330.jpg
    122.1 KB · Views: 8
  • photo241331.jpg
    photo241331.jpg
    108.7 KB · Views: 8
  • photo241332.jpg
    photo241332.jpg
    102.3 KB · Views: 8

mxcobra

Chief Petty Officer
Joined
Jun 27, 2011
Messages
526
there are exact dimensions for the transom, im thinking its 2 and 1/8" finished, to thick and youre asking for problems with any motor. 2 inch plates plus the 1/2 or so of glass thats already on the hull , plus another 1/8 to a 1/4 for finishing glass, will be to much. I would use 2 3/4 plywood plates to build transom glued tight then make up any more width needed, with glass..... smart move pulling the transom apart though, it would be silly to get this far and not go all the way...
 

brian36578

Seaman
Joined
Feb 1, 2016
Messages
59
Correct, for my transom assembly it calls for 2"-2 1/4" thick and must be within 1/8" parallelism from top to bottom. It was this thickness but only in the middle section and then on both sides the transom is 3/4" thick ply with some fiberglass. Would there be any benefit in making the whole transom 2 1/8"? It seems like it would be more robust. Also, this boat is 26 years old, is there any new technology in transoms today that I could utilize or is it more or less the same design/technology as in 1990?
 

mxcobra

Chief Petty Officer
Joined
Jun 27, 2011
Messages
526
Not sure on technology, I am sure on - I have the same transom as you in my boat from 1976 - I did beef up the port and starboard sides of transom - glad I did becouse the swim deck gets a lot of use and is bolted to port side and holding solid- plus I'm about to mount a kicker to starboard - and I know it will hold well....
 

Vintage Rider

Seaman
Joined
Mar 6, 2016
Messages
62
The reason the thickness of the transom needs to be so percise is because that is what determines how much of the splines in the outdrive engage where it connects to the engine. A 2 1/4 inch transom gives you 1/4 inch LESS contact than with a 2 inch transom. That probably won't make a bit of difference in reliability but then again... Persionally, I always try the error on the side of caution whenever possible. Nice bike.
 

brian36578

Seaman
Joined
Feb 1, 2016
Messages
59
No Title

This weekend I wasn't able to get much done because it was in the low 30's with rain and snow but yesterday it hit 60 and i was able to finish the heavy grinding after work! I found a place not too far to buy all of the fiberglass from, Michigan Fiberglass supply in St. Clair Shores, and will be purchasing some fiberglass supplies tomorrow after work. I hope to have the new transom in by the end of the week. I'm still contemplating what kind of wood to buy. I was looking at ACX the other day at Menards. It looks pretty good and so does the price ($36 for a 3/4" sheet compared to $68 for marine). Has anyone used ACX for building a boat?
 

Attachments

  • photo241582.jpg
    photo241582.jpg
    84.6 KB · Views: 9
  • photo241583.jpg
    photo241583.jpg
    120.3 KB · Views: 9

JASinIL2006

Vice Admiral
Joined
Feb 10, 2012
Messages
5,722
ACX should be fine. Some ACX is better than others... generally, the more plies, the better. But any ACX can do the job.
 

brian36578

Seaman
Joined
Feb 1, 2016
Messages
59
Well the boat project might have to be put on hold for a little while...I've been dealing with a clogged main sewer line the past week and after a few failed attempts to get it unclogged myself I had Roto-Rooter come out today. They got it unclogged, for now, but after sending the camera through there is a lot of build up in the pipes and it looks like something else might be going on. They are doing a power wash of the pipe tomorrow ($900) and then they will be able to tell the extent of the damage to the pipe. Worst case scenario, the pipe needs to be replaced or a liner inserted in an area which is a few grand and the money that I was going to use for the boat will have to go to that and I'll have to wait a couple months to buy all the fiberglass materials. It sucks when life gets in the way of the fun projects...
 

JameO

Petty Officer 3rd Class
Joined
May 22, 2015
Messages
85
Well I can completely understand. A house that me and my father spent all but ten years building together,burned down in December. And I just had a sewer main break not too long ago . My boat project is on hold rite now .
 

brian36578

Seaman
Joined
Feb 1, 2016
Messages
59
JameO, very sorry to hear that. kcassells, I've been doing some research since I have never had or knew of anyone who had their sewage line hydro-jetted and after reading about it I will be cancelling their service for tomorrow. $900 to hydro-jet the pipe seems extremely high and I will be doing some other shopping around. I was worried about the line needing to be replaced especially since it runs under the patio I just build last summer and my garage but there are a lot of trench-less pipe repair options that are not as expensive as this guy made it out to be so the boat project will hopefully continue with little delay!
 

kcassells

Fleet Admiral
Joined
Oct 16, 2012
Messages
8,738
They should also give you a copy of the video showing footage count {to pin point** of exactly where the concerns are since you bought there services.
 

mxcobra

Chief Petty Officer
Joined
Jun 27, 2011
Messages
526
put A alarm at the floor drain So you know when it backs up before damage. Find someone cheaper then roto roter to snake the drain.and snake it once a year, home depot rents 120 foot snakes. I have tree roots in my pipes at 220 feet. This is what I do and it works fine, we are also plumbers soooo. Byere bewaere Plumbing and HVAC are some of the biggest con artast around. to home owners that dont know about our feilds.
 
Last edited:

kcassells

Fleet Admiral
Joined
Oct 16, 2012
Messages
8,738
Yup what he said. But depends on what the video shows. Roots or sewer line collapsing. Flat raters will suck you dry.
 

brian36578

Seaman
Joined
Feb 1, 2016
Messages
59
No Title

Its only 87 ft to the city which is nice and most if it is clear, its just the 35 ft belly that has me a little worried. I cancelled their service yesterday before they came. The drain is fine right now but I'll address hydro-jetting and possibly an insert in the future before I finish the basement (tentatively next winters project).
I started back on the boat last night and got her off the trailer and onto the cradles. They seem pretty sturdy and I'm excited the boat can fit straight in the garage now with it closing! Here are a few pics, what do you guys think? Should I add a 3rd support in the middle? Also, when I built the front cradle I made it so the deck is level. I left some of the deck on the edge and will use it as a reference as I rebuild. I used my 6 ft level and I found the rear cradle just needs a little less than 1/2" of shimming. Port side is just a hair lower than starboard as well. I won't rely 100% solely on using the level for everything and will mainly reference the boat but it will be nice for being able to throw a level on the stringers to make sure they are level.
My hinge pin tool came in yesterday so I gave it a try to make sure it fits and I found the starboard pin is not even finger tight!! After work I will be buying some of the fiberglass materials and will start on cutting the wood for the transom.
 

Attachments

  • photo241681.jpg
    photo241681.jpg
    129.5 KB · Views: 6
  • photo241682.jpg
    photo241682.jpg
    140.1 KB · Views: 6

brian36578

Seaman
Joined
Feb 1, 2016
Messages
59
No Title

Bought some of the fiber glass supplies yesterday. 80 yards of CSM, 5 gallons of non-wax poly-resin with the hardener, a dozen chip brushes, 2 lbs of cab-o-sil, a roller, buckets, and stirs. I also cut out the transom assembly and will get it glued together tonight. Here are a few pics of last nights progress.
 

Attachments

  • photo241777.jpg
    photo241777.jpg
    134.3 KB · Views: 8
  • photo241778.jpg
    photo241778.jpg
    97.3 KB · Views: 8

kcassells

Fleet Admiral
Joined
Oct 16, 2012
Messages
8,738
Good for you...Carry on. Drain will probably work for the next 10 years...Now back to the important stuff.
 

TruckDrivingFool

Lieutenant Commander
Joined
Jul 30, 2007
Messages
1,818
Your craddles look great but I would add a beam down the middle to tie them together and come up from that to get the keel supported and take the majority of the weight off of those upper bunks in the front. This should take away the possibility of your craddles pinching the hull sides inward when you walk along the keel.
 
Last edited:

brian36578

Seaman
Joined
Feb 1, 2016
Messages
59
No Title

Last weekend I was busy with the girlfriends birthday and helping my parents clean out my grandpas house so I wasn't able to get as much done on the boat as I wanted to. This week has been crazy busy too but I was still able to finish the transom and installed it in the boat last night. I have a few air bubbles on the transom, any tips on how not to get air bubbles when fiberglassing? I was using a roller and the air bubbles were gone but appeared after it kicked. This weekend I should be able to get a lot done. I plan on:
- finishing the fillets around transom
- tab in and fiberglass transom and make sure its between 2"-2 1/4" and within 1/8" parallel top to bottom
- make another cradle
- start on the motor mounts
 

Attachments

  • photo242234.jpg
    photo242234.jpg
    108.3 KB · Views: 7
  • photo242235.jpg
    photo242235.jpg
    71.5 KB · Views: 7
  • photo242236.jpg
    photo242236.jpg
    129.1 KB · Views: 7
  • photo242237.jpg
    photo242237.jpg
    131.2 KB · Views: 6
Top