1990 Larson All American floor and stringer replacement

JASinIL2006

Vice Admiral
Joined
Feb 10, 2012
Messages
5,722
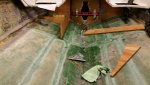
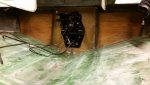
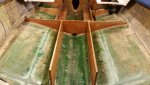
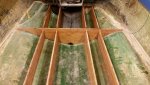
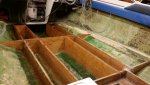
Where are the bubbles you're worried about? If they are the light spots (second picture, top near the center) where the 'glass is following the curve of your fillet between the double and single thicknesses of the plywood, the only ways I found were to either make the curve more gradual or to really baby the glass and keep hitting it with a roller as the resin kicked.

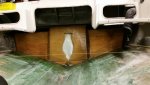
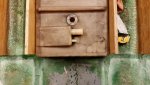
I'm not sure I'd worry about it too much. If it REALLY bugs you, you can grind it off and try again. (I don't think I would.) If your concerned about leaving a cavity where water might get in (or collect), you can get a hypodermic needle and inject some resin into the bubble. (It helps to drill a small air relief hole on the opposite side of the bubble from where you inject.) I got a few needles at a farm equipment store.

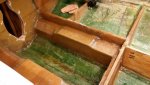
If the bubble is away from where it's likely to be exposed by water, I'd probably leave it alone. If it's down near the bottom of the transom where it might be exposed to bilge water, I'd be pretty invested in doing something about the bubble. You don't want to do all this work and not protect the wood.

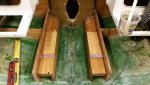
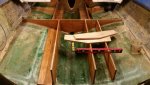
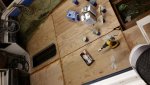
Looks like you're making some progress, despite all the other stuff going on in your life.
 

brian36578

Seaman
Joined
Feb 1, 2016
Messages
59
No Title

Its been a little while since I gave an update. The project has been moving a little slower than I originally wanted but oh well. Its spring so the grass and landscaping needs attention too. The transom is complete. I needed to use 4 layers of bi-axial 1708 to build up to the 2" but I'm nearly perfectly parallel from top of the key hole to the bottom and just over 2" thick. I also drilled the holes for the transom assembly and dry fit it. Last night I got the first 2 stingers in which was exciting to finally work on something other than the transom.
 

Attachments

  • photo243470.jpg
    photo243470.jpg
    113.7 KB · Views: 9
  • photo243471.jpg
    photo243471.jpg
    122.4 KB · Views: 11
  • photo243472.jpg
    photo243472.jpg
    112.4 KB · Views: 9

brian36578

Seaman
Joined
Feb 1, 2016
Messages
59
No Title

This weekend I finished tabbing in the stringers that I have installed and finished the motor mounts and installed them into the boat as well. The motor mounts were pretty time consuming and I am glad they are done! Just have to fiberglass around them now. So far everything has gone smooth except 1 small issue. When I installed the port side stringers, the stringer some how shifted toward the middle of the hull about half inch and now the height is off from the starboard side by a little less than 1/4 of an inch. Any ideas on how to correct this? The idea I was thinking of is adding about a 1/4 inch of wood to the top of that stringer to bring it back level. Tonight I will be tabbing in the motor mounts and possibly putting the biaxial 1708 over them and also start making the template for the first bulkhead in front of the motor mounts.
 

Attachments

  • photo244483.jpg
    photo244483.jpg
    136.7 KB · Views: 13
  • photo244484.jpg
    photo244484.jpg
    124.3 KB · Views: 13

brian36578

Seaman
Joined
Feb 1, 2016
Messages
59
Made some good progress this weekend (pics to follow tomorrow) and I am currently framing in the stringers which go around the gas tank. I would like to add an additional storage area on the starboard side behind the driver seat but I want to make sure I have it far enough back that the seat will not be in the way. Is there a basic standard distance away from the steering wheel the driver seat should be so I know where to make this storage area?
 

brian36578

Seaman
Joined
Feb 1, 2016
Messages
59
No Title

Here are a few progress pics from the past week. After thinking a little more about it, I will not make a storage area behind the drivers seat. It would be pretty shallow for a good half of it and it would probably be better not to have another hole in the deck. Still have 2 more blankets of 1708 to go over the port side motor mount and 3 blankets over the starboard side. All stringers only have 1 layer of CSM tabbing so far. I hope to be ready for the deck next week.
 

Attachments

  • photo245183.jpg
    photo245183.jpg
    94.6 KB · Views: 17
  • photo245184.jpg
    photo245184.jpg
    106.4 KB · Views: 16
  • photo245185.jpg
    photo245185.jpg
    104.2 KB · Views: 15
  • photo245186.jpg
    photo245186.jpg
    115.4 KB · Views: 17

brian36578

Seaman
Joined
Feb 1, 2016
Messages
59
No Title

Thanks! It has definitely improved since the first couple of practice piece I tried before starting on the boat. So last night I test fit the tank again now that the fillets and glass is dry and I have ran into a small issue. I did not compensate for the fillets when I measured for the tank and now it will be in the way of the next bulkhead. In the first pic you can see the tank will no longer slide all the way back to the bulkhead because of the fillets and the 2nd pic you can see the result of the tank sticking out too far. The 2 options I see are grinding down the fillets so the tank sits flush and will fit inside the compartment properly which will degrade the strength of the stringers slightly or add in the required length of wood as a shim for the next bulkhead to rest up against. Which option would you guys suggest?
 

Attachments

  • photo245285.jpeg
    photo245285.jpeg
    54.6 KB · Views: 16
  • photo245286.jpg
    photo245286.jpg
    124.5 KB · Views: 16

mxcobra

Chief Petty Officer
Joined
Jun 27, 2011
Messages
526
can you put some rubber spacers or something under the tank to bring it up some and clear the fillets
 

Woodonglass

Supreme Mariner
Joined
Dec 29, 2009
Messages
25,929
I'd Shim it!! Looks like you only need about an inch. That's a piece of cake!!!
 

JASinIL2006

Vice Admiral
Joined
Feb 10, 2012
Messages
5,722
Made some good progress this weekend (pics to follow tomorrow) and I am currently framing in the stringers which go around the gas tank. I would like to add an additional storage area on the starboard side behind the driver seat but I want to make sure I have it far enough back that the seat will not be in the way. Is there a basic standard distance away from the steering wheel the driver seat should be so I know where to make this storage area?

Whether or not you go with a storage area, you can put the driver's seat where you want. I'm kind of tall, and before I restored my boat, my knees barely fit between the seat and the cockpit console. I put my driver's seat in so it's comfortable for me, but the seat (pedestal type) can be slid up a bit for shorter drivers.

No sense in going through all this work and not making it how you want it!
 

brian36578

Seaman
Joined
Feb 1, 2016
Messages
59
No Title

This past week I busted butt on the stringers and put 2 layers of glass on all of them and this past weekend I got the deck cut on Saturday and glued and screwed it yesterday! I just need to install the new fuel hose that will go to the engine and then I can glue and screw the piece that goes over the tank. I hope to get that done, finish foaming, and the first layer of glass over the entire deck by the end of tonight.
 

Attachments

  • photo246069.jpg
    photo246069.jpg
    107.2 KB · Views: 19
  • photo246070.jpg
    photo246070.jpg
    118.2 KB · Views: 19
  • photo246071.jpg
    photo246071.jpg
    128.9 KB · Views: 18

brian36578

Seaman
Joined
Feb 1, 2016
Messages
59
Thanks! I hope to have it in the water BEFORE July 4th for a good trial run so that I can go out on the 4th worry free. On Monday I ran out of foam so I bought more yesterday and finished foaming it last night. I'm behind a day for my progress for this week but still should be able to hit the deadline. I will be sanding the deck, PBing the wood plugs back in, and possibly putting the first layer of fiberglass on the deck tonight.
 

Spectre250

Seaman Apprentice
Joined
May 16, 2016
Messages
39
Brian, excellent work youre doing here! Glad to see another Larson being restored, Im redoing a 90 senza spectre and have a thread on here about it. One question though, How many yards of glass did you buy? I know it differs per boat, per application, Im just looking for a round-about quantity. Keep up the good work, I hope I can be as devoted as you are, Im still in the denial stage with mine lol
 

brian36578

Seaman
Joined
Feb 1, 2016
Messages
59
Thanks! I have been following your thread and it looks like you are just about passed the worst part of grinding. That boat looks to be in beautiful condition on the outside! I used poly resin so it will be a little different than yours but I bought a 35 yard by 50" roll of CSM and it looks like I will have extra (still have a layer and a half to do over the deck) and 6 yards of 1708 biaxial for the transom and motor mounts. Motor mounts have about 2 layers of CSM and 3 blankets of biaxial 1708. All of the stringers were bedded roughly 1/4" to 1/2" off the hull using thickened resin and each stringer has 2 layers of CSM and a healthy fillet. I opted not to cap the stringers but coated the end grain with 3 coats of resin prior to gluing and screwing the deck on. So far for material breakdown:

- 20 gallons of poly resin
- 3 gallons of acetone
- 6 sheets of 3/4" marine B plywood
- on my 3rd box of 100 latex gloves
- on my 5th dozen of chop brushes
- lots of paint stirs
- roughly 15-20 buckets. Once the resin cures in the bucket, if you carefully flex the bucket you can crack it all out and reuse. Sometimes it breaks though.
- 3 gallon kits of pour foam and 1 quart kit
 

Spectre250

Seaman Apprentice
Joined
May 16, 2016
Messages
39
Yea, my hull is in really good condition! Has a couple small stress cracks in the gel coat bit other than that, it's just needs a good buffing and polish.

Thanks for making that list, I know for epoxy it's different but it just gives me an idea. Keep it up bud, if I have any other questions, I'll let you know
 

brian36578

Seaman
Joined
Feb 1, 2016
Messages
59
I haven't done anything with the seat yet. Since I decided to skip making an additional storage area behind the driver seat, driver seat placement moved down on the priority list. I should be receiving the new seat in the mail today or tomorrow so I will set it up and decide a location for it pretty soon.
 
Top