1992 16.5 Mirrocraft Pro Fisherman Rebuild

munster04

Seaman Apprentice
Joined
Sep 26, 2015
Messages
35
Good morning All,

I purchased this 1992 Mirrocraft last summer which looked great with new carpet and storage/casting deck. After using it a few times I found the casting deck was taking up to much room. I couldn't turn around my seats without having to put my legs up on the deck. I've been planning on replacing everything since last September when I asked about honeycomb aluminum sheets. I started the process in May of taking everything out of the Mirrocraft. Well we have all been there done that and found that has come true.. The boat that "DOES NOT LEAK" according to the seller was worse then I could have imagined.

First Issue:
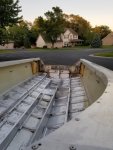
After removing the new carpet and casting deck I now know why they built the deck. There was NO plywood under the deck and the foam was 100% soaked with water. The plywood under the seats covered with new carpet was so bad I could take it out by my finders. It fell apart as I pulled it off.
Deck Removed 1.jpg

Deck removed 2.jpg

Plywood falling apart.jpg

Soaked Foam.jpg

water logged Foam.jpg


Second MAJOR issue:
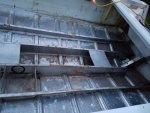
At some point in time they removed a live well in the floor of the boat forward of the consoles. When they removed the live well it allowed the soaked foam to put the aluminum runners to bent inward. After removing all the foam I fixed that part. Now for the so called "Dumb butt fixes of the year" they had the bright idea of putting 2X2" square aluminum over the holes used in the live well in the bottom of the boat. Then topped it off wit the canned spray foam "Great Stuff" thinking it would keep it sealed. They did try and seal the aluminum with something we can't figure out what it is but does not matter. I have to remove those two pieces and my friend is going to weld two new ones on there. When I did the water leak test the two holes leaked as a stead drip every .05 second filling up a cup in 2 minutes. I had to see how much water was getting in the boat so I put the cup under each leak I found and did the same test.


Other leaks:
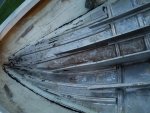
The bow where the bottom and bow keel join is leaking in eight "8" spots along the seam. The same area also has three "3" rivets that are leaking. Along the portside the seam is leaking in four "4" spots as well as two rivets. Starboard side has five "5" seams areas leaking and eight "8" rivets. The bow seams are the worst at roughly filling a cup in five minutes. Saying roughly since they all flow down and drip in the same general location its hard to tell which seam leak is the worse.


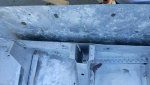
I have removed all the old carpet from the rail as well as the inside of the boat. I removed all the glue and cleaned the aluminum on the rail and inside. It looks like new in most spots. I still have to remove the splash well and transom. Already know its BAD as I found when I took off the aluminum plates and cover I found someone had put silicone in a few areas at some point but it did not help. The wood looked like termites had eaten it on top. Still have to remove a lot of screws and rivets before I can get the splash well off and remove the transom.

The gas tank was dirty on the outside but when I took the hoses off and looked inside it looked like orange slim on all the walls. From what I know I did not even want to try and clean it just going to replace it. (Still looking for the correct size one online.


Questions:

Fuel tank:
It had an angel 1.5 pipe intake on top sitting roughly 2" higher than the main fuel tank top. Do I need to replace it with another angel tank or can I simple replace it with a straight feed pipe?

Steering:
After removing the steering cables and helm I found the bar that feeds into the motor shaft was bent. When I was driving the boat it was not as responsive but took effort to turn the motor when under way. Would you replace the cable or complete system? This is the system that would replace my current one I found online.
Teleflex Marine SS13213 NFB and Teleflex 4.2 NFB or Teleflex Safe-T which is one the boat now. I know I should go with the NFB version from reading a lot of post but really don't see the difference between the SS13213 vs 4.2 NFB systems.


I have to change the file size to upload to this site. For now I have shared a few images on my Google account.
https://goo.gl/photos/uzhjgRWMFgQ68du46


Thank you,

Munster
 
Last edited:

munster04

Seaman Apprentice
Joined
Sep 26, 2015
Messages
35
More pictures:

Spray foam fix. :) Spray foam.jpg


Foam removal process and afterward looks. Foam removal.jpg
Foam removal 2.jpg


Aluminum After removal 3.jpg
Aluminum after removal 2.jpg


Aluminum after removal 1.jpg


Cleaned upped:

Top carpet removed and glue removed. Carpet and glue removed from top.jpg


Aluminum inside cleaned. Aluminum Cleaned.jpg
Aluminum Cleaned 2.jpg


Transom view: Transom Top.jpg


They had put two 1/4" aluminum plates on the inside and outside of the boat transom area. You can see it laying on the floor. They did not seal the holes they made for the bolts so the water soaked into the transom wood through there and the splash well drain hole. The drain hole did not feed out it the aluminum insert went halfway and they filled the rest with silicone. Both drain holes had holes in the bottom of the silicone fix that went directly into the top of the transom. Transom 2 aluminum plate removed.jpg


I'll post more pictures as I get the transom off and splash well off. Still have to sand the aluminum areas that have turned white. Want to make sure they are not to far gone yet. Should have all this done in a few hours today. Just have to put plywood down to lay on under the splash well.


Next step after that is removing a few rivets to get the correct size to order. Then replace them next week along with sealing the seams and rivets with Goop Coat-IT.


Thank you,

Munster
 

Attachments

  • Aluminum after removal 2.jpg
    Aluminum after removal 2.jpg
    115.3 KB · Views: 4
  • Aluminum after removal 2.jpg
    Aluminum after removal 2.jpg
    115.3 KB · Views: 4
  • Aluminum after removal 2.jpg
    Aluminum after removal 2.jpg
    115.3 KB · Views: 4
  • Aluminum after removal 1.jpg
    Aluminum after removal 1.jpg
    108.2 KB · Views: 4
  • Aluminum after removal 1.jpg
    Aluminum after removal 1.jpg
    108.2 KB · Views: 4
  • Aluminum after removal 1.jpg
    Aluminum after removal 1.jpg
    108.2 KB · Views: 5

munster04

Seaman Apprentice
Joined
Sep 26, 2015
Messages
35
No Title

Splash well and transom is out. It took longer than I thought. What a pain but now I can clean it tomorrow and see how bad the pitting is on the inside. Splash well is out.jpg
Trasom wall pitting closeup.jpg
Transom wall pitting.jpg
Transom wood backing.jpg


Transom slot.jpg
All washed and cleaned.jpg


Tomorrow I'll sand all the white spots, Transom and sidewalls.

Question:
Should I do anything other than sand the transom wall?

Thank you,

Munster
 

Attachments

  • photo266776.jpg
    photo266776.jpg
    131.3 KB · Views: 5

Baylinerchuck

Commander
Joined
Jul 29, 2016
Messages
2,739
Nice job on the demo and clean up. Hopefully some of the tin guys chime in for ya. I'm a glass guy, so not much help at this stage. I'll follow along to see how the tin guys do a restoration.
 

Tnstratofam

Commander
Joined
Aug 18, 2013
Messages
2,679
Nice progress so far. You can use jb weld or marine tex as a skim coat to fill any pitting. You should primer the alluminium with self etching primer after you get it sanded and all the pitting filled.
 

munster04

Seaman Apprentice
Joined
Sep 26, 2015
Messages
35
Thank you for the reply Tnstratofam. I seen some JB Weld patches on the transom already. Looks like they replaced it at one time. Someone tried to fill the holes but left the JB Weld in big thick patches. They also used something that is Pink in color but I have never seen that before so not sure what material was used. It was used to fill five small screw holes in the transom.

I was planning on priming/painting the inside before installing the foam and floor again. Do you reconnected any type of self etching primer over others? I've only used the Rust-Oleum stuff on yard furniture.
 

Tnstratofam

Commander
Joined
Aug 18, 2013
Messages
2,679
I used Rustoleum on our SS when I redid the transom. Both self etching primer and paint. I bought them both in rattle cans from Lowes. I'm not sure you need to primer the floor or stringers unless you see signs of corrosion on them. As for the foam most here use the pink sheet foam from Lowes or Home Depot for under the deck.
 

fishin98

Chief Petty Officer
Joined
Nov 28, 2009
Messages
521
WOW! Got quite a project there...Looks like the previous owners did a half azzed rehab. You can rebuck the rivets and use either Gluvit or 3M5200 SLOW CURE to seal the seams. In the bow area where the keel comes together with the hull...I would rebuck the rivets, warm the area with a heat gun and fill the cavity with SLOW CURE 5200. As far as steering I would go with a new unit. For flooring I used 19/32 BCX plywood thoroughly soaked on both sides and edges with a spar varnish. To attach the floor I used stainless screws. Your fuel tank can be cleaned by using liberal amounts of Dawn dishwashing liquid and let it soak. Have you thought about installing a length of PVC pipe down the center of the hull to run wiring through? I painted the inside of my boat with Rustoleum industrial gray primer and Industrial Gray paint from spray cans. My project is down on page 66 1988 Alumacraft Lunker redo. I'm going to follow this project as it is interesting
 

munster04

Seaman Apprentice
Joined
Sep 26, 2015
Messages
35
Thank you all for the replies.

Sorry BaylinerChuck I missed your reply. I was reading in between the work.

It was a long day of sanding yesterday but still not finished. If I have to fill the pits its going to take a lot to fill them. Some of the bolt holes had been JB Welded at some point where they cracked.

Have to go get a drill stainless steel wheel today and primer. I used the one I had on my angle iron grinder but it's to much power. I was trying to hold it off the aluminum just enough to clean it but it grad way to much for me. As for the floor I did find under the old foam corrosion spots as well. Those are not where near the depth of the transom area.

Plywood is already in my garage waiting to be sealed. I purchased the Marine grade plywood when it was on sale at Menards. It might be a mistake but I when with the 3/4" instead of the 1/2" they used in the factory. I'll have to see if the console and windshield still fit correctly. Might have to trim some of the attachment pieces. As for sealing them I was going to use Spar Varnish or the linseed mixed then after it dries spray it with Raptor Liner. Already have it in the Garage as well. My neighbor did a boat deck last year with it and it's nice. The plan right now is to cut the plywood to 63.5" leaving .125 gap from the sides. The plywood will be jointed after the cuts and fitting with biscuits. This way there are no seals in the plywood of issues with the Raptor liner creating a bigger joint at the seals if it was coated.

The screws where my next question for the floor. They had it riveted down not screwed down. Since the plywood will be one piece instead of three parts I'll have to either pre drill each location then plug it with a mini dow to keep the Raptor liner out of the holes. I want to use eight flush mount flat head sheet metal screws or u-nuts on the runners after I drill it. Just have to make sure it goes back in the correct spot but that's really not hard.

The gas tank is gone. I did not even want to deal with that. Would rather buy new since everything else is going to be new at this point.

I've read on here Gluvit or Coat-It so I order Coat-It. The biggest reason was the price and it could be delivered by today. I purchased the 1 gallon can just to make sure it was enough. I'll take out a few rivets to see what size they are before ordering them this afternoon. Going to replace the transom support as it was shoot. Basically it looks like Swiss cheese on the front and bottom. There are only two bends in the support which I can get done at my friends shop. He said the same thing about rebuck or replace them. Does not hurt to rebuck them before drilling them all out.

Foam:
I've seen everything from pool noodles to pour foam on this site. I've looked at and mapped out the pink foam from HD as well as figured out the cubic feet of pour foam. difference in price is roughly $75 dollars more for the pour foam vs the pink but I'll spend a lot of time cutting and fitting it. Not to say I would not spend that much time with the pour foam since it would have to be done is small parts. Let's say I go with the Pink sheets would it be better to go vertical or horizontal? From the floor to the top of the rips its 1" x 11.25". I could either level it out of cut the foam sheets on a angel to match the rise for a better fit. Just want to do what's best one time instead having to go back later and fix it again.


Thank you,

Munster
 

munster04

Seaman Apprentice
Joined
Sep 26, 2015
Messages
35
Here are a couple of pictures of the pitting in the transom aluminum. You can see one of the holes is pretty big with other smaller holes round it.

20170605_075847.jpg


7190.jpeg

20170605_075837.jpg

20170605_075843.jpg

20170605_075856.jpg
 

Attachments

  • 7190.jpeg
    7190.jpeg
    180.9 KB · Views: 3
  • 7190.jpeg
    7190.jpeg
    180.9 KB · Views: 3

ezmobee

Supreme Mariner
Joined
Mar 26, 2007
Messages
23,767
Wow definitely some classy work there by previous owners. Nice work on the tear out. Fortunately now that you've got it all cleaned out and cleaned up I don't think you're up against anything too out of the ordinary from all the other aluminum hull restores on here including my own Starcraft SS project. I did not encounter much in the way of corrosion on mine so I don't have any good advice there but others have seen similar issues on the transom and have dealt with them. Hopefully they'll chime in. Good luck with your project.
 

munster04

Seaman Apprentice
Joined
Sep 26, 2015
Messages
35
Well as in the famous words from the Joker.. You haven't seen nothing yet. :)

This was the "fix" for the livewell he removed in the bottom of the boat then covered it with the can spray from in the first pictures. This is being welded on Friday. I'm also thinking about having another .125 welded to the outer skin of the transom. Then I could safely fill the pitting with metal-2-metal or JB weld. Since there is a lot to fill it might be metal-2-metal.

Oh and YES that is a screw coming thought the "fix" to hold it in place. They then added enough JB Weld on the bottom to cover up and smooth it out. 20170605_123823.jpg
 

sublauxation

Lieutenant
Joined
Oct 13, 2008
Messages
1,317
As long as you're talking about putting some new metal over the transom, here's something for you to consider:

I have roughly the same shaped boat with the same splashwell. When I redid it the first time I removed the splashwell and raised up the sides of the transom. I had a smaller splashwell made and was able to put a nice flat casting deck in it's place. It really opened the boat up nicely!
 

munster04

Seaman Apprentice
Joined
Sep 26, 2015
Messages
35
As long as you're talking about putting some new metal over the transom, here's something for you to consider:

I have roughly the same shaped boat with the same splashwell. When I redid it the first time I removed the splashwell and raised up the sides of the transom. I had a smaller splashwell made and was able to put a nice flat casting deck in it's place. It really opened the boat up nicely!

What do you mean you raised up the side of the transom? Do you have pictures?

It had a casting deck/storage in the back last summer. It was nice but took up to much room. A shorter Splashwell would fix that but it would have to allow the 90 HP motor room when in the raise position.

Munster
 

sublauxation

Lieutenant
Joined
Oct 13, 2008
Messages
1,317
I'll see if I can find pics, it's currently torn apart again because I've come up with a couple of improvements on the first attempt.
 

munster04

Seaman Apprentice
Joined
Sep 26, 2015
Messages
35
Any Mirrocraft owners know what this area was used for on the boat? This was covered up by the floor but did not have any foam in it from the factory. It has a protected grommet in the center. The Capt seat would be placed in the upper left of the picture where the stringer is cut.
Aluminum after removal 2.jpg
 

sublauxation

Lieutenant
Joined
Oct 13, 2008
Messages
1,317
Post #9 shows what I did. The material above the weld line is new. When you take that huge splashwell out it sorta makes you feel like you're going to sink so I built it up a bit! This time I built a slightly taller and wider splashwell because I'm adding a bench seat, the casting deck will be about 4 or 5 " higher. The first splashwell was just a bit too narrow so the steering arm hit it and I lost some turning radius. I also have a 90 hp and have no problems tilting all the way up.

http://forums.iboats.com/forum/boat...redoing-the-ugly-duck-my-18ft-aluminum-sylvan
 

jbcurt00

Moderator
Staff member
Joined
Oct 25, 2011
Messages
25,121
A random guess would be this hull was offered in a center console

Your Mirrocraft is rivetted, I strongly suggest rivetted repairs instead of welded repairs
 

munster04

Seaman Apprentice
Joined
Sep 26, 2015
Messages
35
A random guess would be this hull was offered in a center console

Your Mirrocraft is rivetted, I strongly suggest rivetted repairs instead of welded repairs

Hi JBcurt00, I'm not replacing the current riveted transom only looking at putting a new .125 outer skin on it. This way it I don't have to take it completely off and try to find someone in MN that can shape a new replacement transom. I did check with three shops they all wanted to cut the back skin then bend/shape angle aluminum to weld to the skin. Two of them side it would be a 100% fit then it could be riveted back in place. That sounded good but nothing is a 100% fix plus I would have to find a rubber gasket to go between them from what I can see on the boat.

If anyone knows someone that can make a new transom up here I would have it replaced.

I've been reaching online and read a lot of reviews on metal-2-metal which looks like it might be a good over all choice. Only part would be the larger holes in the transom. JB Weld might do a better job but I do not have the experience level to know which would be a better fix.


Boy If I could find a picture of one of them as a center console that would be something to consider. That would make for a great fish fighting boat on the lakes. No place you could not fish from plus it would but the weight in the center of the boat.

Munster
 
Top