1992 Astro Restoration

Joined
Sep 23, 2010
Messages
1,058
Re: 1992 Astro Restoration

I've heard three years is too long, but that's just what I've heard. Seems valid to me. I wouldn't use three year old paint, and I'd be leery of old fuel. Don't think resin would be much different. YD or the other experts here can tell you.
 
Joined
Aug 17, 2009
Messages
941
Re: 1992 Astro Restoration

LOL, well I restore a boat or two every year, so I'll go thru it, but it's only two drums so 110 gallons. This would last a while, but was worried about shelf life. I've read about 6 months and a year but was for opened containers, didn't know about still sealed.

Sorry. My bad. I thought you said three 55 gal drums. If you know who originally made the stuff you could always contact them and ask.
 

ondarvr

Supreme Mariner
Joined
Apr 6, 2005
Messages
11,527
Re: 1992 Astro Restoration

At three years old they should be paying you to take it away, the chances of it being usable are slim, at this age its considered hazardous waste and would cost about $500.00 per drum to dispose of. Promoted resins typically have a shelf life of from 90 to 120 days, unpromoted resins may be up to a year.

I have on occasion seen resin this old still sort of be usable, but I wouldn't use on anything important, and that's only if its still in a liquid state.
 

Cadwelder

Lieutenant Commander
Joined
Aug 30, 2010
Messages
1,780
Re: 1992 Astro Restoration

Thanks ondarvr, I'll leave it sitting in the warehouse. I wanted to check with a pro first on the resin. I know the cloth, mat, etc are good and got some nice tools cheap. (In case you're wondering this was a small boat manufacturer that went under during the 2009 economy, and hung on as long as he could, but just never recovered)
 

Yacht Dr.

Vice Admiral
Joined
Feb 26, 2005
Messages
5,581
Re: 1992 Astro Restoration

I agree.. nix on the old resin ( unless your planning on making 110 gals of putty..because its all its good for right now ;) ).

YD.
 

Cadwelder

Lieutenant Commander
Joined
Aug 30, 2010
Messages
1,780
Re: 1992 Astro Restoration

Precoating is the proper way :).

As far as the fillets..I probably would.. ( I would use Microballoons instead of Cabosil ).

OH..and Ill tell ya a trick about fillets. After you make your radi but before the putty cures..gently coat the fillet with resin to smooth it out. Wait untill the putty starts to cool down..then LAM..

Good luck.

YD.

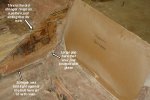
Now I'm a little confused here on the fillets. You said to leave the gap between the stringers and the hull and bridge it with a couple layers of glass in one post, but in another one said you probably would run the fillets?? Are you saying run the fillets on areas other than the stringers?? In the boat I'm doing now the stringers were set in resin directly to the hull for the first 4 feet or so starting at the transom, but then rose up with a gap as they went toward the bow. Should I go back this way or leave a slight gap all the way??

I was able to salvage a good pattern for the main stringers (the ones that tie to the transom). If I leave a gap all the way I'll need to shave a little off the bottom before attaching them.
 

Attachments

  • Transom Stringer.jpg
    Transom Stringer.jpg
    146.4 KB · Views: 0
Joined
Aug 17, 2009
Messages
941
Re: 1992 Astro Restoration

Cad,

Set/bed your stringers in with either PL Premium or a PB mix. Once that has set then come back and add a fillet of PB mix were the stringers contact the hull. You can either let the fillet fully cure first before you lay in the glass OR you can start to lay in the glass as soon as the fillet starts to set-up. No need to leave gaps as long as there is a bedding compound of some sort between the stringers and hull. Also in you pic, and I may be wrong because it is hard to see, but that large gap at the transom might be for letting water drain to the bilge.
 

Cadwelder

Lieutenant Commander
Joined
Aug 30, 2010
Messages
1,780
Re: 1992 Astro Restoration

Thanks for the bedding information, this was what I've done in the past, but when reading some other posts got a little confused. The large gap wasn't intended as drainage as it was glassed in solid on both sides. They just bridged the gap with glass. It was hollow when I cut it out. It was bridged with two layers of woven roving on each side, so it was plenty strong I guess, but nonetheless, still hollow.
 

Cadwelder

Lieutenant Commander
Joined
Aug 30, 2010
Messages
1,780
Re: 1992 Astro Restoration

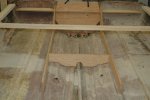
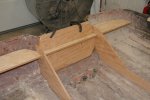
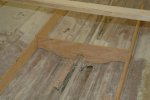
I know we all like pictures, so here's a few of the test fit on the transom, bracing and main stringers. Any comments welcome.
 

Attachments

  • DSC_0303.jpg
    DSC_0303.jpg
    141.3 KB · Views: 0
  • DSC_0304.jpg
    DSC_0304.jpg
    146.4 KB · Views: 0
  • DSC_0305.jpg
    DSC_0305.jpg
    144.1 KB · Views: 0

Yacht Dr.

Vice Admiral
Joined
Feb 26, 2005
Messages
5,581
Re: 1992 Astro Restoration

Sorry for the confusion...

Yes you can fillet..just dont pack with structural putty.. ( I said about micro balloons ).

Yes you can Non fillet..and add extra lam tabbs..

I normally would radius the stringers/bulks for my glass .. but in most cases Im talking Larger boats..

You can just extra tab and glass your stringers and bulks with just glass without fills. ( smaller boats ).

Sorry for the confusion again..

YD.
 
Joined
Aug 17, 2009
Messages
941
Re: 1992 Astro Restoration

Nice work. Looks great!
Was this the original layout of the stringers, bulkheads, etc? What is the thickness of the ply?
 

Cadwelder

Lieutenant Commander
Joined
Aug 30, 2010
Messages
1,780
Re: 1992 Astro Restoration

All 3/4" Marine grade and yes this is the orginal layout, made the patterns off the old stuff I took out. I'm pretty good at restoring but not much on redesigning.
 

Cadwelder

Lieutenant Commander
Joined
Aug 30, 2010
Messages
1,780
Re: 1992 Astro Restoration

Okay, ready to start glassing in some parts, but got a question. I hope I can describe this properly, you can look back a few posts and see the pictures of the transom and braces. As you can see the stringer/braces goes right up against the sides of the transom plywood. The question is should I tab in the transom plywood with a layer of 1708 and then put the transom braces in and cover them all with additional layers? Or should I do it as the factory did and just attach the braces to the transom and glass the transom to the bracess with several layers of 1708. Now there was about a 4" strip of woven roving (I'll use 1708) along the top of the transom that went all the way to the outside corners of the hull (which I will do as well)

The problem I see is getting the braces to fit properly against the transom with a layer of glass already there (probably why the factory done it that way). Need the experts take on this one.
 

j_k_bisson

Lieutenant Junior Grade
Joined
Oct 6, 2010
Messages
1,082
Re: 1992 Astro Restoration

I would glass in the transom piece fully first and then laminate the braces in to it with additional mat. Might have to re fit the wood a bit. That way if one piece od wood gets water/rot the others a separated from it. But I'm not a expert. Just my opinion.
 

Cadwelder

Lieutenant Commander
Joined
Aug 30, 2010
Messages
1,780
Re: 1992 Astro Restoration

I would glass in the transom piece fully first and then laminate the braces in to it with additional mat. Might have to re fit the wood a bit. That way if one piece od wood gets water/rot the others a separated from it. But I'm not a expert. Just my opinion.

My thoughts too, but since the factory didn't do it that way, thought I'd run it by the forum for more input. What about glassing in the entire transom and then sliding the braces in while the resin is still wet? This would force the new fabric to the shape of the brace?? Or perhaps taking a couple pieces of 3/4" thick lexan (it won't stick to the resin) and using it to form the glass for the braces to attach?? Input welcome here.
 

j_k_bisson

Lieutenant Junior Grade
Joined
Oct 6, 2010
Messages
1,082
Re: 1992 Astro Restoration

I would not try that wet installation of the braces. You will end up with more air bubbles and possibly move the sheet of mat you are trying to laminate. I was under the understanding that if you make all you laminations with in a certain period of time, Same 24-48hrs, It will bond as one chemical piece of resin and mat. Reguardless of having to sand off between the set ups. I know this was the case with the System Three epoxy product I used.
 

Cadwelder

Lieutenant Commander
Joined
Aug 30, 2010
Messages
1,780
Re: 1992 Astro Restoration

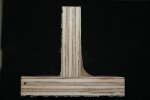
Since I'm not use to running inside fillets I thought I'd try some test pieces first. I tried smoothing out the fillet with a plastic spoon, metal spoon, wooden dowel, finger, etc. and just couldn't get the result I wanted and then I noticed a piece of 3/4" PVC conduit laying on the floor and tried laying that in the mix while it was wet and just left it there till in cured. It worked perfect, but left an extremely mirror finish in the resin. Should I rough it up a bit before I laminate over it or will it be fine like it is?

Here's a picture of the test piece (I used the black background so it would show up better)
 

Attachments

  • Inside Fillet.jpg
    Inside Fillet.jpg
    90.4 KB · Views: 0

j_k_bisson

Lieutenant Junior Grade
Joined
Oct 6, 2010
Messages
1,082
Re: 1992 Astro Restoration

Since I'm not use to running inside fillets I thought I'd try some test pieces first. I tried smoothing out the fillet with a plastic spoon, metal spoon, wooden dowel, finger, etc. and just couldn't get the result I wanted and then I noticed a piece of 3/4" PVC conduit laying on the floor and tried laying that in the mix while it was wet and just left it there till in cured. It worked perfect, but left an extremely mirror finish in the resin. Should I rough it up a bit before I laminate over it or will it be fine like it is?

Here's a picture of the test piece (I used the black background so it would show up better)

Seeing that I have not read what you are using for your resin. You might have to sand everything before moving on to the next layer. The system three epoxy I used did not need sanding unless it was after a couple of days. Polyester resins need sanding between each hardened coat. I been told the resin makes a layer of waxy substance on the surface that needs to be removed before the next coat is applied. This is to ensure that a proper bond is achieved.

What I did to avoid all this sanding. Was while the fillet was still wet, I layed my tabbing and all my layers of 1708. That way when it kicked, it was one chemical structural piece. One of the ways I did this was to play with the temp in the garage. Droped the temp down to 50-60'F and it gave me a long pot life for the epoxy. Then when I was done I turned the furnace on to high and kept rolling out the bubbles while I waited for the resin to kick off. You might want to try this method on one of your test pieces. Just an Idea/suggestion.
 
Top