1992 Sea Ray 180 Floor Project Help and Advice needed

chevymaher

Commander
Joined
Mar 29, 2017
Messages
2,932
Ok, now I understand! Sorry, I’m a bit slow sometimes 😂! Not using it to do any alignment, just to make sure you’re not so far off that you couldn’t hit it with a hand grenade.

Right you got to get it in the ballpark before the actual tool will even go in and work.
 

MC_What have I done?!

Petty Officer 2nd Class
Joined
Jun 8, 2019
Messages
101
Didn’t make as much progress tonight as I had hoped for, but I wanted to ask your opinions on this.

I bought 50” wide 1708 from one supplier and 10” 1708 from another but they look totally different. Not to mention the 10” 1708 wets out much easier & nicer than the 50” and the 50” seems much thicker, both are supposed to be 1708 -45/45, and I can see the -45/45 17 oz and the csm on the back sides. I got them both for good prices so I’m not really complaining but I am curious why they are so different.
 

Attachments

  • photo317420.jpg
    photo317420.jpg
    1.7 MB · Views: 2

MC_What have I done?!

Petty Officer 2nd Class
Joined
Jun 8, 2019
Messages
101
Decided I needed more floor support on the back deck where everyone congregates and steps in from swimming, so I cut and glued them to the Hull last night, along with 2 x 3/4 ply laminated together for solid floor in the bow for the ski locker. I will get that all glassed in tonight along with attaching the cleats.

Been slow progress this week but this boat is going to be solid, and it will be such a relief not having to worry about it’s structural integrity especially once I find a bigger motor!
 

Attachments

  • photo317572.jpg
    photo317572.jpg
    1.1 MB · Views: 5

MC_What have I done?!

Petty Officer 2nd Class
Joined
Jun 8, 2019
Messages
101
It’s been a couple weeks since the last update, had to do some travel for work so I hadn’t made much progress. I took this week off of work hoping to make a final push to finish her up enough to get back on the water this year.

Installing the decking in about 30 minutes after I'm done eating and will cut and glass the bottom for the front tonight.
 

Attachments

  • photo318700.jpg
    photo318700.jpg
    1.4 MB · Views: 5
  • photo318701.jpg
    photo318701.jpg
    1.2 MB · Views: 4

MC_What have I done?!

Petty Officer 2nd Class
Joined
Jun 8, 2019
Messages
101
Rear floor glued (PB’d) and screwed, the rest of the floor is cut and pretty dang close. Have a couple trims to make in the morning, then get the backside glassed and installed.
 

Attachments

  • photo318759.jpg
    photo318759.jpg
    1.1 MB · Views: 4

MC_What have I done?!

Petty Officer 2nd Class
Joined
Jun 8, 2019
Messages
101
Deck is installed, filets done, fuel bay has the first coat of gel coat down.

Tomorrow is 1708 tabbing on the deck, foam, fuel tank install, and glass the deck. If things go great then I’ll even try to get the first coat of gel coat down on the deck!
 

Attachments

  • photo318879.jpg
    photo318879.jpg
    891 KB · Views: 4
  • photo318880.jpg
    photo318880.jpg
    1,021.7 KB · Views: 4

MC_What have I done?!

Petty Officer 2nd Class
Joined
Jun 8, 2019
Messages
101
Looks good from here! :thumb:
CSM is even worse... I just finished off my 16th gallon. :rolleyes:

My 3rd 5 gallon bucket just arrived yesterday... 😭😭😭 I estimated everything, dare I say, perfectly... except the resin, the charts out there on how much resin it takes to wet out fiberglass materials are full of 💩💩, they are not even close to realistic.
 

MC_What have I done?!

Petty Officer 2nd Class
Joined
Jun 8, 2019
Messages
101
Guys, I know this might be a serious noob question but I need help.

What do do I need to buy for reinstalling the motor and outboard, I still don’t know the names for all the different sections of it but I do know that my Gimble bearing is ok, so I don’t need that but I’m not sure what other seals/gaskets I need besides the obvious seal that goes around the transom keyhole.

Links would be amazing if anyone has the time.

My I/O is a mercruiser 3.0 Alpha One Gen 2 model.
 

chevymaher

Commander
Joined
Mar 29, 2017
Messages
2,932
2 lower through bolts seal those good mine leaked. GM 4200 solved that. Change the boots for the exhaust and driveshaft. My kit with the boots came with a gimbel bearing.

I would check the shifter boot real good to. I changed the whole shifter cable.

The foam ring on the outside for the gimble housing. And the gasket for the outdrive to bell housing.

Replace the flapper in the exhaust. It is cheap and it is easier when it is apart.
 

MC_What have I done?!

Petty Officer 2nd Class
Joined
Jun 8, 2019
Messages
101
2 lower through bolts seal those good mine leaked. GM 4200 solved that. Change the boots for the exhaust and driveshaft. My kit with the boots came with a gimbel bearing.

I would check the shifter boot real good to. I changed the whole shifter cable.

The foam ring on the outside for the gimble housing. And the gasket for the outdrive to bell housing.

Replace the flapper in the exhaust. It is cheap and it is easier when it is apart.

This is perfect info! Thank you very much!
 

MC_What have I done?!

Petty Officer 2nd Class
Joined
Jun 8, 2019
Messages
101
I don’t have a picture to show right now, and if work didn’t have me traveling I could have this dang boat done but it is what it is. Foaming is done, plugs put back in with PB, and the front half of the deck fiberglassed with 2 layers of CSM.

Gelcoat Issue:
I put a final layer of gelcoat with surfacing wax on the fuel bay but something went wrong, it never fully cured, I put a little personal space heater down in the bay and covered the area so the heat could flow across the gelcoat and that helped a big portion harden up but still had some spots that gelcoat came off on my finger.

Trial:
I wiped the entire area down with acetone, and instead of rolling it on this time, I am going to spray it on. I mixed 8 oz of gelcoat with 1/4 oz surfacing wax and 1/8 oz MEKP. That’s double the catalyst called for for clear gelcoat and it says that colored can take up to double the amount.

I have heat lamps and the heater on it now since the temp is dropping quick but if this doesn’t kick I’m going to try different catalyst even though this is brand new from US Composites.
 

MC_What have I done?!

Petty Officer 2nd Class
Joined
Jun 8, 2019
Messages
101
Hey guys, I know it has been a long time since the last update so here we go!

I was on the road for work for about 3 months straight just after my last post so the boat rebuild pretty much came to a complete halt, by the time I was able to start working on it again it was winter and to cold for any fiberglass or gelcoat work.

The last 3 weeks it has finally been warm enough to get back at it and for this being my first boat and rebuild, I gotta say that I am very happy with my progress and where its at now. So here is a shortened list of what's been done.


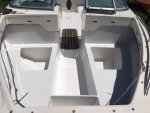
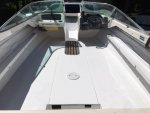
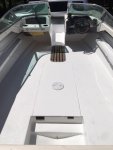
Deck glassing done with 2 layers of CSM
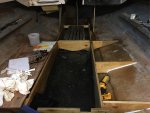
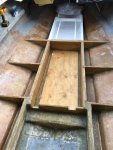
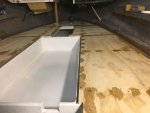
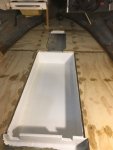
Front Bow seats and console boxes built and glassed to the haul and floor
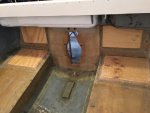
Sacrificial mounts made and glassed onto transom and floor ( for mounting Batteries, trim pump, blower, etc...)
EVERYTHING sanded with 5" DA to knock down any high spots and rough edges
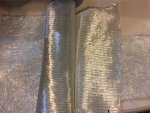
2 layers of gelcoat rolled/brushed on from top lid down
Final layer of gelcoat mixed 50/50 with Duratec Hi-Gloss Additive sprayed over entire boat

Side Note: I questioned if the Duratec was worth the +$125/gallon price tag, I will never think twice about buying it again! The stuff is amazing and after less than 24 the stuff makes gelcoat sand out like automotive paint.

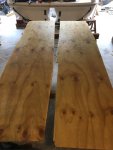
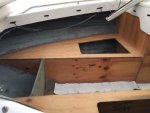
Side interior panels were rotted so to get on the water soon, I scabbed in new ACX coated in poly and stapled the vinyl back. ( Next project will be to completely rebuild and polyester the boat interior.

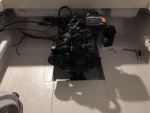
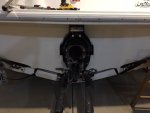
Transom Plate and Gimbal Housing installed
Motor serviced (oil changed and flushed, new plugs, carb rebuilt)
Motor installed, wiring and cabling connected
Fuel Tank installed
Engine Aligned.... (I am only 85%-90% confident on this and don't have any marina shops close to me to confirm my alignment, first boat, first alignment so I don't have anything to compare against)

Next is the Outdrive install and lots of little things left to do like cable/wire management, run new speaker wire, interior around motor install, Rear seat boxes to be made, etc....

BUT.......

I got to hear the old girl purr last night just for a few seconds to make sure I had everything wired up correctly!! Splash is imminent and hopefully this Sunday or Monday! It will be a validation splash to make sure everything is working how it should, like not sinking to the bottom of the lake ;) and then finish all the little stuff since we have already booked a trip and taking the boat to Dale Hallow Lake for the week of the 4th of July!


Hear are some photo's but don't have any from the last week, so I'll share those on the next post.
 

Attachments

  • photo332342.jpg
    photo332342.jpg
    36.1 KB · Views: 5
  • photo332343.jpg
    photo332343.jpg
    32.3 KB · Views: 4
  • photo332344.jpg
    photo332344.jpg
    26.9 KB · Views: 5
  • photo332345.jpg
    photo332345.jpg
    32.5 KB · Views: 5
  • photo332346.jpg
    photo332346.jpg
    33.9 KB · Views: 5
  • photo332347.jpg
    photo332347.jpg
    29.6 KB · Views: 5
  • photo332348.jpg
    photo332348.jpg
    28.5 KB · Views: 5

havoc_squad

Senior Chief Petty Officer
Joined
Mar 5, 2011
Messages
739
Engine Aligned.... (I am only 85%-90% confident on this and don't have any marina shops close to me to confirm my alignment, first boat, first alignment so I don't have anything to compare against)

Friscoboater did do a good alignment versus bad alignment video on Youtube for his larger complete restoration video series.

Use the search feature on the iBoats mercruiser to see if your questions can be answered that way, and if not post a topic in that forum section.
 

MC_What have I done?!

Petty Officer 2nd Class
Joined
Jun 8, 2019
Messages
101
Friscoboater did do a good alignment versus bad alignment video on Youtube for his larger complete restoration video series.

Use the search feature on the iBoats mercruiser to see if your questions can be answered that way, and if not post a topic in that forum section.

I honestly would have probably tried putting it together as it was but your comment made me try again. I can tell you that I was WAY off the first time, the tips from the other threads who could only get the splines half way on the alignment tool is what really helped me.

Took a couple hours but I finally got the alignment tool to slide in like cutting room temp butter, it took many trips in and out of the boat for 1/2 and finally 1/4 turns of the mount. Best part is the outdrive shaft slide in perfectly!

So now the Outdrive is all bolted together, trim cylinders attached, and all new magnesium anodes installed.

New Perko vented fill cap installed
Trim Pump installed and flushed

While moving the outdrive around I did find out that I have a power steering fluid leak somewhere that I need to track down though.
 

MC_What have I done?!

Petty Officer 2nd Class
Joined
Jun 8, 2019
Messages
101
So everything is going back together great, but I have 2 plastic pieces in my bucket that I don’t have any pictures of and can’t remember what they are for. Can’t see them in the picture but the green one has the number 2 molded inside and the black has 3.

Picture attached, any ideas what they are for?
 

Attachments

  • photo332460.jpg
    photo332460.jpg
    332.5 KB · Views: 0

MC_What have I done?!

Petty Officer 2nd Class
Joined
Jun 8, 2019
Messages
101
No ideas? Really wondering if these just made it into my parts buckets from something else since I can’t find a home for them anywhere.
 
Top