1993 Chaparral Gemini 190: Chronicles of a New Boat Owner (Deck Rebuild) [SPLASHED June 2018]

bpounds1991

Petty Officer 1st Class
Joined
Nov 3, 2017
Messages
321
The added strength with the lower chance of stress cracking was what enticed me to even revisit the idea. That ontop of VE being a better waterproofer than poly, but still not as good as epoxy. BUT seeing as this project is only happening because I refused to wait and purchase a more expensive/newer boat against my wife?s wishes and still got burned, I?ve got to always err on the side of budget.
 
Last edited:

kcassells

Fleet Admiral
Joined
Oct 16, 2012
Messages
8,738
It becomes a personal choice. Poly has been used since the beginning of glass boats and has perfromed well, then came VE...Thay all work and do a fine job. Me personally I use EEEPPPoooxxxyy from the start and will stick to it. No smells, easy to work with {for me** and yup expensive. Cost has at times slowed down my rehab. The biggest problems that we end up fixin are actually a result of the mfg going into mass production.
But I got a good pc. of mind with EEEPPPooooxxxyy also and to me that matters.
Looks like you have a busy weekend, hope all goes well. On another note any progress os good. Timelines seem to fade away as you work on the boat so anticipate some slow and some fast.
 

bpounds1991

Petty Officer 1st Class
Joined
Nov 3, 2017
Messages
321
You're absolutely right. The timeline has more so turned into a goal sheet of things I plan to get done before moving on to the next section, no skimping allowed lol. The weather went from supposedly being sunny all day tomorrow to rain with a chance of snow up until 10:00am. Hoping it won't hinder too much work, I just HATE the cold and it's supposed to be a high of 45 later in the afternoon. I unscrewed the rub rail cap and started taking it off yesterday to see what was under, it's all pop rivets no screws. I've got 3 batteries charged up ready to go for tomorrow and after the O/B comes off we'll just get to drilling.
 

Timr71

Petty Officer 1st Class
Joined
Jul 19, 2012
Messages
326
bpounds - it has snowed pretty much constantly all day over here in Birmingham, and Georgia seems to get our weather just 4 - 8 hrs later. So, I'm not sure if they'll adjust the forecast for tomorrow, but this little "snow event" started about 5:30am this morning and it's still coming down at 2:30pm. Good luck dealing with the weather tomorrow. Can't wait to see pics of the cap off.
 

bpounds1991

Petty Officer 1st Class
Joined
Nov 3, 2017
Messages
321
Thanks Timr71, forecast is still showing for about a 50% chance of rain here after 5 AM, luckily no freezing though. I'm going to try and take a good bit of pictures, I've also got to get up early to measure how many cement blocks i'll need and pick up a couple of 4x4's.
 

bpounds1991

Petty Officer 1st Class
Joined
Nov 3, 2017
Messages
321
WOW. I am wiped. Worked from 10 this morning until 9:30 tonight, got a decent amount of pictures in so I?ll try and post those once I get home from grabbing some food. I haven?t drank, ate, or used the bathroom all day and I am just completely drained lol. I?ll also go through everything I did as well. Stay tuned.
 

bpounds1991

Petty Officer 1st Class
Joined
Nov 3, 2017
Messages
321
No Title

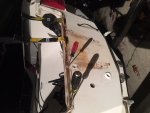
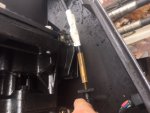
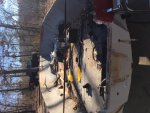
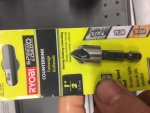
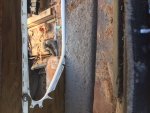
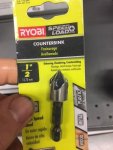
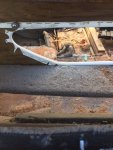
Now that I've actually eaten I'll give a better update. I went out this morning and picked up 32 cinder blocks and 2 4x4's to lay the top cap off when finished. Once I got home around 8:30 the snow had let up (it wasn't very bad to begin with) so I decided to start tackling the rivets. After 15 or so my black oxide bit was toast, and let me tell you guys....countersinks are the answer to rivet problems. I hadn't heard a think about them yet but I picked up a 1/2" bit for 8$ and it chewed through 30 rivets in about 5 minutes, then just popped them through with a punch.

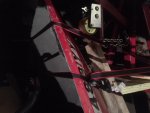
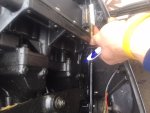
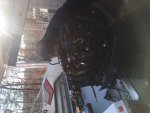
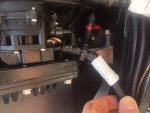
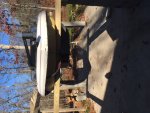
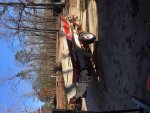
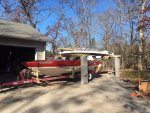
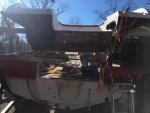
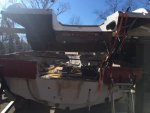
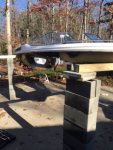
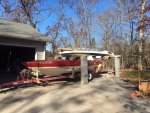
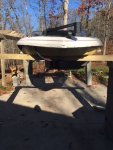
The O/B removal was actually a lot easier than expected. It only took us a couple hours to get all the connections named, removed, and then get the actual motor off. The only problem we ran into was that the hydraulic tilt on the low end couldn't be engaged due to it touching the driveway, so that made getting it onto the stand just a little bit tricky. We got most 80% of the boat separated by 3:30 but ran into problems around the transom. I actually crammed myself down into the ski locker for about 30 minutes to chisel away whatever material was used to "glue" the top cap into the transom. Hours went by and we just could NOT budge this thing, I mean the top cap was flexing all sorts of horrible but it just wouldn't come off. After that I hopped back in the ski locker and could finally see what the problem was, the damn copper pieces that seal the drains above the water line in the transom area were the only 2 pieces keeping us from pulling the entire cap up. Man we felt like idiots, and I broke one of the 4x4's at a knot after dropping it (damn the splinters) so I'll need to grab one of those before tomorrow. Two connections need to come off in the morning then my wife will assist in getting on the blocks. What. A. Day.

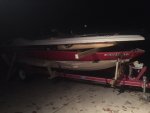
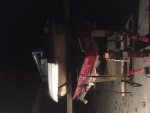
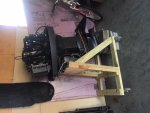
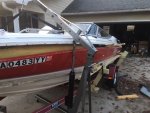
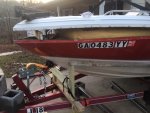
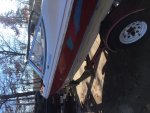
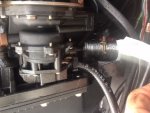
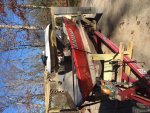
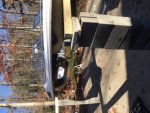
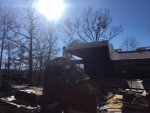
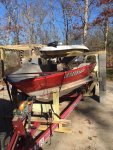
Here are some of the pictures removing motor parts, pulling the rivets, then cap, and what I had in mind for the front with ratchet straps finally coming to life.
 

Attachments

  • photo281958.JPG
    photo281958.JPG
    67.9 KB · Views: 2
  • photo281959.JPG
    photo281959.JPG
    92.2 KB · Views: 2
  • photo281960.JPG
    photo281960.JPG
    77.3 KB · Views: 2
  • photo281961.JPG
    photo281961.JPG
    85 KB · Views: 2
  • photo281962.JPG
    photo281962.JPG
    95.1 KB · Views: 2
  • photo281963.JPG
    photo281963.JPG
    118.7 KB · Views: 2
  • photo281964.JPG
    photo281964.JPG
    119.5 KB · Views: 2
  • photo281965.JPG
    photo281965.JPG
    129.1 KB · Views: 2
  • photo281966.JPG
    photo281966.JPG
    101.9 KB · Views: 2
  • photo281967.JPG
    photo281967.JPG
    95.6 KB · Views: 2
  • photo281968.JPG
    photo281968.JPG
    103.9 KB · Views: 2
  • photo281969.JPG
    photo281969.JPG
    103.6 KB · Views: 2
  • photo281970.JPG
    photo281970.JPG
    109.1 KB · Views: 2

bpounds1991

Petty Officer 1st Class
Joined
Nov 3, 2017
Messages
321
Another 4 hours today, my wife?s help, her almost having a heart attack, and the boat is separated. Pictures to come
 

kcassells

Fleet Admiral
Joined
Oct 16, 2012
Messages
8,738
Another 4 hours today, my wife’s help, her almost having a heart attack, and the boat is separated. Pictures to come


Well that being said with the wife help and all.... You are going to have to buy her a nice boat related thingy.
A rod and reel, crab traps, skis, bumper gaurds, anchor, etc... :joyous:
 

bpounds1991

Petty Officer 1st Class
Joined
Nov 3, 2017
Messages
321
No Title

Some more pictures of the deconstruction, as well as that holy countersink that saved me 2 hours of rivet removal.
 

Attachments

  • photo282019.JPG
    photo282019.JPG
    186.5 KB · Views: 2
  • photo282020.JPG
    photo282020.JPG
    120.6 KB · Views: 2
  • photo282021.JPG
    photo282021.JPG
    118.6 KB · Views: 2
  • photo282022.JPG
    photo282022.JPG
    141.8 KB · Views: 2
  • photo282023.JPG
    photo282023.JPG
    141.8 KB · Views: 2
  • photo282024.JPG
    photo282024.JPG
    96.8 KB · Views: 2
  • photo282025.JPG
    photo282025.JPG
    157 KB · Views: 2
  • photo282026.JPG
    photo282026.JPG
    177.9 KB · Views: 2
  • photo282027.JPG
    photo282027.JPG
    96.6 KB · Views: 2
  • photo282028.JPG
    photo282028.JPG
    132.2 KB · Views: 2

bpounds1991

Petty Officer 1st Class
Joined
Nov 3, 2017
Messages
321
I'm really confused on the pictures. They're taken without the phone sideways, show up on the computer normal, but go sideways on here no matter what size I upload as.
 

bpounds1991

Petty Officer 1st Class
Joined
Nov 3, 2017
Messages
321
No Title

Worked like a charm oldrem. I uploaded a picture looking into the side of the boat down (should be the second picture). To show how weird the installation of these side panels are. There's a small piece of what looks to be a 2x2 piece that each panel screws into, and that's the only thing holding them up on the sides. Found that among other things to be quite a head scratcher, such as most of the bow storage compartment panels not even being attached to anything at all.
 

Attachments

  • photo282068.jpg
    photo282068.jpg
    46.6 KB · Views: 1
  • photo282069.jpg
    photo282069.jpg
    61.6 KB · Views: 1
  • photo282070.jpg
    photo282070.jpg
    45.4 KB · Views: 1
  • photo282071.jpg
    photo282071.jpg
    59.5 KB · Views: 2
  • photo282072.jpg
    photo282072.jpg
    89.7 KB · Views: 2
  • photo282073.jpg
    photo282073.jpg
    85.3 KB · Views: 2
  • photo282074.jpg
    photo282074.jpg
    67 KB · Views: 2
  • photo282075.jpg
    photo282075.jpg
    67.5 KB · Views: 2
Top