1999 Celebrity 190 - Engine Mount and Stringer Repair

bvetter

Petty Officer 1st Class
Joined
Jun 2, 2013
Messages
263
Re: 1999 Celebrity 190 - Engine Mount and Stringer Repair

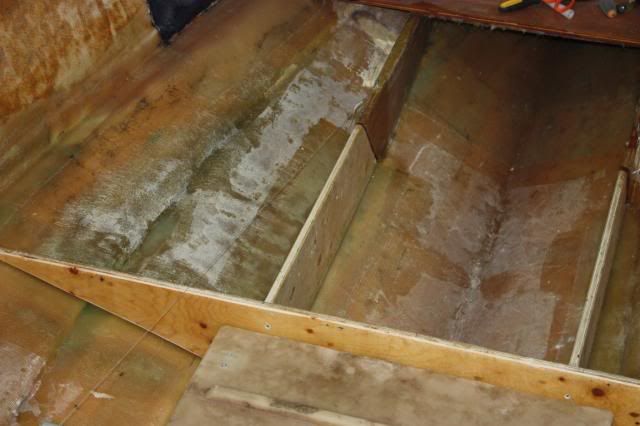
Well, I laid my first bit of glass today. Hooray! Not a whole lot, just enough to get a feel for it and stink up the house.......

Since my last post, I more or less just cleaned things up a bit inside the hull, wiped everything down with acetone. I mixed up a batch of PB and filled in the low spots from grinding, as well as my "oops" which put a small hole through the hull a few weeks ago.

On Saturday, I built some racks for holding the rolls of CSM and 1708, and more or less got set up for the rebuild.

Today, I laid a bit of 1708 in the forward compartment of the ski locker, and some 8" strips along the outer edges of the hull where the deck used to be tabbed in. My plan is to strengthen up the areas where the stringers and bulkheads originally were located (some low spots from grinding have me worried). I'm hoping to get some plywood cut this week and bedded into place. It's a long weekend next weekend, so if I can get a bulkhead and a couple of stringers bedded in place with PL Wed/Thu it should be cured by Sunday and ready for glass. I learn't today that foam rollers do not work well. I also tried using a lint free (what seems to be cotton) roller instead, it held up much better.

On that note, I was at Home Depot today looking at the Lepage PL Premium, I noticed it says it's water resistant (as opposed to waterproof - not recommended for continuous submersion). Figured this wouldn't be an issue but wanted to ask the people in iboater-land and make sure this was the standard PL Premium that everyone seems to be using for bedding before I buy it.

I will post some more pics this week, promise.
 

Woodonglass

Supreme Mariner
Joined
Dec 29, 2009
Messages
25,929
Re: 1999 Celebrity 190 - Engine Mount and Stringer Repair

Yep it's the stuff, and Hopefully your stringers won't be constantly immersed in water!!!:eek: I'd still recommend bedding your stringers in PB and NOT in PL! Your boat your Choice!!!
 

bvetter

Petty Officer 1st Class
Joined
Jun 2, 2013
Messages
263
Re: 1999 Celebrity 190 - Engine Mount and Stringer Repair

Here come some updates, as promised.

Last weekend set up racks for the CSM/1708.


Then started laying 8" strips of 1708 where the original bulkheads and stringers were. I ended up layering small strips of CSM first in a few of the areas which needed building up.


Here we go on the bulkheads, this is what we started with.....


Mark the cutlines.....


First rough cut.....


bvetter

Petty Officer 1st Class
Joined
Jun 2, 2013
Messages
263
Re: 1999 Celebrity 190 - Engine Mount and Stringer Repair

Second cut, this will be the rear bulkhead.....


Best part about a good project, is a good excuse to buy new tools....


Cut out an arc at the base of the bulkhead for water flow....


Closeup picture. I used a 1/4" rounded bit on my router to put a profile on all the edges. Figured it might help with wrapping, we'll see....


Picture of both bulkheads, with first coat of resin, then a layer of CSM on both sides (not wrapped around just yet)...


bvetter

Petty Officer 1st Class
Joined
Jun 2, 2013
Messages
263
Re: 1999 Celebrity 190 - Engine Mount and Stringer Repair

Test fitting the bulkheads and partial stringer pieces...


I've got a few ideas on making the joints, but that comes later on after they are bedded in.


bvetter

Petty Officer 1st Class
Joined
Jun 2, 2013
Messages
263
Re: 1999 Celebrity 190 - Engine Mount and Stringer Repair

Removed the front bulkhead and stringers (until this point they were just temporarily screwed together). Set up on a bench for assembly, wrapped what would be the base of the assembly with a 3" strip of 1708 to seal up. Then layed strips of CSM where the butt joint between the bulkhead and stringers would be, screwed them back together to sandwich the CSM and seal the butt joint. Keep in mind this "assembly" is flipped upside down from how it will be when installed.


Pictures of the 1708 wrap.


That's it for tonight. Tomorrow is a day off, hoping to get everything bedded in and ready for wrapping. Once the two bulkheads are in place, will then cut out the stringers which would go along side the fuel tank.

Later gents....
 

tpenfield

Moderator
Staff member
Joined
Jul 18, 2011
Messages
18,140
Re: 1999 Celebrity 190 - Engine Mount and Stringer Repair

Nice pics and looks like you are doing a very detailed job :thumb:

I might have missed it in your write-up, but are you considering a plywood 'mending joint' where the new stringers meet the originals?

IMG_9963_zps114aa681.jpg
 

glnbnz

Chief Petty Officer
Joined
Oct 4, 2011
Messages
458
Re: 1999 Celebrity 190 - Engine Mount and Stringer Repair

Yes very nice work!!
 

bvetter

Petty Officer 1st Class
Joined
Jun 2, 2013
Messages
263
Re: 1999 Celebrity 190 - Engine Mount and Stringer Repair

Nice pics and looks like you are doing a very detailed job :thumb:

I might have missed it in your write-up, but are you considering a plywood 'mending joint' where the new stringers meet the originals?

IMG_9963_zps114aa681.jpg

I was thinking of using another piece of ply on the outside of each stringer to mate the old and new together. I would prefer not to go on the inside as this is where the ski locker is. For each piece, I would lay maybe 1 or 2 layers of CSM over the area where the supplementary ply would go, then clamp the ply in place (the wetted out CSM being the glue). My question, just clamp the ply in place, or use stainless screws to fasten the ply running across the joint? All of the edges would be filled with PB afterward, then wrapped in two layers of 1708 when I wrap the stringers. Overkill or not enough?
 

jbcurt00

Moderator
Staff member
Joined
Oct 25, 2011
Messages
25,111
Re: 1999 Celebrity 190 - Engine Mount and Stringer Repair

Wet the mating surface of the sister'd plywood before you clamp it over the seam in the stringer & let it get tacky before sticking it to the Resin soaked & CSM covered stringer. If you think you can get better, more even 'clamping' coverage using screws, clamp it together 1st & run the screws too. Leave it all until the resin kicks.

You are pre-wetting all the plywood 1st as you wrap/cover them w/ glass, correct?
 

bvetter

Petty Officer 1st Class
Joined
Jun 2, 2013
Messages
263
Re: 1999 Celebrity 190 - Engine Mount and Stringer Repair

I am using unwaxed resin. After it's set up and left overnight (say on a layup), it isn't really tacky. I can touch it quickly and it doesn't feel sticky, if I hold my hand on an area or rest my knee on a previously glassed area, it does feel a little tacky, almost like the heat from contacting an area for a little bit softens it and makes it tacky. So my question, is it necessary to wipe down previously glassed areas (say within a week of being laid) with acetone before overlaying it with fresh material? Or say, if I wet down the plywood with resin and let it set overnight, should I be wiping down with acetone the next day just before laying CSM/1708? I'm not worried about it being dusty or dirty or anything, just wondering if it's necessary to make it tacky again before adding layers.
 

slow joe

Seaman
Joined
Oct 23, 2013
Messages
60
Re: 1999 Celebrity 190 - Engine Mount and Stringer Repair

Wow, very nice work! :eagerness:
 

tpenfield

Moderator
Staff member
Joined
Jul 18, 2011
Messages
18,140
Re: 1999 Celebrity 190 - Engine Mount and Stringer Repair

Yea, I used screws when I mended the stringers on my 242. I put a piece of wetted CSM between the stringer and the mend pieces to provide better adhesion of the pieces . . . You can see the 6 SS screws in the pic below.

I put a mending piece on both sides of the joint, but I think you should be OK with a single-sided mend.

IMG_0441.jpg
 

bvetter

Petty Officer 1st Class
Joined
Jun 2, 2013
Messages
263
Re: 1999 Celebrity 190 - Engine Mount and Stringer Repair

Last night I stayed up late to bed in the bulkheads. I learn't that you can add TOO much chopped strand to the mix. My first batch was almost impossible to work with, but I got progressively better at mixing it, I started using less chopped strand, and more cabosil. My spreading technique was awful, so I ended up putting down a second fillet layer this morning to help "round" things out a little. I was using a pie server because it has a nice radius on the end (maybe a 3/8"-1/2" radius), I tried using a plastic serving spoon, but it I preferred the pie server. I think I may still have to quickly go over the fillets with the grinder to smooth things out before tabbing.


Still need to finish the stringer mating. Even without any tabbing, these bulkheads seem rock solid.
 

bvetter

Petty Officer 1st Class
Joined
Jun 2, 2013
Messages
263
Re: 1999 Celebrity 190 - Engine Mount and Stringer Repair

Yea, I used screws when I mended the stringers on my 242. I put a piece of wetted CSM between the stringer and the mend pieces to provide better adhesion of the pieces . . . You can see the 6 SS screws in the pic below.

I put a mending piece on both sides of the joint, but I think you should be OK with a single-sided mend.

IMG_0441.jpg

Thanks for the pic tpenfield.
 

Woodonglass

Supreme Mariner
Joined
Dec 29, 2009
Messages
25,929
Re: 1999 Celebrity 190 - Engine Mount and Stringer Repair

My personal ration is about 1/4 cup of chopped fibers per quart of resin. Cabosil is about 1.5 quarts per quart of resin.
 

bvetter

Petty Officer 1st Class
Joined
Jun 2, 2013
Messages
263
Re: 1999 Celebrity 190 - Engine Mount and Stringer Repair

My personal ration is about 1/4 cup of chopped fibers per quart of resin. Cabosil is about 1.5 quarts per quart of resin.

I think in the end I was using about the same qty of chopped fibers as you've suggested. But I could probably use more cabosil. Thanks Wood.
 

Woodonglass

Supreme Mariner
Joined
Dec 29, 2009
Messages
25,929
Re: 1999 Celebrity 190 - Engine Mount and Stringer Repair

I like it a little thicker than Mayonaise but not quite as thick as creamy peanut butter. Oh man, now I made myself hungry!!!!
 

glnbnz

Chief Petty Officer
Joined
Oct 4, 2011
Messages
458
Re: 1999 Celebrity 190 - Engine Mount and Stringer Repair

I am using unwaxed resin. After it's set up and left overnight (say on a layup), it isn't really tacky. I can touch it quickly and it doesn't feel sticky, if I hold my hand on an area or rest my knee on a previously glassed area, it does feel a little tacky, almost like the heat from contacting an area for a little bit softens it and makes it tacky. So my question, is it necessary to wipe down previously glassed areas (say within a week of being laid) with acetone before overlaying it with fresh material? Or say, if I wet down the plywood with resin and let it set overnight, should I be wiping down with acetone the next day just before laying CSM/1708? I'm not worried about it being dusty or dirty or anything, just wondering if it's necessary to make it tacky again before adding layers.

I see that you had a question here that never really got answered and its a good question...when you are glassing what are the time limits and prep work between coats?

I always hit the area being glassed with acetone if I had left my work overnight. I didn't necessarily between same day layups but someone else may have an opinion on that. It is just what I did. Hope this helps.
 
Top