1999 Celebrity 190 - Engine Mount and Stringer Repair

tpenfield

Moderator
Staff member
Joined
Jul 18, 2011
Messages
18,142
Re: 1999 Celebrity 190 - Engine Mount and Stringer Repair

BV- Your work is very clean. (I feel like I am the opposite . . . sort of messy :) ) You should have excellent results and enjoy the boat. I might have missed it, but do you have a target date when you be on the water with the boat?
 

SWD

Petty Officer 1st Class
Joined
Mar 1, 2011
Messages
284
Re: 1999 Celebrity 190 - Engine Mount and Stringer Repair

Great job sir. Oh...by the way....we are done with all the snow here....grass is green and its 20c! Sending it your way...LOL!
 

bvetter

Petty Officer 1st Class
Joined
Jun 2, 2013
Messages
263
Re: 1999 Celebrity 190 - Engine Mount and Stringer Repair

BV- Your work is very clean. (I feel like I am the opposite . . . sort of messy :) ) You should have excellent results and enjoy the boat. I might have missed it, but do you have a target date when you be on the water with the boat?

Thanks TP! I had always planned on trying to be finished mid May. But that schedule is slipping so, beginning of June I'm hoping. I'm in no rush, the lakes around here likely still have 2+ of ice on them, that and still have a busy household. So June is about as good as I can expect. Lets hope for the best!

Great job sir. Oh...by the way....we are done with all the snow here....grass is green and its 20c! Sending it your way...LOL!

Thanks! And yesterday it was nice here to, just above 20C as well. But it's supposed to be single digits and rainy for the next week. Bummer.
 

bvetter

Petty Officer 1st Class
Joined
Jun 2, 2013
Messages
263
Re: 1999 Celebrity 190 - Engine Mount and Stringer Repair

Got a little bit of work done over the last few days, been chipping away in the few spare hours I have. The deck is fully installed now. I knew there was going to be some voids between the deck and the pour-in-foam, especially around the very perimeter of the deck, so I drilled a series of 1/4" holes and injected some Great Stuff to fill the voids. This is what it looked like afterwards, I'd say she's pretty much full.


Knocked everything off with a sharp drywall trowel, cleaned up real nice. Little bit of residue here and there, but I have to sand the entire surface down anyway before glassing in.


Also got a good start on applying the final layer of CSM to the transom and bilge. The transom is complete, the bilge is around 90% covered. I'm very happy with the results, I shouldn't have to do much surface prep (ie: grinding) before doing the gelcoat. Unfortunately, all that PB I used for putting the deck down and filleting the edges ran me dry of resin, so I had to order another 5 gallons today.


bvetter

Petty Officer 1st Class
Joined
Jun 2, 2013
Messages
263
Re: 1999 Celebrity 190 - Engine Mount and Stringer Repair

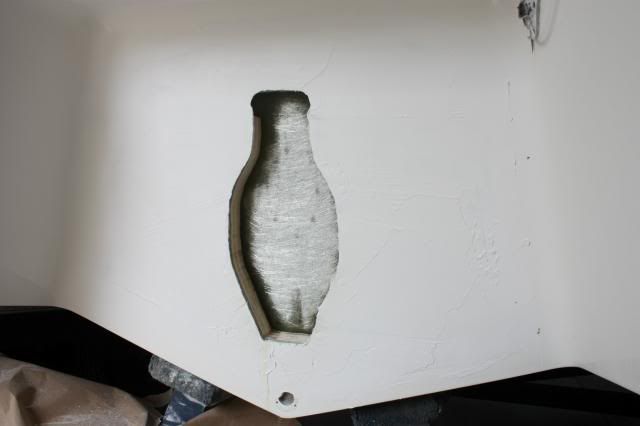
One of the other things I've been chipping away at is the transom gelcoat. A while back, I decided to grind down the outer skin because of a whole bunch of spider cracking from removing the old transom wood. So, a week ago or so I troweled on a layer of thickened gelcoat, let it cure, then sanded it down this week. Since then, I've progressively got closer and closer to a very smooth finish by adding more thickened gel, sanding, adding, sanding, etc... I'm pretty much at a point to doing the final gelcoat application. Here is a pic of the roughly applied coat before sanding.


I forgot to take a pic tonight of where it's at right now.

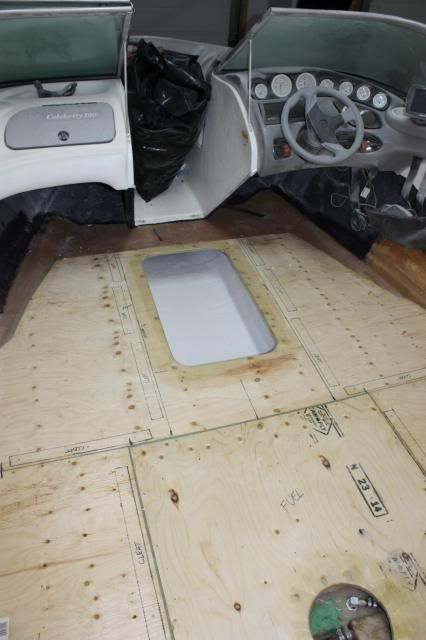
Also, the other day, I was looking at the ski locker opening, and something just didn't seem right. Long story short, when I cut the hole in the deck before the install, I cut it in the wrong spot, used the wrong edge as a reference for the location and ended up cutting the hole about 10" to far forward. :facepalm:


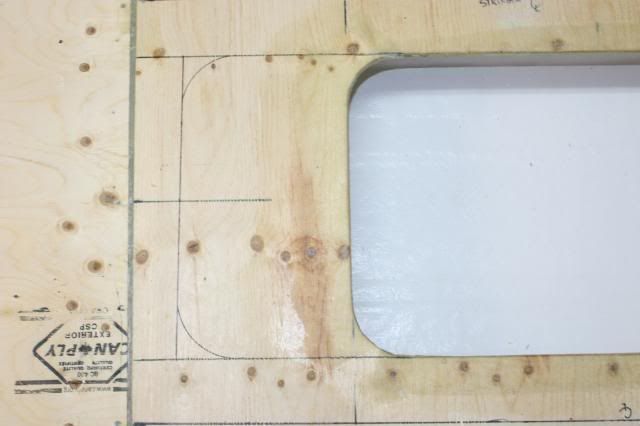
So, marked the proper location:


And cut it out:


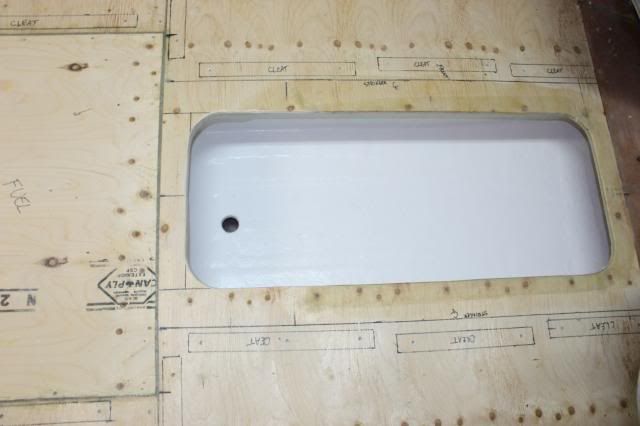
I'm making a filler piece to fill the forward end of the hatch, no pics yet.

G'night fellas.
 
Last edited:

Woodonglass

Supreme Mariner
Joined
Dec 29, 2009
Messages
25,929
Re: 1999 Celebrity 190 - Engine Mount and Stringer Repair

My compliments on some extremely nice deck work!!!
images
 

laxray

Seaman Apprentice
Joined
Jul 11, 2009
Messages
43
Re: 1999 Celebrity 190 - Engine Mount and Stringer Repair

So was your fuel tank completely sealed in when you took the floor up?

Where can you access your fuel gauge sending unit?
 

73Chrysler105

Chief Petty Officer
Joined
Sep 10, 2009
Messages
407
Re: 1999 Celebrity 190 - Engine Mount and Stringer Repair

So was your fuel tank completely sealed in when you took the floor up?

Where can you access your fuel gauge sending unit?

Notoce the round hole in the sole towards the back or in the third to last pic posted in the bottom of the pic there is his access hole I am assuming he is going to put an access panel there.

Regarding your ski locker Make the lid bigger and utilize the entire space.
 

JASinIL2006

Vice Admiral
Joined
Feb 10, 2012
Messages
5,715
Re: 1999 Celebrity 190 - Engine Mount and Stringer Repair

That is some might fine work you're doing. Really great workmanship!
 

bvetter

Petty Officer 1st Class
Joined
Jun 2, 2013
Messages
263
Re: 1999 Celebrity 190 - Engine Mount and Stringer Repair

So was your fuel tank completely sealed in when you took the floor up?

Where can you access your fuel gauge sending unit?

No, there was a roughly 3'x3' hatch that was screwed to the stringers and was removable, there was also a small round inspection hatch to access the fuel line connections and sending unit. The original design allowed for water ingress, so I eliminated that problem by sealing everything up. I will still have the round access hatch directly above the connections and sending unit for future servicing. Hopefully I won't have a reason to pull the tank in the future!

Notoce the round hole in the sole towards the back or in the third to last pic posted in the bottom of the pic there is his access hole I am assuming he is going to put an access panel there.

Regarding your ski locker Make the lid bigger and utilize the entire space.

About the access panel, you are correct sir. About the ski locker, I had thought about that, however I planned on re-using the aluminium trim piece that goes all around the hatch hole, so I'm stuck with that size. Also, with the door that far forward, it won't open up all the way, it would hit the driver side console which may be an inconvenience for trying to keep it propped open.

That is some might fine work you're doing. Really great workmanship!

Thanks!
 

laxray

Seaman Apprentice
Joined
Jul 11, 2009
Messages
43
Re: 1999 Celebrity 190 - Engine Mount and Stringer Repair

What is the trick on getting the 1708 tight over the top of the stringers?
 

bvetter

Petty Officer 1st Class
Joined
Jun 2, 2013
Messages
263
Re: 1999 Celebrity 190 - Engine Mount and Stringer Repair

What is the trick on getting the 1708 tight over the top of the stringers?

Use a router with a 1/4" rounding bit to radius the edges that will have CSM/1708 wrapped. When I wrapped the stingers, I started at the top edge, and worked my way down to the fillet using a 4" microfiber roller.
 

bvetter

Petty Officer 1st Class
Joined
Jun 2, 2013
Messages
263
Wow, it has definitely been a while since my last update! With the arrival of warm weather my priorities have shifted slightly to yard work and enjoying time outside with the family. I have indeed been chipping away at the project, but have been reluctant to try and do an update with all of the forum issues people have been experiencing, so let'™s give this a shot.

At my last progress update, I realized I had cut out the ski locker hatch too far forward. So, I began extending the hatch aft and fabricated a filler piece of the same size to fill in the forward section of the hatch.


Glued with PB and screwed in place with SS. Filled the gaps with PB.


More to come...
 
Last edited:

bvetter

Petty Officer 1st Class
Joined
Jun 2, 2013
Messages
263
Had a nice day out a while back so degreased and pressure washed the engine and outdrive. Afterward, it looks damn near brand new. Actually had people asking me if I bought a crate engine!


Apparently stainless T-Nuts are not very common in the fastener shops around here, so was able to salvage and clean up the old ones for the seat bases.


Laminated two sheets of 5/8” ply with CSM to make the seat bases. Counter sunk the bolt heads into the underside of the bases using a 1” Forstner bit.


bvetter

Petty Officer 1st Class
Joined
Jun 2, 2013
Messages
263


All of the seams in the deck were covered in a strip of 1708, tabbing to the hull and bilge was done in 1708 as well. After, everything was covered in two layers of CSM.


Kept tinkering with the outer skin on the transom. Gel, sand, gel, sand, gel, sand….. Got to a point where I was fairly happy with it, wet sanded it down and started polishing with the power polisher. Got really nice and shiny except in a few spots that needed a little more wet sanding. Still needs work…


bvetter

Petty Officer 1st Class
Joined
Jun 2, 2013
Messages
263
Seat bases installed. Used a few layers of soaked CSM to glue them in place, then screwed down.


Mounting plate for the trim pump. Tabbed with 1708, then covered in 2x CSM.


Mounting plate for the battery tray. Tabbed with 1708, then covered in 2x CSM.


Soaked the keyhole and bellhousing stud holes in resin, then did a quick layer of CSM, didn’t turn out too great but it’s better than nothing I suppose.


bvetter

Petty Officer 1st Class
Joined
Jun 2, 2013
Messages
263
This is where things got interesting, and somewhat disappointing. Before gelcoating the bilge, I decided to test fit the engine in place and do a quick/rough alignment just to see if my engine mounts were at the right height. Boy, was I ever off. Ended having to add some 1-1/4” blocks to get the engine up to the right height. Good thing I checked before gelcoating!!!

New blocks installed. Same routine, two layers of CSM to glue, screwed in place.


Tabbed/covered with 4 layers of 1708, then one layer of CSM.


bvetter

Petty Officer 1st Class
Joined
Jun 2, 2013
Messages
263
If anyone is curious, here is the weight of the 5.0L engine block. Pallet underneath is attached, so subtract 40-60 lbs to get the engine weight.


Last night, did the bilge gelcoating. Here is what it looked like before:


After:


Top