1999 Stingray 190RS Restoration

Boisebiker

Petty Officer 3rd Class
Joined
Aug 24, 2016
Messages
91
No Title

I was hoping for more response to my questions, some of my decisions are on hold until I get help/suggestions from those of you more experienced in these matters. Until then I will continue to post up my findings and what work I get done.
Last night I did some more exploratory work. I drilled a few test holes with a 2" hole saw in locations I can not see under the deck. I found clean dry foam under each test hole. I pulled up a core of foam as far as the hole saw would drill and found the foam to be dry and intact. I only drilled/tested in 3 locations, should I test more? What would be the best method for putting the plugs back in the floor? I also performed more tap testing and probing with the end of a screwdriver. So far I have not found a single soft or week spot in the floor or transom.
I also put test screws in the floor to see if I could pull the floor down to the stringer, it seemed to work. So I will purchase stainless screws, countersink the holes, glue the deck to the stringers in the ski locker area and screw the deck down. I was planning to use 3M 5200 for the glue, is this the best choice?
We are still on the fence over the gelcoat vs carpet. Carpet will cost around $300 for decent marine carpet and glue. Gelcoat will be around $150 for material but needs more upfront work to prep the deck. There are a lot of rough spots that need sanding or glass work in order to make the floor look good. We will still need carpet for passenger comfort. I do like the thought of washing out the boat when it needs a good cleaning.
 

Attachments

  • photo273200.JPG
    photo273200.JPG
    148.8 KB · Views: 4

Boisebiker

Petty Officer 3rd Class
Joined
Aug 24, 2016
Messages
91
While waiting for some help/opinions on epoxy vs polyester and carpet vs gelcoat I have been working on the drive. I performed a pressure test on the outdrive and it leaks. I removed it from the boat and separated the halves. It looks like the o-ring on the shift shaft housing is leaking so I ordered up a kit from Tungsten Marine, see it on the link. I received it in about 3 days. I will be replacing all seals and the water pump on the lower unit.
I also did some inspecting on the engine block I bought. I had asked the person I bought it from is the boat had been swamped, he said no. As it turns out the engine had about 3 gallons of water in it. This is after it sat in Tahoe for over a year on the trailer where a tree fell on it. I started pulling the motor apart. Exhaust manifolds came off, I will inspect them and plan to replace the single piece manifolds on the Stingray with them. Intake manifold came off to inspect cam. Everything on the top of the motor looks great, cam and valve train. The oil pan was next. All of the oil that was sitting on top of the water is now coating all of the bottom end of the block, what a mess. After removing the spark plug and draining the water out of the cylinders I was able to get the motor to turn over. I put the oil pan back on and put a gallon of used oil in the engine to push all the water out of the oil passages and bearings. I still have to get the engine oil system primed and cleared. Then I will work on cleaning up the rest of the engine so I can test the block for cracking and check compression on cylinders.
I ordered a few color samples from a vinyl vendor so we can decide on colors. We are leaning on using the same layout, so we can use existing as patterns, but go with Boise State colors in the accent areas. This will require me to repaint the teal blue strip on the exterior of the hull to match the blue vinyl we use on the interior. Once we get vinyl ordered I will start making new backers and seat bases to begin the recovering process.
 
Last edited:

Boisebiker

Petty Officer 3rd Class
Joined
Aug 24, 2016
Messages
91
No Title

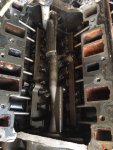
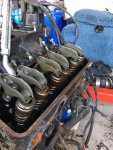
Wanted to add a couple shots of the engine internals, this is the spare engine I bought. Also the set of sample vinyl pieces, colors are just not quite right for BSU.

Also last night I removed the exhaust manifolds for the spare engine, cleaned them up, tested lowers for leaks and even mounted one side in the boat to make sure they fit. It is going to work and I moved over the correct oil dip stick tube.
 

Attachments

  • photo273685.JPG
    photo273685.JPG
    151.7 KB · Views: 1
  • photo273686.JPG
    photo273686.JPG
    167.1 KB · Views: 1
  • photo273687.JPG
    photo273687.JPG
    77.1 KB · Views: 1

Boisebiker

Petty Officer 3rd Class
Joined
Aug 24, 2016
Messages
91
No Title

Got some more deliveries yesterday. Now I can begin the process of putting thing in/on the boat. Outdrive gets new seals and pressure test. Waiting for gaskets and hoses to finish up exhaust system. 3M 5200 will be in on Friday so I can work on the deck flooring. Still researching polyester vs epoxy and finding vendors. Leaning towards polyester. Lots of sanding on deck to get it smooth and flat, one layer of glass fabric with polyester(unwaxed) then one coat of gelcoating (unwaxed) with a final coat a waxed gelcoat. I need to put anti-slip on the first gelcoat so I am still researching that.
 

Attachments

  • photo273888.JPG
    photo273888.JPG
    126.5 KB · Views: 0

AShipShow

Lieutenant Commander
Joined
Jul 8, 2016
Messages
1,803
No offense, but those Seloc manuals aren't worth the paper their printed on... I can't recommend enough using the Merc manuals that are online.
 

Silverbullet555

Chief Petty Officer
Joined
Mar 13, 2011
Messages
621
Nice to see another Idahoan on the board.

I've never put down gel so i cant speak grom experience. I'm not a fan of glued in carpet because it holds water. Gel and resins generally absorb some water. I would right have gel and snap in carpet. Then again, I'm not doing the work.

Stingrays hulls are usually pretty quick. Hopefully you can get one good motor out of the two you have.

Good luck.
 

ondarvr

Supreme Mariner
Joined
Apr 6, 2005
Messages
11,527
You mention epoxy in the original construction, it's not epoxy, it's all polyester. The "puddled" area is putty that was troweled into place to fill the low spot, it's very weak and cracks easily.

​Like others said, check closely for rotten wood, few of these boats don't have any, and, well, I never seen one without rotten wood.
 

Baylinerchuck

Commander
Joined
Jul 29, 2016
Messages
2,731
Just found your thread today, so hopefully I can help some. I just finished my Chap restoration.

That deck looks really nice for two years in the weather. You don't need 2" holes to look for wet or rot. You can go smaller. Make sure you sample the areas close to the transom. Most people store their boats bow high so water will collect aft. Look thoroughly, for a boat that was that neglected it would be miraculous to not find rot.

Glue the pucks back in with thickened resin. I would also fill the screw countersinks with this. Poly vs. epoxy......if your doing gel, you already decided. Gel works better with polyester resin and is cheaper. Your boat was built out of polyester resin, so there's no need to spend money on epoxy IMO.

If your going to gel coat, do at least 3 coats. The last coat should have surfacing wax added with the MEKP. I started out with gelcoat only, but found out it wasn't for us. The carpet is way more comfortable and stays cleaner. The white gel was so bright in the sun. Nothing like getting sun burned from above AND below.

Good luck with her, she's a beauty.
 

Boisebiker

Petty Officer 3rd Class
Joined
Aug 24, 2016
Messages
91
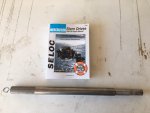
No offense, but those Seloc manuals aren't worth the paper their printed on... I can't recommend enough using the Merc manuals that are online.

I do agree there is a lot to be desired as I read through the Seloc, but it does give me the basic info that I need like torque specs and special procedures. I will continue to use the online manuals when doing research.
 
Last edited:

Boisebiker

Petty Officer 3rd Class
Joined
Aug 24, 2016
Messages
91
You mention epoxy in the original construction, it's not epoxy, it's all polyester. The "puddled" area is putty that was troweled into place to fill the low spot, it's very weak and cracks easily.

​Like others said, check closely for rotten wood, few of these boats don't have any, and, well, I never seen one without rotten wood.

I continue to look for rot but have so far been unsuccessful in my search(thank heavens). As for the puddled areas, can I sand and glass over them before doing gel coat? I plan to put 1 layer of glass fabric over the whole deck, maybe 10oz cloth.
I was planning to put on glass without wax so I could apply gel without a bunch of sanding. I know that I will need to do some sanding as I smooth out rough spots, low spots being repaired and put the plugs back in, will I need wax in each of the repair locations or will I be able to do any sanding on the un-waxed polyester?
 
Last edited:

Boisebiker

Petty Officer 3rd Class
Joined
Aug 24, 2016
Messages
91
Thanks for the replies, it is nice to know people are watching. I feel that with all of your help there is a fighting chance I won't screw this up.
Last night I had a few minutes so I decided to check the alignment since the outdrive is off. Alignment bar was very hard to push into the coupler, bar indicated spline marks on the top only. So I lowered the front engine mounts about 1 turn. Bar slid in better but still stiff. 1 more turn down and bar slid in much smoother. I went another 1/2 turn down and it still felt smooth pushing in and pulling out so I tightened the top nut.
 

bonder

Recruit
Joined
May 7, 2012
Messages
4
Good to hear there doesn't appear to be any rot. Ĺooking forward to your progress.
 

ondarvr

Supreme Mariner
Joined
Apr 6, 2005
Messages
11,527
I continue to look for rot but have so far been unsuccessful in my search(thank heavens). As for the puddled areas, can I sand and glass over them before doing gel coat? I plan to put 1 layer of glass fabric over the whole deck, maybe 10oz cloth.
I was planning to put on glass without wax so I could apply gel without a bunch of sanding. I know that I will need to do some sanding as I smooth out rough spots, low spots being repaired and put the plugs back in, will I need wax in each of the repair locations or will I be able to do any sanding on the un-waxed polyester?

​If not finding any rot holds true, buy one of those $300,000,000+ lottery tickets because you're on a streak. Although being 1999 it isn't all that old.

Don't use 10oz cloth alone, you need CSM as the first layer or it won't bond well.

​Never use resin with wax, you'll be able to sand it easily in a day or so even without wax.
 
Last edited:

Boisebiker

Petty Officer 3rd Class
Joined
Aug 24, 2016
Messages
91
​If not finding any rot holds true, buy one of those $300,000,000+ lottery tickets because your on a streak. Although being 1999 it isn't all that old.

Don't use 10oz cloth alone, you need CSM as the first layer or it won't bond well.

​Never use resin with wax, you'll be able to sand it easily in a day or so even without wax.

Isn't the final coat supposed to have wax in it to fully cure? Also can I use wax paper over a small repair to get it to fully cure?
 

ondarvr

Supreme Mariner
Joined
Apr 6, 2005
Messages
11,527
No, never use waxed resin, there is no reason to use waxed paper.
 

Boisebiker

Petty Officer 3rd Class
Joined
Aug 24, 2016
Messages
91
No, never use waxed resin, there is no reason to use waxed paper.

Very interesting, goes against everything I have read about polyester resin. Every vendor and instruction says to use surfacing wax on last coat. I have never used polyester so I am totally in the dark on this one. This will not be a speedy process so if I need time between coats I can wait.
 

ondarvr

Supreme Mariner
Joined
Apr 6, 2005
Messages
11,527
I am and have been a supplier of resin for one of the major manufactures, there are very few instances where a waxed resin is useful, virtually no builders use a waxed resin for any purpose. I can't really think of a reason to use waxed resin on the rebuild of a boat, it can complicate things though.
 

Boisebiker

Petty Officer 3rd Class
Joined
Aug 24, 2016
Messages
91
What is the cure time to be able to sand if I do not use wax in my polyester resin layup? Also still looking for a supplier for resin, maybe you could make a suggestion.
 

ondarvr

Supreme Mariner
Joined
Apr 6, 2005
Messages
11,527
What is the cure time to be able to sand if I do not use wax in my polyester resin layup?

​When it's hard and tack free, that's the only answer, every resin will be different, plus temperature and humidity can have a huge affect. But it can typically be later that day because you would rarely sand it with a fine grit paper, 36 grit would be normal. If you wanted to sand it with finer grit paper, and I don't know why it would be needed, it might be a day or so.

​You probably won't know the brand you're buying, there are no resin manufactures that sell retail, in fact most don't sell directly to the retail places that sell it to you. Retailers typically buy from a distributor, then they repackage it into smaller containers with their name on it.

​Plus every manufacturer makes and sells hundreds of different resin types, blends, styles and qualities, and retailers will switch suppliers frequently based on price.
 
Last edited:

Boisebiker

Petty Officer 3rd Class
Joined
Aug 24, 2016
Messages
91
I put the outdrive back together last night. New seals and water pump in the lower unit, minus the prop shaft seals. The Tungsten Marine kit was pretty good, only part that was off was the o-ring on the speedometer connector. It did not fit, too large. It was too late to pressure test, hope to get to that tonight.
Progress feels slow but that was to be expected. I got the gaskets and hoses for the exhaust system so that can go back on. Still need to order new exhaust manifold drain elbows, the set on the replacement exhaust were melted.
 
Top