1st restore on a 14ft ski boat

Woodonglass

Supreme Mariner
Joined
Dec 29, 2009
Messages
25,929
Re: 1st restore on a 14ft ski boat

No, its more like Liquid Nails..

PL Premium Construction Adhesive

Urethane-based. Nontoxic, nonflammable/noncombustible. Gives off no fumes and is environmentally safer than other conventional adhesives. Securely bonds and is compatible with all building materials. Bonds can be made in temperatures ranging from 0 to 400 F. Material may be repositioned up to 1 hour without losing strength. Tested 3 times stronger than conventional adhesives and provides twice as much coverage as conventional adhesives. May be used inside or outside. 10 to 12 hour cure time. Exceeds VOC compliance regulations, exceeds glued subfloor and construction code AFGl-01, FHA bulletin UM-60, ASTMC557, and ASTM3498. Workable yield of adhesive per 10.2 oz. cartridge is 30´.

31R0494HUoL._SL500_AA300_.jpg
 

fishfeatures

Senior Chief Petty Officer
Joined
Mar 29, 2011
Messages
743
Re: 1st restore on a 14ft ski boat

Thanks for that I'll try track down an equivalent version over here...;)
 

damomul

Recruit
Joined
Jan 28, 2010
Messages
5
Re: 1st restore on a 14ft ski boat

hey,

Your making great progress!!!!!

Sorry i haven't been back. i have been flat out on mine. Must be finished in 3wks!!!

I used plain old Gripfill on mine. Only thing i would say about it is, it can take a while to cure fully. Now i did the stringer fillets with it. It needs to cure at least over night. Tho before it becomes fully cured is a related to the thickness of application. It is touch dry relatively quickly, but i think it needs to be open to atmosphere to cure fully. Being that it is solvent based, they need to work themselves out from the deepest parts.

It should be fine, especially saying as you are going ot be encasing it in Fiberglass. It has a rubber content so it will have an element of flex and does bond to the fiberglass quite well. I'm quite happy with the results, tho if i was looking a quick job i would go with a Peanut Butter resin mix.

Other bonus is that it is quite a bit cheaper than ?51 ea. I think i got a box of 12 tubes from the builders merchants for about ?40.

There is only one other thing to note when using it. It wont fit into a standard silicon gun. It needs a slightly longer one.

Zoperman, yea i'm from up near the Giants Causeway, from outside a town called Ballycastle.
 

fishfeatures

Senior Chief Petty Officer
Joined
Mar 29, 2011
Messages
743
Re: 1st restore on a 14ft ski boat

Right a little update,

I put in the transom and stringers, and kinda lost myself in the job and used peanut butter on the stringers instead of the adhesive :facepalm: It is amazing stuff , I've been telling everybody about it. Now I know I'm after probably f ing up the whole thing as now my gelcoat will start cracking due to hard spots or something....:facepalm:


Anyway transom in and glassed , filleted it in using PB and then tabbed with CSM, roven, CSM. Glassed it all ove rthen with CSM and will get another one before i finish.

Only staarted tabbing in the stringers tonight so only barely started but should have them done in a day or two if I find the time.

One tip !!!

I forgot in my haste was the damn spoon for going over the fillets and so after it kicked off I had to go over it the grinder to make it flat so it would take the glass better.


I know everybody says it but .... it does take a lot of resin to do this job.. The glass just soaks it up, to tab and glass over the transom took nearly two litres. I hate to see how much I'd use if I had a big boat:)

Oh I forgot to mention , I switched to epoxy resin for doing the transom and stringers as it's stronger and won't be in contact with the flocoat I'm doing the deck with ( as I hear gelcoat doesn't stick to epoxy).I rather have the stronger of the resins on the transom and stringers due to the forces on them. Once at deck level I'll revert back to poly as the epoxy is rather strongly priced.


Still enjoying doing this but man I'd love a hand at times it's messy work, fibreglass stuck everywhere...:D

Oh as well I'm terrible at glassing there are places where air bubbles formed so I'll sand these down and redo...

i suck at remembering to take photos but at least I remember :p


piston cage bearing 006.jpg
 

seamorewaterVIP

Petty Officer 2nd Class
Joined
Jan 6, 2010
Messages
184
Re: 1st restore on a 14ft ski boat

just dont try to get the poly to stick to the epoxy.:eek: Epoxy will stick to the poly but not the other way around. :( My advice choose one and stick with it.:D
 

fishfeatures

Senior Chief Petty Officer
Joined
Mar 29, 2011
Messages
743
Re: 1st restore on a 14ft ski boat

Seamore I'm only epxoying under the deck, once that is laid then it's back to Poly.

I must say I do like the "Get in, sit down, shut up, and hold on! " in your signatureI may just use that someday in the boat if you don't mind , I'll quote you while doing it though :D:D:D
 

seamorewaterVIP

Petty Officer 2nd Class
Joined
Jan 6, 2010
Messages
184
Re: 1st restore on a 14ft ski boat

go for it fish I have seen it many other places including bumberstickers so it is not completly original.
 

seamorewaterVIP

Petty Officer 2nd Class
Joined
Jan 6, 2010
Messages
184
Re: 1st restore on a 14ft ski boat

What are you planning to use to bed the deck to the stringers?
 

fishfeatures

Senior Chief Petty Officer
Joined
Mar 29, 2011
Messages
743
Re: 1st restore on a 14ft ski boat

ok I've hit a problem, all my photos are gone off the camera:mad: and I never downloaded them.. i'm an idiot I know :facepalm:..
So I've no photos of the stringer install or bow timber install and glassing or foam pics, sorry .... I have learned my lesson and will know downlaod from camera to PC every evening after taking pics...

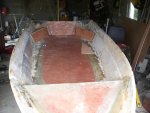
That aside what i have done is put in the stringers with PB then tabbed and capped. I didn't really like capping the stringers and I made a really bad job of it. It seemed that it was all one big air pocket on the port side. So i ground it down and redid it but it still wasn't 100%. I capped with CSM as I thought it lay better over the stringer than the roven.

I then cut out the bow area timbers and PB (I love this stuff) them in then tabbbed and covered. Again as you will see from the photos I got air pockets. I use a paddle roller but still comes up bad. Now maybe I'm not wetting out enough but I'm soaking all the stuff through..
I was thinking of adding the fuel tank to the bow but my tank wouldn't fit as the spot is not that great height wise. i also didn't want to change from the original design there either.

The foam I decided to go with for anybody on my side of the world was the "xtratherm Thin R" sheets. I cut them up and tried to fit as much of it in the boat as possible. I also ran some down the middle of the hull as there wasn't any and I'm under the impression that it's better to have extra bouyancy than none.

Glassed eck 007.jpg
I know that there is sanding down and reglassing to be done so that will be fixed.
he deck sat down right ontop of the stringer so I decided that it was soild enough that way so I didn't fix it down ( I'll screw it down if it does need to be fixed but I'm happpy with it).
I'm after running out of CSM so the deck isn't full covered. When i get more I'll finish off first coat then lay a second on also. I used PB along the edge of the deck but only a thin line of it nothing heavy.

I am going to cap the supports in the corners at the stern with ply and glass over.These were originally open with the foam exposed but my thinking is if I seal the foam in ,
1. it's water tight
2. In terms of the port one I can mount my battery here so I have a permanent place for it , which is something I didn't have.

I also decided to cover the hole to the bottom with a removeable peice of timber ,as I had the odd bit of something or other fall down there. I have cut a hole in the corners so the rainwater can find it's way down there but also the wiring and plumbing for the pump ( which hopefully will never be used again says he with fingers crossed) can come out of there too.

I am really not a fan of glassing, it's messy,sticky annoying work especially when it doesn't look good.

Glassed eck 003.jpgGlassed eck 005.jpg


I also had the idea to make a little "anchor box" for the folding anchor and wrap which holds the boat well as we are in a very tidal spot whenwe boat. The box is mainly on the passenger side as my first mates legs are shorter than mine so she requested that here footstop be brought closer , I decided to kill two birds with one stone. Herself gets here footstop to her liking and I get somehere to put the anchor as it was usually tucked under the the splashwell, the rope can then be put up underneath the bow out of the way.


Plan from here is to finish glassing in the deck then install the ply tops on the corner peices. Redo all bad spots, install bilge pump and then ........ flip it over !!! and begin sorting out that area.

I'm under a bit of pressure to have most of the hull sorted in the 2 weeks as I have sold the house and the new one doesn't have a place to store the boat !!! I know it's seems bad but I wasn't allowed to choose houses based on how it suits a boat, so I'll have to store it under a tarp while I work on it from there on in.


I recieved the flo-coat which for the hull will be white. If i did a test on say a scrap peice of ply would I be able to bring it to a shine like I should be able to when it's on the hull???? As i posted at the start the flocoat is meant to be gelcoat with the wax added already, all you do is add the catalyst and roll/brush on. I choose this as I know that 2 pac paints tend to bubble if the boat is stored on bunks which mine is.


If I left anything out I'll be back to let you know, generally still enjoying doing this but a bit peeved about my glassing techniques.Having said that I don't think I could put this much time and effort in to something that wasn't mine.It is a good bit of work a bit more than I initally thought, and I haven't even started sanding and I still have to do more grinding. I don't like the grinding it's so slooooow but has to be done i guess.

Can someone explain how to fix the scrapes and gouges in the gelcoat. Never done anything like this but fromwhat I gather I sand , fill with filler , sand smooth by block sanding? fill again, sand , fill again etc. etc. until all "faired" off and then paint , correct?? or is that just for perfectionists?
 

Attachments

  • Glassed eck 001.jpg
    Glassed eck 001.jpg
    143.9 KB · Views: 1
  • Glassed eck 006.jpg
    Glassed eck 006.jpg
    145.3 KB · Views: 1

produceguy

Lieutenant Junior Grade
Joined
Sep 30, 2010
Messages
1,243
Re: 1st restore on a 14ft ski boat

he deck sat down right ontop of the stringer so I decided that it was soild enough that way so I didn't fix it down ( I'll screw it down if it does need to be fixed but I'm happpy with it).
I'm after running out of CSM so the deck isn't full covered. When i get more I'll finish off first coat then lay a second on also. I used PB along the edge of the deck but only a thin line of it nothing heavy.

I would make sure to tad in the deck to the hull and use ss screws to screw down the deck. I would predrill all holes, fill and coat screws with 5200.

I would glass that piece of ply that you'll test the paint on because it is a fiberglass hull. That's just what I would do.

Something that helps me with the glass work is to smooth out the glass with my hands,after its layed in resin and before you cover it with resin. Wear gloves. Some will soak thru the glove but hay it turns out nice.
 

fishfeatures

Senior Chief Petty Officer
Joined
Mar 29, 2011
Messages
743
Re: 1st restore on a 14ft ski boat

Well update since last post,

I have redone the air pockets in the glass , glassed over the corner peices in the stern to make them water tight with the foam sealed off which it wasn't before. I sunk the port one 4" so the battery could sit down there in the corner, but after doing that I thought it best to shift it altogether up to the bow since i wont have the fuel thank there. At least it'll take some of the weight from the stern.

Can someone tell me what strength the wires going to the motor should be? right now they are like heavy duty ones and to replace these at about 15ft will cost a bit..

I then gathered a few of the guys around to "watch the match and have a few beers" and at half time we flipped the boat ( i know great sneaky idea):D


Now i've asked here and on other sites about fairing and sanding but received little help. So what i've done is scuff the gel coat with 160 quite roughly, and then fill in all scratches and low with filler. Now i've read threads where guys have been really really particular in doing this as prep work, I started out that way but over the course of the last 3-4 days where i've been at this for about 2-3 hrs a night , I give up ! I know that I'll be beaching this when done and also i tie off at our pier and when the tide is out and the PWC boys are out, it'll be bounced of the sidewall. SO i'm gving up on perfection, it is infectious though looking for those little low spots or pin holes:redface:

I will finish the sanding off by trying to get the whole hull as level and faired within reason, then I'm going for it with the something:confused:

I did 2 tests with the flowcoat, one on a glassed peice of ply and the other ont the underside of the hull at the stern. Both results left me very upset, after leaving to cure then sanding the first test which was rolled with 600 dry then 800 wet and then 1200wet, and the second test brushed then sanded wet 800 and 1200 , the compounding and polishing ,,,,,,,, no shine came :(

Very unhappy maybe i didn't mix it right, catalyse it right or sand it right etc... dul i'm left with a dullness that won't buff up.
I'm going to try to spray it at the weekend and see how it comes out , if still bad results then I will revert to two pack paint like Toplac.

My lack of pictures is due to the fact that this is dusty work and you're missing nothing right now, it's jsut a cas eof put on the ipod and go sanding.. I'mnot looking forward to the wet sanding but if I'm getting good results it may be easier to work to.

I started out doing this with a slight thought that this won't be too bad , but be warned I have got completely caught out by all the sanding involved and I know I won't be doing have a good a job as some people on here. there is a good bit of sanding involved and I have learned a lot about how to use a DA sander, how to long board ( really helpful) and how singing while working at this helps :D although the dogs nearby may not agree...

Will hopefully be back in a few days with it shot so fingers crossed, remember I am not after perfection and am quite happy knowing that :p
 

zopperman

Lieutenant Commander
Joined
Jun 22, 2011
Messages
1,551
Re: 1st restore on a 14ft ski boat

Well update since last post,

I have redone the air pockets in the glass , glassed over the corner peices in the stern to make them water tight with the foam sealed off which it wasn't before. I sunk the port one 4" so the battery could sit down there in the corner, but after doing that I thought it best to shift it altogether up to the bow since i wont have the fuel thank there. At least it'll take some of the weight from the stern.

Can someone tell me what strength the wires going to the motor should be? right now they are like heavy duty ones and to replace these at about 15ft will cost a bit..

I then gathered a few of the guys around to "watch the match and have a few beers" and at half time we flipped the boat ( i know great sneaky idea):D


Now i've asked here and on other sites about fairing and sanding but received little help. So what i've done is scuff the gel coat with 160 quite roughly, and then fill in all scratches and low with filler. Now i've read threads where guys have been really really particular in doing this as prep work, I started out that way but over the course of the last 3-4 days where i've been at this for about 2-3 hrs a night , I give up ! I know that I'll be beaching this when done and also i tie off at our pier and when the tide is out and the PWC boys are out, it'll be bounced of the sidewall. SO i'm gving up on perfection, it is infectious though looking for those little low spots or pin holes:redface:

I will finish the sanding off by trying to get the whole hull as level and faired within reason, then I'm going for it with the something:confused:

I did 2 tests with the flowcoat, one on a glassed peice of ply and the other ont the underside of the hull at the stern. Both results left me very upset, after leaving to cure then sanding the first test which was rolled with 600 dry then 800 wet and then 1200wet, and the second test brushed then sanded wet 800 and 1200 , the compounding and polishing ,,,,,,,, no shine came

Very unhappy maybe i didn't mix it right, catalyse it right or sand it right etc... dul i'm left with a dullness that won't buff up.
I'm going to try to spray it at the weekend and see how it comes out , if still bad results then I will revert to two pack paint like Toplac.

My lack of pictures is due to the fact that this is dusty work and you're missing nothing right now, it's jsut a cas eof put on the ipod and go sanding.. I'mnot looking forward to the wet sanding but if I'm getting good results it may be easier to work to.

I started out doing this with a slight thought that this won't be too bad , but be warned I have got completely caught out by all the sanding involved and I know I won't be doing have a good a job as some people on here. there is a good bit of sanding involved and I have learned a lot about how to use a DA sander, how to long board ( really helpful) and how singing while working at this helps :D although the dogs nearby may not agree...

Will hopefully be back in a few days with it shot so fingers crossed, remember I am not after perfection and am quite happy knowing that :p

Sanding and grinding can really be nasty. I'm glad to be done with all that :eek: You're doing a great job, just keep your head up. Maybe it's your brand or finish of gelcoat? Mine shined right up without anything except surfacing wax...?
 

fishfeatures

Senior Chief Petty Officer
Joined
Mar 29, 2011
Messages
743
Re: 1st restore on a 14ft ski boat

I thought maybe it's the products i used on the flowcoat so I found a supplier of 3M products over here for marine use so I'm going to use them on the next test peice and see what happens.
 

fishfeatures

Senior Chief Petty Officer
Joined
Mar 29, 2011
Messages
743
Re: 1st restore on a 14ft ski boat

Ok , i'm going mad now .... another 2 hrs sanding this evening and I still have a little bit more to do, it's just nuts this sanding lark and i don't even know if i'm doing ok at it. It all feels smooth and all big gouges and scratches filled in so I must be on the right track..

After tomorrow I'm going for it, rolla and tip is the choice, supplier told me the stuff was brushable and it does seem to thick to spray and duratec, patchaid and stuff can't be found here and acetone is not to be used to thin I believe.

I'm going to wipe it down with acetone twice all over then mix approx 1/2 litre at 2% and see from there how far it goes and howlong it takes to kick. I'm aiming to do 3 coats so I can have plenty of it on there to sand back. I didn't go ahead with a 3rd test piece of the flowcoat so a bit wary of how it'll turn out but worse case is that if won't come up I can get another batch and I'll spray that over it. fingers crossed.
 

fishfeatures

Senior Chief Petty Officer
Joined
Mar 29, 2011
Messages
743
Re: 1st restore on a 14ft ski boat

ok I went for it today and painted her.

I'm quite pleased with the result but there is an awful lot of sanding ahead of me still:( this flow coat really doesn't flow, it went on heavy and to level it all will take a bit of elbow grease and time but it's a big improvement on the original colour that was there.

flocoat 003.jpgflocoat 002.jpg

I went it the roller option as the brush was putting it on too heavy. The flowcoat was brushable so the option to spray it wasn't on but the rolling worked ok i think. There are a few "light" areas where i could have applied a bit more so i'll tape off these areas and wipe down with acetone, then rough it up and re apply which should cure that prob.

I'll hit this with 200 first a few light swipes , then 400,600,800 and 1200. The jump from 800 to 1200 to me is barely recognisable but i suppose that's my untrained eye. I'm thinking i'll hand sand all this no da as i think it's a better and more precise job. I have done a small area and can't believe how smooth it gets.

To anybody thinking of going this route I'd say that with the flowcoat being so thick that most of my previous work was in vain. Seening as I applied it a bit heavy all scrapes and light gouges I think would have been filled in. Kind of depressing when I consider how much time i spent prepping before today :facepalm:.

So the plan now is to reapply to light areas and then let it set. Then I'm wet sanding until it's all even (hopefully).I hope i'm going about this the right way so if anyone has anything to add please feel free to suggest things. Then prep the top cap and apply to that. I'm thinking now of doing the second colour in a two pack paint simply because of all the work involved. Most of the second colour will be above the waterline so two pack should be ok shouldn't it?

I'm also playing with ideas on make the driver side dash slightly domed so the speedo and tach guages can fit behind the wheel and still not block much of the view.The time is also coming close to pick that 2nd colour so the seats and side panels can be worked on , i'm 90% of going with orange leatherette/vinyl but am having a bit of a job finding the right one. Can anyone suggest some sites to go to for this please?

well that's all for now will update during the week to let you know how the wet sanding is going..
 

produceguy

Lieutenant Junior Grade
Joined
Sep 30, 2010
Messages
1,243
Re: 1st restore on a 14ft ski boat

That flowcoat turned out nice. Great job.
 

fishfeatures

Senior Chief Petty Officer
Joined
Mar 29, 2011
Messages
743
Re: 1st restore on a 14ft ski boat

ok , the flowcoat has been kind of a PITA to wet sand with 200 to start off with to knock down the high spots. Can i dry sand with 100 for the first few passes or will it caus eme some trouble. Also I went a bit light in places and when I started sanding it started to fade out, shall i redo these spots now or wait till I have the whole hull done then redo ??

Also would the guys with experience recommend hand sanding or will the DA sander be a better option ??
 

seamorewaterVIP

Petty Officer 2nd Class
Joined
Jan 6, 2010
Messages
184
Re: 1st restore on a 14ft ski boat

perfetion is in the eye of the beholder! if you are a perfectionist keep working if you are a passafist it looks good. Good work so far and I am willing to bet the discolorations will disapear after you progress to the finer papers.

imho dry verses wet dry can cause more scratches due to build up of gunk on the paper which in turn means you use more paper if you want a glass finish wet the whole time or spend more time once you move to the wet and finer paper.

as for the lite places pick a spot and sand it to a shine and see if you need to recote if you need to then do it.

here is a hint go to a dollar store and buy a spray bottle use it to keep your surface wet--uses a lot less water than the water hose. If you get a lot of build up or residue spray it off with a hose then go back to the spray bottle.
 

fishfeatures

Senior Chief Petty Officer
Joined
Mar 29, 2011
Messages
743
Re: 1st restore on a 14ft ski boat

Thanks seamore the spray bottle is handy when on finer grits but need the hose on knocking back the high stuff.

OK,

the flowcaot when dried left an awful lot of work, it just dried way too "bumpy". I used a short mohair roller but still it left a good bit of work on me. I spoke to the supplier and he agreed that it doesn't sound right. I stirred it with the electric drill with an attachment for paint stirring and used the correct catalyst, so we reckon maybe just a bad batch. He is send out some more just to see if it helps.

I have spent 8 hrs sand the underneath of the hull only, starting with 120 wet just to start on the high spots then 240,300,600,800 and 1200. I even tried to squeegee in places and this helped somewhat but still I shouldn't have had to do that. Now I'm am no way a perfectionist but I am trying to get a good finish and I am really happy when i finsh with the 1200, it does look so good.

If anyone is considering this option my best tip is to use plenty of paper and don't be a miser with it. Changing the paper often is vital to improve progress even if at times the paper seems good still change it.Unfortunately I learned the hard way:facepalm:

I'm under pressure due to moving the house in a few days so I'l have to finish the bottom tomorrow and then load onto the trailer. I'll then have to work on the sides of the hull and transom while it's on the trailer as I will only have limited times over the next few weeks to work on it.

I'll try and get photos up tomorrow but right now the last thing I want to do is remind myself of how much work i've put into this sanding..

Still am convinced all this is worth it as the new white is a million times better than the old creamy colour that was there so that keeps me going.
Am flowcoating cap too , was going to do the 2nd colour in flowcoat but after all this I won't and will use International Toplac instead as I really can't justify any more sanding if the finish is the same..

I have got myself nice new SS cleats instead of the black plastic ones that were there and am kinda chuffed with them ,they should look nice on the new cap.Also i've got soem samples of the new boat seat covering so it's the little things that keep me sanding and sanding and sanding. I've the softest hands after all this wet sanding and herself loves them compared to my usual rough ones ....and I mean soooooft it's sooo weird :D:D
 
Top