One of the features of the "magflash electronic ignition " is that timing never goes out of adjustment.-----Sheared flywheel key does throw it out.-----Make no adjustments if you are unsure of what you are doing !

I have the same engine that had similar symptoms. I've put new coils on it, but haven't pulled the flywheel nor cleaned the carburetors just yet. I was unsatisfied with the freedom of movement for all the mechanical linkages to throttle and gear shift; the spark advance seemed especially gummy and unresponsive. I pulled all the linkages, cleaned, lubricated, and reinstalled them. Where before the engine had a hard time going from idle to forward unless I really feathered the throttle, it now is quite comfortable going forward.
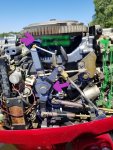
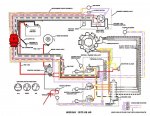
I didn't lube the cables. In the attached image I circled in blue all the linkages that I removed, cleaned, lubed, and reinstalled. For cleaning I used carburetor spray, with white lithium spray grease for lube. Green shows where I cleaned and lubed only (no removal.)
The green up under the flywheel I first sprayed the tiniest amount of wd40 in to dissolve old grease, hitting it top and bottom and front and back, then working the lever back and forth. I gave it time to dissolve and evaporate, then repeated the process with the white lithium spray.
The purple arrows show where my intuition says the most good was done with my efforts. I don't know that all of my disassembly was necessary, but it did work. Be careful if you disassemble the main nut pointed at by the lower purple arrow. There are some 47 year old plastic bushings that I'm sure are fragile, and it takes a little thinking to get the main spring back where it should be on reassembly.
It should spring back with some authority. Check out the before and after on mine below.
Also take note of the safety switch in mine, especially compared to yours. As you can see in before the ground connection is just dangling and as you say, there is no way to start it when that is true. The ground strap is necessary. Mine just goes to a different place than yours. There is no cleaning of the switch internals, and the safety is not disabled the way you have it wired.
The safety is definitely disabled and out of the circuit if the second wire is added as shown !!!-----It is easy to clean the internals of the safety switch !!!!-----And those safety switches only came with one wire !!----If you add that second wire to ground you might as well take the switch off and throw it on the floor and stomp on it.
Yes your switch is different than the factory switch installed on this 1973 model motor.----The factory installed switch installed in 73 is easy to take apart and clean the internal ground !!----Note-----I am not working on my first outboard motor.------Come on over with a few cases of suds and I show you how to clean that 1973 switch !!!!!
Never mind- I was wrong. Leaving the notes anyway:
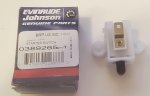
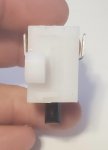
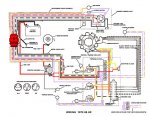
All I can say is that this must be a different switch than you are thinking of. Here is a brand new one I have to replace mine. It is clearly riveted together and the internals are not accessible. There are no wires attached just two spade terminals. And with the plastic housing the only way to make any electrical connection is to use both wires, as shown in the schematic.
??---The original factory switch was grounded INTERNALLY to the block with throttle in idle position !----Yes there are 2 tabs on it and those 2 tabs are directly connected.----So by adding the second wire to ground the function of the switch is DEFEATED as shown in the picture earlier.----Not sure why wiring appears to be hard to grasp.-----Clean the internals of this switch as it is easy to do and help you understand how it works.----Or walk over I have lots of those switches and will trade for a couple of cold treats.