79 Starcraft SS18 Project

Starman8

Chief Petty Officer
Joined
Sep 17, 2010
Messages
630
Most of my stuff is scattered on other posts. Starting this one, with more pics later, but at a wiring jam, need some folks for recollection and assistance.

The first problem after sorting through all the reds and blacks around the battery and after tearing up the dash, some wierd wiring was used.

For the sake of being simple, I have identified the pos/neg running to the outboard engine, the trim motor, and any unswitched accessories.

One would think the remaining 2 wires would be a house red and black leading through the harness to the dash. More on that later.

On to the dash. The incoming harness has a brown for the bilge, the blue/green for the bow and anchor light, the pink for the never worked fuel gauge, the reddish/orangey hot and the black ground, and the 7th wire is a mysterious red that appears to have been never used?

The wiper and horn located at near the helm not part of the harness run, but there. The dash, as many of you have the same or similar, was a series of jumps for red and black to power up. One would think that at your battery, you would have the other end of the black and red to supply the power.

Well, I found what appeared to be my house red even though it looks more on the orange side of red as part of 3 wires bound together with tape or sheathing. The other 2 wires are purple(ignition) and white with green markings(trim down)? See the picture...........................

picture.php


The reddish one splits off near the battery to a 15 amp breaker on a clip, then the other clip has the exiting red wire rejoining the run of 3 wires forward but sheathed. If this is my main house red hot, where did the purple and white/green wire go to? They are NOT at the helm. Do they go to the positive battery post since they have connectors?

Mystery number 2 is that I cannot locate my house black ground where it should connect to the battery. It is in the harness at the helm!!

I think my house ground was jumped by the previous owner adding a permanent fuel tank. On the tank, a ground wire jump is attached to some funky harness, see the pic..........................
picture.php
, then into this

picture.php


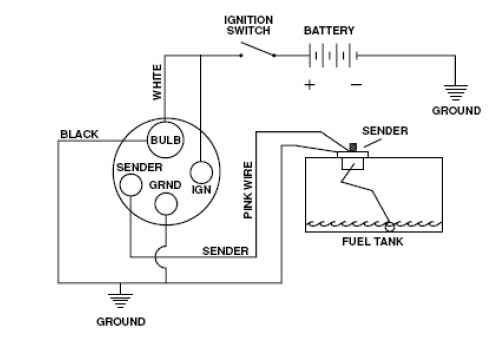
The gauge, which I was told never worked is because of this botch. The tank has a black pig that leads into a 3 wire harness, the other 2 wires are pink and blue. The pink needs to eventually get to the fuel gauge at the helm, and the blue, who knows because it is split off and hanging there with a brass coupler, was somehow attached to the battery at one point?

picture.php


The left side of the connector has the black ground and pink gauge wire, but a 3rd wire white with green appears? What is that for? I can't find it at the helm coming through the harness. Why is it part of this run of wires?

At some point I have to ground the panel from the main battery. Any ideas what this mess is?
 

Starman8

Chief Petty Officer
Joined
Sep 17, 2010
Messages
630
Re: 79 SS18 Project

Re: 79 SS18 Project

Can some of you kindly look at your battery and tell me if a purple ignition wire is on the positive?
 

Pugetsound

Lieutenant Commander
Joined
Apr 5, 2009
Messages
1,824
Re: 79 SS18 Project

Re: 79 SS18 Project

The wires from the controll to the motor are as rhey should be ,so do not mess with them. My advese for the rest is to Leave a bit of exixting wire fron accessories to solder wires to and cut them, removing all wires( ops) with one exception the rear light and the bow This is a three wire for use to bow ligt and rear or only rear light as a anchor light. Get a multi fuse bloch 6 or 8 should do and run a no 8 red wire from th battery to wherever you mount the fuse panel ( get the fuse panel that also ha a grounding bar. Then run a wire from the battery to the ground bar. NOW replace each accessory with new Red for plus and black for ground Ground to the ground bar and red to the fused side of the panel. Now you have all acessories fused and labled within easy reach from the Helm without haveing to crawl under the dash tio identify. May sound conplicated but draw yourself a diagram of the wiriing before you start. I did that with my recent rebuild on my 16 SS and mounted the fuse panal on the dash on the right lower corner. You do not want to have to hunt down a fuse in bad weather and have to crawl around to find it.
 

barato

Petty Officer 1st Class
Joined
Oct 27, 2008
Messages
386
Re: 79 SS18 Project

Re: 79 SS18 Project

especially if it's the fuse for something like your bilge pump or running lights...
 

Starman8

Chief Petty Officer
Joined
Sep 17, 2010
Messages
630
Re: 79 SS18 Project

Re: 79 SS18 Project

Thanks, but lets try this again.

I understand what you are all saying, but we are talking 2 different things.

Some sites on the web state that Mercury purple wire gets connected to the positive of the battery. Any Merc engines out there want to check their battery and confirm this.

Also, the trim down wire white with green stripe also appears to get a hot feed directly from the positive of the battery. Any Merc engines out there wanting to confirm this?

Once I get these answers, then I can solve the fuel gauge and ground issues.
 

Pugetsound

Lieutenant Commander
Joined
Apr 5, 2009
Messages
1,824
Re: 79 SS18 Project

Re: 79 SS18 Project

I dont think we are talking the same conseption of your wireing. The Engine- 0r -Outboard has its independent wireing from the engine source to the electrical system. You would not need ro do any thing under normal conditions except plug it the engine to the wires from the control to the BATTERY. all the accessories can be fused from one palel without any changing of Power source or the start system.
 

CheapboatKev

Vice Admiral
Joined
Oct 4, 2008
Messages
5,813
Re: 79 SS18 Project

Re: 79 SS18 Project

I have something to contribute..

"Have you asked in the OB or electronic forum?"
 

GLG fishing

Chief Petty Officer
Joined
Dec 25, 2009
Messages
456
Re: 79 SS18 Project

Re: 79 SS18 Project

Check this link for the colour codes that Merc used for their outboards.
http://continuouswave.com/whaler/reference/wireColorCode.html#Merc

Wiring of conductors to battery terminal posts should be done with ring terminal lugs. The ring terminal should be properly sized for the terminal post it will be used under. You will have one size for positive and a different size for negative. Hope that helps.

GLG
 

Starman8

Chief Petty Officer
Joined
Sep 17, 2010
Messages
630
Re: 79 SS18 Project

Re: 79 SS18 Project

Check this link for the colour codes that Merc used for their outboards.
http://continuouswave.com/whaler/reference/wireColorCode.html#Merc

Hope that helps.

GLG

Thanks, I read that and it says the purple ignition wire directly attached to the positive battery post. I assume it is grounded by all the items using that power that are grounded elsewhere?

I was hoping some fellow Merc owners would also verify they have that connection. The confusion is a result of the process of elimination. The engine has its own red/black. The trim motor has its own red/black.

The panel has a red entering a 15 amp breaker attached under the splashwell near the battery area, then it heads forward to the helm, and riding along with the 2 other wires mentioned, the purple and the white with green stripe.

If I attach all 3 to the positive post, I assume the red carries to the switch panel bypassing the "key-on" for lights, bilge, horn. Then I assume the hot purple terminates at the ignition to supply it power, and the white with green appears to terminate at the PT switch on the throttle?

When you see additional adds to a positive battery post, makes you wonder where the corresponding ground black is for them?

My guess is a splice after attempting to trace sheathed cables. There is a black ground at the helm for the panel switches and not at the battery, but it may be spliced to another black?

The only 2 gauges on the boat are a Speedo and Fuel gauge. The fuel gauge doesn't work because I don't see a power source off the ignition, or a poor attempt by the previous owner.

The mess by the fuel tank is perplexing due to the connector that was used. I am unsure how that circuit flows.

Coming from the tank is a ground and a pink(sender) that join together in this harness, and a 3rd blue wire that does NOT flow through, but terminates to a battery connector. If I were guessing, this blue wire was grounded to the battery. At the connection, the ground and pink sender continue on with a third new wire, white with green stripe. This circuit runs under the splahwell to the star gunwale where it appears to "trunk" into another sheathed run of wires, then moves forward.

I suppose when this blue wire was attached to the battery, the previous owner felt it grounded the fuel tank, sender wire, and white with green stripe trim wire, same color as the one directly wired to the positive battery post.

If all this is accurate, then it may be OK, and the only feed needed is off the purple IGN to power up the fuel gauge. The backlight will get switched power of the Nav lights.
 

GLG fishing

Chief Petty Officer
Joined
Dec 25, 2009
Messages
456
Re: 79 SS18 Project

Re: 79 SS18 Project

Check this link to Moeller Marine Fuel Sender website
http://www.moellermarine.com/sites/moellermarine/files/035727-10_installation_instructions.pdf

I have heard that you can ground the sender wire (pink) but I do not know why. Perhaps that is what the PO (previous owner) did.

Some helpful hints
Buy a copy of the manual for the motor you are working on.
Break each subsystem down and trace the wires.
Work on one subsystem at a time.
Mark your wires with masking tape and write down it?s purpose.
Do a search in the correct forum on iBoats to see if the question and answer are there
Post one question at a time and try to make it clear and short.
Use your multi meter or buy one and learn how to use it.
Understand the circuit you are troubleshooting before you apply power.
Just because the PO did it doesn?t mean it is correct

Once you have gone through your electrical system you will gain the understanding of what is going on and your repairs will go easy.
Hope that helps.

GLG
 

GLG fishing

Chief Petty Officer
Joined
Dec 25, 2009
Messages
456
Re: 79 SS18 Project

Re: 79 SS18 Project

fuelsystem.jpg


If it were my boat this is the way I would wire up the fuel gauge / sender

I would make sure that the pink wire has no other connection.
Ground goes to a common bus bar or ground wire not the hull of the boat.

You may want to check to see if the sender and the gauge work by using this diagram with your own wire. If so then try to get your boat wire to work.

Can?t help you with the trim, as I don?t have any reference at this time.

GLG
 

Starman8

Chief Petty Officer
Joined
Sep 17, 2010
Messages
630
Re: 79 SS18 Project

Re: 79 SS18 Project

New switch panel not arrived yet so worked around my electrical mystery. Finished cutting the bulkheads, side console panels, rear aft deck, bow deck, and ran some wires for 2nd bilge already mounted and 5 LED courtesy/cockpit lights. Also finished the new back wall, just need to attach the 6 launchers in advance before mounting.

Ready to carpet the main floor area and reassemble the consoles, then back on getting all the juice correct. Then I can get to the hatches and deck flooring.

Used formica for my front dash panels. It came out pretty good, hard to handcut, but I did it that way. Just need to figure out whether to carpet the console tops. I don't care for the painted metal look. Maybe will consider the gray vinyl some of you have used for floor and sidewalls?

Also built new rail cushions for the bow. Sometimes thoses staples and plywood don't agree with each other, but they came out OK. Also sold the Anchor Pro power winch anchor system.

Here is the backwall, leaning on a basement post along with the bulkheads, and you can see the side panels in royal blue marine vinyl.

picture.php


Here you see a side cushion in white, the dash panels, and some golf bags and my YAM's drum kit. Poor lighting in the basement with cellphone pics

picture.php
 

Starman8

Chief Petty Officer
Joined
Sep 17, 2010
Messages
630
Re: 79 SS18 Project

Re: 79 SS18 Project

backwall mounted and aft deck frame installed

picture.php
 

GLG fishing

Chief Petty Officer
Joined
Dec 25, 2009
Messages
456
Re: 79 SS18 Project

Re: 79 SS18 Project

Starman good progress. What?s the back deck for? Casting? Never seen a back deck, front deck yes, what kind of fishing do you do?
 

Starman8

Chief Petty Officer
Joined
Sep 17, 2010
Messages
630
Re: 79 SS18 Project

Re: 79 SS18 Project

Since these SS models transom design cause wasted space with a huge splashwell, the raised aft will assist with:

-a higher perch for a casting seat
-creation of additional storage
-easier to step in the boat(skiers)
-better angle to land/net fish trolling

the 2 back seats mounting plates(Swiveleze lock n pin) will be
positioned just fore of the aft deck wall. The bottom of each seat
is 14" off the floor, and the deck 12.5" carpeted. Passengers can freely
rotate the seat and if trolling, can face aft and use the deck for
stretching legs.
 

GLG fishing

Chief Petty Officer
Joined
Dec 25, 2009
Messages
456
Re: 79 SS18 Project

Re: 79 SS18 Project

:cool:Cool ? That?s another thing I like about these tin cans.
The way you can modify them to suit your needs.
Did I read trolling?. Trolling for what.

Edit your profile and put where you?re from.:)

GLG
 

Starman8

Chief Petty Officer
Joined
Sep 17, 2010
Messages
630
Re: 79 SS18 Project

Re: 79 SS18 Project

Very multi-species.................

troll for walleyes Lake Erie, Ohio Inland, and Ontario
troll for Muskie Inland Ohio and Ontario, plus Pike

I had Bert Tracks on the gunwales of my 2000 Star. For this 79, considering
the Scotty triple holder system, mounted on the back bar, each side for 6 possible lines using small boards.

The back bar now is also being supported by the back wall which is bolted in. Then the back wall is L-bracketed into the aft deck, which is also attached
to the main deck making sure I grabbed strength from piece #1 and Piece #2 of the new floor.

The 2 access hatches you see still open give me access to the trim motor on
one side and the fuel tank on the other side. Those have pieces that fit in the
jambs you see. If I ever need to yank out any of that stuff when it falters, I can simply unbolt the back wall.
 

Starman8

Chief Petty Officer
Joined
Sep 17, 2010
Messages
630
Re: 79 SS18 Project

Re: 79 SS18 Project

Switch panel came, so I mounted it along with the speedo and fuel gauge on black microdot Formica............

picture.php


Also carpeted the cockpit so I can dry fit the bulkheads and start aligning things
 
Top