82 Starcraft MR 180 floor, slight refit and leaks

redneck joe

Supreme Mariner
Joined
Mar 18, 2009
Messages
11,447
does the wood go under the splashwell?

What gun did you buy?

How do you remove the solid ones?
 

MikeSchinlaub

Petty Officer 2nd Class
Joined
Jan 14, 2025
Messages
179
"What gun?" Solid rivets take an air hammer with a concave bit that cups the head. You hold a solid metal block on the shank end, while someone good with the air hammer hits the head and the rivet mushrooms.
555-82394.jpg

Pop rivets, the ones with the hole in the head and the shaft running through, have hand, electric, and pneumatic guns. The hand riveter with 3/16 rivets requires a Thor like grip though.

"How do you remove solid ones?" Hit the head with a center punch and drill the head off, then punch the shaft through the hole.
 

MNhunter1

Lieutenant Junior Grade
Joined
May 12, 2014
Messages
1,077
What gun did you buy?

How do you remove the solid ones?
I went with a dedicated ATS 4X rivet gun. I've used a standard air hammer in the past and its fine for setting one or two, but well worth picking up an actual rivet gun if you have several solids to drive.

As noted above, center punch the head of the old rivet, drill off the head as you would with a blind rivet, and punch out the tail. Coat your new aluminum solids with some 3M5200 when you set them.
 

redneck joe

Supreme Mariner
Joined
Mar 18, 2009
Messages
11,447
Funny I had already ordered a nail punch set for another project so she can't blame the cost on the boat....
 

Watermann

Starmada Splash of the Year 2014
Joined
Jan 12, 2013
Messages
13,822
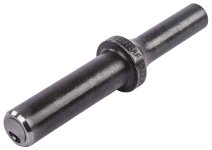
Brazier head rivets that SC used usually have a dimple in the center of the head but even if not you'll want a new sharp pilot point drill bit in 3/16. I didn't center punch any solids using that bit.

dewalt-drill-bit-.jpg
 

redneck joe

Supreme Mariner
Joined
Mar 18, 2009
Messages
11,447
for the prob 40 or so i might drill out, how many bits should I get and are there best in class brands? I'm cheap but i'm not poor and i understand god tools/supplies
 

BWR1953

Admiral
Joined
Jan 23, 2009
Messages
6,277
for the prob 40 or so i might drill out, how many bits should I get and are there best in class brands? I'm cheap but i'm not poor and i understand god tools/supplies
I went through a bunch of the cheap Harbor Freight bits, but finally switched to the Dewalt Pilot Point bits like Watermann showed above and never broke one of those.
 

redneck joe

Supreme Mariner
Joined
Mar 18, 2009
Messages
11,447
Tell me if I'm stupid, however please read the question before responding.

I've got the rear pieces out, the ones under the splash well.

The ones under the rod holders and the ones rear of that to peek in.

It appears none of these are structural. What if instead of drilling out the rivets thru the hull I cut vertically to access the flooring rivets and be able to slide wood out. I reassemble with hbar and 5200?


I would be way more comfortable with that process instead of drilling out, I feel time would be less given my solid rivets experience, no need tool to buy.


OK, pile on.
 

redneck joe

Supreme Mariner
Joined
Mar 18, 2009
Messages
11,447
Yessir, but putting back on. Either with an h bar or plain angle depending on where I cut it.

The panel behind that as well but is that panel a part of the splash well?
 

MikeSchinlaub

Petty Officer 2nd Class
Joined
Jan 14, 2025
Messages
179
For the ones on the sides, could you hook something under the edge and pull them up out of the way? Like a ratchet strap, easier and better looking than cutting them off.

The one behind it, it looks like the too edge of the splashwell is welded to it.
 

MNhunter1

Lieutenant Junior Grade
Joined
May 12, 2014
Messages
1,077
The only solids are the ones attaching those lower side braces(below the rod holders) to the side of the hull. The flat panels behind them, along with those supports under the splashwell, are blind rivets and screws. No solids, no welding. They have screws into the deck, blind rivets into that aluminum trim piece, which is blind riveted to the lower side of the gunnel, and blind rivets or screws(don't recall) that secure to the splashwell.

The way they are engineered, they are indeed structural as a system. That being said, I have seen examples when I was contemplating the same concerns where someone has done as you are inquiring, cutting along that edge and reattaching/joining the two pieces with some aluminum angle and blind rivets. That would still maintain the structural integrity of the panels being tied into the hull, screwed into the deck, and the deck secured to the hull(stringers and ribs). The structural integrity is dependent on all these components tying together to work as one system. Same holds true for the splashwell and the associated panels.

As long as you leave the existing solids in place and join everything back together in the end, you could successfully use that approach and eliminate the need to drive home some new solids. Not sure what your bow deck supports are like, but mine were also attached with solids.
 

MNhunter1

Lieutenant Junior Grade
Joined
May 12, 2014
Messages
1,077
Here are some pictures of those individual panels from painting. You can see many of the holes and lips where the panels are secured.
Paint2.jpgPaint05.jpgPaint5.jpg
 

redneck joe

Supreme Mariner
Joined
Mar 18, 2009
Messages
11,447
For the ones on the sides, could you hook something under the edge and pull them up out of the way? Like a ratchet strap, easier and better looking than cutting them off.

The one behind it, it looks like the too edge of the splashwell is welded to it.
think it would bend in the wrong place to get as high as needed, it appears there are blind rivets in the decking i need to get to.

That said, the back decking piece seems to not have any rivents to the ribs the last 2/3s of that board so i may be able to bend up and slip new in there.

as I've been thinking, the ones under the rod holders would the able piece, bolts/nuts one one side then blind rivets on the other, which to which TBD.


Thanks for all the great pics that helps a bunch.
 

redneck joe

Supreme Mariner
Joined
Mar 18, 2009
Messages
11,447
oh and for taking the splashwell out, that is last resort. Its 100% completely solid and not in the plan to pull the motor and i have zero concern for the aesthetics. I just want to be the old guy fishing every day.
 

MNhunter1

Lieutenant Junior Grade
Joined
May 12, 2014
Messages
1,077
to clarify above post, i was talking about no need to remove the transom.
You could still remove the splashwell and leave the transom in. I guess it depends on how thorough you want to get with everything. If the decking is in need, I'd be willing to bet your transom is no longer at 100%. Now would be the time to do it, but it all depends on what your timeline and end goal is.
 

redneck joe

Supreme Mariner
Joined
Mar 18, 2009
Messages
11,447
I just looked over your thread and your was I way worse shape than mine is. What appears to be original vinyl and wood is way better, execpt on the starboard side. So the story I'm developing in my head is this thing was minimally used but sat on an outside edge of a carport/pole barn up there in missesota where I drove to pick it up. Or a leaky full barn. The decking rot is only just starting on the back half of the second panel, pretty bad on the third panel.

Honestly if I wasn't for the leak I prob would have just slapped some diamod plate over the soft and left it.

As you know the transom does not touch the decking and I've poked 99% of it with my smallest blade screwdriver and nothing soft and no flex when i stand on the motor. I'm confident the transom is as 100% as a 43 year old boat can be.

I'm about to cut the ones under the rod holders. Pics to follow.
 
Top