DunbarLtd
Petty Officer 1st Class
- Joined
- Nov 8, 2016
- Messages
- 357
Just add some sealer/ sillycone to the bolt.
You might need a washer to make it seal??
Motors with a lot of use and long time use in salt water the cover and the block gets corrosion and
milling both surfaces really helps make a seal.
The edges get eaten away making it harder to seal.
You can test the sending unit with an ohms meter.
Remove,put in pot and slowly bring up the temp
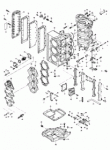
Ok thanks Jerry. I noticed the exhaust plate gaskets on my engine dont match the manual's description of order of parts to assemble. Looks like on mine they added 2 gaskets to the block then the spacer plate then the cover.
Im almost positive this is wrong but it looks like its a factory install. Like I said all the bolts looked like theyve never been touched but I could be wrong and whomever replaced the gaskets did it wrong.