89 Chris Craft Sea Hawk 254

fscuttle

Seaman
Joined
Jul 9, 2012
Messages
67
Re: 89 Chris Craft Sea Hawk 254

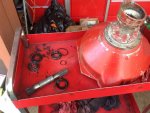
PDS bearings removed. It came apart nice and easy. In the link provided above detailing the procedure the guy says the aft seal gets installed with the spring facing toward the rear.But the original installation the spring side of both seals were facing the bearings.Which way should i put it back? I think im going to put them back the way they were because i know nobodies ever been in there before so tIMG_0107.jpghats how they did it in the factory.
 

zool

Captain
Joined
Aug 19, 2012
Messages
3,432
Re: 89 Chris Craft Sea Hawk 254

In the link provided above detailing the procedure the guy says the aft seal gets installed with the spring facing toward the rear.But the original installation the spring side of both seals were facing the bearings.Which way should i put it back? I think im going to put them back the way they were because i know nobodies ever been in there before so tView attachment 192866hats how they did it in the factory.

Are you sure of your removal sequence?...because the manual says the outer seal opening should face outwards, which would be towards the upper gear housing.

"Assemble, observing the following sequence:
Install the new, inner sealing (5) using special tool part
no 884838-4. The sealing is installed with its ?opening?
facing outwards. Install the new bearing on the shaft.
Use special tool part no 884596-8 and press the bearing
onto the shaft. Install the locking ring (6). Fill up the
space ?A? between the sealing and the bearing shoulder
with water resistant grease. Install the primary shaft in
the flywheel housing. Use special tool part no 884596-8
and press the shaft into its location. Make sure that the
locking ring (6) ends up in the machined ?groove? of the
tool. Install the locking rings (2). Fill up the space ?B?
with water resistant grease. Use special tool part no
884359-1 and install the new, outer sealing (1).
NOTE! The ?opening? of the sealing should face outwards"
 

fscuttle

Seaman
Joined
Jul 9, 2012
Messages
67
Re: 89 Chris Craft Sea Hawk 254

I'm positive that the spring side of the front and rear seals were installed facing inwards. And we have had the boat since it was brand new. So now i'm really confused. Is it possible it was put in wrong in the factory? The manual you were referring to covers the 89 AQ271? It makes sense that it would be installed the way you said because you would want any air or grease to be able to be purged out the rear right?
 

zool

Captain
Joined
Aug 19, 2012
Messages
3,432
Re: 89 Chris Craft Sea Hawk 254

I suppose its possible is was installed that way, its also possible, the manual is wrong, and it may just work ok regardless......but yes, you're correct that you want the outer seal to be the weakest link, being that the inner handles the bulk of he load.

I have the page from the manual saved, but not the full manual, but as far as I know,pds setup is the same thruought the engine range. You have the Aq series, with DP.
 

zool

Captain
Joined
Aug 19, 2012
Messages
3,432
Re: 89 Chris Craft Sea Hawk 254

I did some reading around, and most suggest the spring side out for the rear seal, but they may just be parroting the manual. Then I went out back to look at mine today, The PDS rear seals seem to be spring face "inwards"...Ive ownded this boat since 5 years old, and dont recall them being changed either. What Im thinking is, it may be where the factory originally installed them inwards, but now recommends outward when repair/replace is performed, like a service bulletin.. The manual page does specify this with a (NOTE!)

Might be a question for the volvo engine forum....
 

fscuttle

Seaman
Joined
Jul 9, 2012
Messages
67
Re: 89 Chris Craft Sea Hawk 254

I went down to the local marina today and spoke to the parts guy and a mechanic. The general consensus is that the spring should face out toward the outdrive. The mechanic did say he hasnt done one of those old setups in a long time though. So i put it in with the spring facing out. But the seal doesnt seal on the shaft. It seals on the front knuckle of the ujoint on the outdrive. It looks to me like when i slide the outdrive in the front of the knuckle could easily catch the lip and knock the spring off the seal. Since the knuckle has to slide into the seal it makes sense that the seal should be installed spring facing in. Im going to slide it in on the ground tomorrow and see if it knocks the spring off.
 

fscuttle

Seaman
Joined
Jul 9, 2012
Messages
67
Re: 89 Chris Craft Sea Hawk 254

Im pretty sure it will knock the spring off and possibly roll the seal. The sealing surface on the outdrive shaft needs to enter the bevel on the face of the seal and the seal expands around it.
 

fscuttle

Seaman
Joined
Jul 9, 2012
Messages
67
Re: 89 Chris Craft Sea Hawk 254

Unless as you're putting the outdrive in you reach in with a feeler gauge and walk the seal around the shaft. I don't know if people are doing that or if its even possible.
 

zool

Captain
Joined
Aug 19, 2012
Messages
3,432
Re: 89 Chris Craft Sea Hawk 254

Unless as you're putting the outdrive in you reach in with a feeler gauge and walk the seal around the shaft. I don't know if people are doing that or if its even possible.

Ive never heard of needing a feeler, and i dont think it could be managed.

Since the knuckle has to slide into the seal it makes sense that the seal should be installed spring facing in. Im going to slide it in on the ground tomorrow and see if it knocks the spring off.

The whole idea of the seal being installed this way is to allow the excess grease pressure to exit and not cause the forward seal to dislodge. So it would make sense that this seal shouldnt exactly seal. I believe the female yoke sleave on the ujoint assembly just needs to mate with the sealing lip, and since the yoke will be guided by the spline, no adjustment of the spring should be necessary. The closed side of the seal has the recess, correct?
 

fscuttle

Seaman
Joined
Jul 9, 2012
Messages
67
Re: 89 Chris Craft Sea Hawk 254

This pic is a different setup than mine. My shaft has no pilot on the front and no pilot bearing in the back of the crankshaft. And what is number 9? A spacer? I don't have that either.This looks like it might be a single bearing setup? The 2 seals in mine are identical. So the front seal seals tightly around the shaft and the rear seal on the back doesnt even come close to sealing on the shaft. It sure looks to me like the female yoke sleeve goes through the seal. The space between my rear seal and the shaft is gaping. If the female yoke sleeve doesnt go through it then i would imagine grease would be pouring out of there after it gets hot. I rebuild transmissions for a living and i just dont see that female yoke sleeve just bumping up against the back of that seal. It would leak like crazy. I have to try and find a pic of my exact setup. thanks for the help i appreciate the input. Ill putbthe flywheel cover onto the yoke sleeve tomorrow and see what it looks like. Ill also try to get a good pic of just how big the space between the rear seal and the shaft is so you can see what i,m seeing.
 

fscuttle

Seaman
Joined
Jul 9, 2012
Messages
67
Re: 89 Chris Craft Sea Hawk 254

Thats the pic the parts guy showed me. The seal is number 80 and it looks like the spring is facing in but the front seal looks like the face is toward the back so i guess i cant go by this. But i just had a good idea. If that female yoke sleeve was actually sitting inside the seal there will be a polished sealing surface on the end of it and there should be a mark where the seal was riding. I have to unbury the outdrive its got 12 years of crap packed all around it.
 

zool

Captain
Joined
Aug 19, 2012
Messages
3,432
Re: 89 Chris Craft Sea Hawk 254

I just pulled both uppers, ill go out tomorrow and look too. I has to wrestle them off the spline, but the seals stayed intact, didnt fall out or move. Sounds like a plan tho.
 

zool

Captain
Joined
Aug 19, 2012
Messages
3,432
Re: 89 Chris Craft Sea Hawk 254

Ok, i cleaned out the grease on the seal, and it turns out, the seal is installed open side out towards the outdrive on mine. The lip with the spring around it, leaves clearence for the female yoke to slide in without a problem. The seal holds in place around the spline with the flywheel cover housing. The outside of the yoke shows polished wear about a 1/2 inch.

I would install it spring side out.

I slid the upper on for a second, and it had no problem clearing the spring, just slid inside the seal lip.
 

fscuttle

Seaman
Joined
Jul 9, 2012
Messages
67
Re: 89 Chris Craft Sea Hawk 254

Great thanks. I didn't get a chance to do anything on mine. Pouring rain here all day.
 

fscuttle

Seaman
Joined
Jul 9, 2012
Messages
67
Re: 89 Chris Craft Sea Hawk 254

But mine was originally installed with the spring in for sure. I think turning the seal around may be something they changed probably due to problems with excess pressure blowing out the front seal. Either that or whoever put mine together in the factory just did it wrong.
 

zool

Captain
Joined
Aug 19, 2012
Messages
3,432
Re: 89 Chris Craft Sea Hawk 254

I could be, but I cant recall ever having the PDS seals/bearings changed. Maybe yours was a Friday afternoon assembly. The only other issue you might be seeing is that your seals are new, and the lip may not be expanded from time, and may be a tighter fit. Id lube the outer yoke surface, and the inner seal lip, before install.
 

fscuttle

Seaman
Joined
Jul 9, 2012
Messages
67
Re: 89 Chris Craft Sea Hawk 254

Yes good idea. Ill brush on a little STP Oil Treatment. Thats the slickest stuff on Earth.
 

fscuttle

Seaman
Joined
Jul 9, 2012
Messages
67
Re: 89 Chris Craft Sea Hawk 254

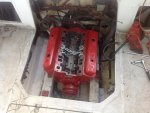
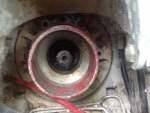
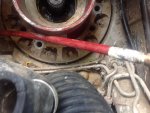
Ok got the engine set in and motor mounts tight and 3 clamp ring bolts snugged up. If i never moved the mounts and the clamp ring is flush against the flywheel cover i should be ok right? The only thing that bothers me is the clamp ring doesn't sit perfectly symmetrical inside the transom plate when looking in from the outside {see pic} does that matter? Im going to measure the alignment tomorrow i hope i don'IMG_0112.jpgIMG_0115.jpgIMG_0117.jpgIMG_0116.jpgt have to make any adjustments.
 
Top