99 Larson 186 SEI Ski-n-Fish Re-Deck Project

QuickPuppy

Petty Officer 1st Class
Joined
Oct 18, 2017
Messages
230
Props... I’m liking the hanger bolt idea for the panel.

WOG and Jim... thanks for the info.
 

QuickPuppy

Petty Officer 1st Class
Joined
Oct 18, 2017
Messages
230
Got the seat bases cut out, glued together, and test fit.
 

Attachments

  • photo295396.jpg
    photo295396.jpg
    1.2 MB · Views: 5
  • photo295397.jpg
    photo295397.jpg
    1.1 MB · Views: 5
  • photo295399.jpg
    photo295399.jpg
    982.7 KB · Views: 5

QuickPuppy

Petty Officer 1st Class
Joined
Oct 18, 2017
Messages
230
Also tried using slightly thickened gelcoat on the bottom of the locker hatch. I was trying to get it to fill in some imperfections a bit better and to test how the final finish on the topside might look. Big fail. Clumpy, sticky, deep brush marks. Sanded half out this evening. The result after sanding is nice and smooth. I’ll try un-thickened next time around.
 

Attachments

  • photo295402.jpg
    photo295402.jpg
    1.4 MB · Views: 3
  • photo295403.jpg
    photo295403.jpg
    964.5 KB · Views: 3

mickyryan

Rear Admiral
Joined
Apr 18, 2016
Messages
4,216
Spray it with a 2.6 tip primer gun hlvp reduced with about 10 % acetone it will flow out nice
 

Bayou Dave

Lieutenant Commander
Joined
Dec 13, 2012
Messages
1,780
On my boat the seat bases have the flat part toward the center, not the outside. Not sure if it makes any difference, just thought I would throw it out there.
 

JASinIL2006

Vice Admiral
Joined
Feb 10, 2012
Messages
5,713
Those seat bases look pretty good to me! Glass those suckers in there good and secure, and you'll be in business!
 

QuickPuppy

Petty Officer 1st Class
Joined
Oct 18, 2017
Messages
230
I wondered about the flat parts... the previous owner had them facing out. Any idea why they are like that?
 

Bayou Dave

Lieutenant Commander
Joined
Dec 13, 2012
Messages
1,780
I think they are there so the seats can be installed further toward the center and not be in the way of opening the ski locker.
But, yours are far enough back that they will never interfere with the ski locker.
 

JASinIL2006

Vice Admiral
Joined
Feb 10, 2012
Messages
5,713
I always assumed the flat part goes toward the center so you don't trip on the seat pedestal when the seats are swiveled around, but I really don't remember how they were. With your bases, it's not an issue, so put them however you want. (I would not put the flat part at the rear, however, or you lose some leverage holding the seat when accelerating.)


I didn't have much difficulty getting the glass to lay flat. I cut squares of 1708 that extended past the base by about 3", then added a second layer that exceeded the first by about 3'. I cut wedge shapes out of the corners of the 1708 that covered the bases so it would lay flat, and then I worked it quite a bit with a roller as it set up. It really went down pretty easily. If you do a dry fit with a piece of fiberglass, you'll get a sense of how to trim corners so they lay flat over the bases. (It might be possible to just work the 'glass without cutting to get it to lay flat, but I wasn't that skilled!)
 
Last edited:

QuickPuppy

Petty Officer 1st Class
Joined
Oct 18, 2017
Messages
230
Another five weeks have gone by without work on the Larson. I finally had a three day stretch to get something done this past week. Unfortunately, as usual, I didn't get as far as I would have liked.

I discovered that I am apparently not capable of drilling a straight hole in 1.5" of plywood with a hand drill. Out of the 10 holes I drilled, 7-8 of them were off by some amount. Using stainless steel bolts and t-nuts requires very good alignment as it is brittle . I found this out when over half of them stripped and locked together while I was test fitting things. I had to cut some of them out. Several hours were wasted getting things back part and going back to the store for more nuts and bolts.

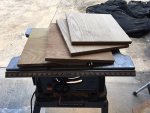
Necessity being the mother of new shop tools, I found this drill press nearby on OfferUp. Another few hours was spent getting this 320 lb monster that does drill a straight hole.


IMG_7543.jpeg

IMG_7544.jpeg

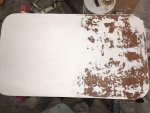
I mixed up some peanut butter, slathered it onto the deck, set the based in place, and weighted them down for the night. I came out the next morning to find that the resin did not appear to have set up at all. I'm not sure what went wrong. I took a pry bar under the edge of the base and with fairly minimal effort was able to pop them off. Some of the resin did set up as the t-nuts all pulled out of the bases and were glued to the deck. I had to chisel those off and used acetone to clean up the resin that was still goopy.

IMG_7553.jpeg

Another several hours and many sanding disks were used getting all of the dried and partially dried resin off of the base bottoms and deck as well as yet another trip to the store for more t-nuts. (I think the guys at the store felt bad for me as they just gave me 15 more.

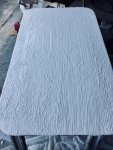
For my second attempt, I decided to countersink the t-nuts a bit more and covered the bottoms of them with tape. I was extremely careful about mixing up the peanut butter. This time I add a bit of surfacing wax (Which in hindsight probably was not a good idea since these parts are sandwiched together. Any thoughts on this?) I used a notched tile trowel to to put the resin on the deck, set the base and weighed it down with about 300 lbs. It wanted to keep sliding out of position, so I wedged it on two sides.
IMG_7557.jpeg


I removed the weights last night and it looks like it worked this time. I'm praying that no resin got into the t-nuts and that the bolts still go in smoothly.
IMG_7559.jpeg

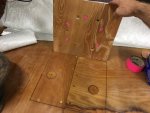
I still have to sand off the messed up resin on the passenger seat side and cover both bases with two layers of 1708.
 

Attachments

  • IMG_7546.jpeg
    IMG_7546.jpeg
    86.4 KB · Views: 4
Last edited:

oldrem

Commander
Joined
Nov 7, 2013
Messages
2,002
I have 2 drill presses, but for jobs like that I use a Wolfcraft 4525404 Muilti-Angle Drill Guide Attachment.
 

mickyryan

Rear Admiral
Joined
Apr 18, 2016
Messages
4,216
i just purchased the harbor freight one just to do some minor stuff , i dont have much room so i have to keep that in mind when purching rarely used tools :)
 

QuickPuppy

Petty Officer 1st Class
Joined
Oct 18, 2017
Messages
230
I’ve needed one many times over the past few years and I’ve always been able to use a friends. He was out of town and I didn’t want to lose three days of work waiting on it. I am blessed to have a pretty good sized shop building so I have the space for it. (Once I can get it all cleaned up again when the boat is done!) I figure $115 was well spent.😬

Any thoughts on using surfacing wax on parts that are being glued together, not just covered?
 

AShipShow

Lieutenant Commander
Joined
Jul 8, 2016
Messages
1,803
Can't say for sure from personal experience cuz I've never done it, but I can't imagine the surfacing wax is that big of a deal... what was the reason you used it in the first place? Poly resin cures by lack of air.. if you sandwich it between two pieces, it should fully cure on its own.
 

JASinIL2006

Vice Admiral
Joined
Feb 10, 2012
Messages
5,713
Looks good! Now you just need to avoid getting resin in the holes and messing up the T-nut threads.
 

QuickPuppy

Petty Officer 1st Class
Joined
Oct 18, 2017
Messages
230
How did you do that Jim? I have a couple of ideas: Taping over the tops like I did on the bottom or maybe packing the tops of the holes with playdoh or something of the sort that could be easily drilled back out again. Leaning toward the playdoh idea as I can fill just the hole and not around it too.

That reminds me of why I wanted to countersink the t-nuts a bit more in the remaining base... just in case I needed to tap one out, I'd then have enough room to get the tap through.

I also probably need to think about how to seal the holes themselves to make them waterproof. I drilled them just fraction larger than the bolt width so I wasn't comfortable coating the sides with resin. I'll likely just put a dab of marine caulk at the top of the threads before I tighten them all the way.
 
Last edited:

QuickPuppy

Petty Officer 1st Class
Joined
Oct 18, 2017
Messages
230
I likely didn’t get the MEKP mixed in well enough as I added the chopped fibers before the hardener. I usually add the MEKP as I am adding cabosil and then after it is throughly mixed, I’ll add the chopped fiber. I did it a little out of order and it was probably too thick to mix properly. I am also pushing it on the age limit of the resin I have. I had to strain it before using it because it was starting to gel in the pail on it’s own. I hope to be done with the glassing this week.

I added the wax because I saw that the center of the area (furthest from the base edges) did cure but the rest did not. I figured the wax would help. My concern after the fact, was if the wax separated to the top, does it affect the bond at all?
 

mickyryan

Rear Admiral
Joined
Apr 18, 2016
Messages
4,216
How did you do that Jim? I have a couple of ideas: Taping over the tops like I did on the bottom or maybe packing the tops of the holes with playdoh or something of the sort that could be easily drilled back out again. Leaning toward the playdoh idea as I can fill just the hole and not around it too.

That reminds me of why I wanted to countersink the t-nuts a bit more in the remaining base... just in case I needed to tap one out, I'd then have enough room to get the tap through.

I also probably need to think about how to seal the holes themselves to make them waterproof. I drilled them just fraction larger than the bolt width so I wasn't comfortable coating the sides with resin. I'll likely just put a dab of marine caulk at the top of the threads before I tighten them all the way.

fill them with candle wax
 

JASinIL2006

Vice Admiral
Joined
Feb 10, 2012
Messages
5,713
I’d do as mickyryan suggests. I would pack in cotton balls, leaving about 3/4” to fill with wax. After you glass, drill out the wax and pull the cotton out. You will be good to go.
 
Top