aaaand so it begins - starcraft rebuild

matthewp

Petty Officer 2nd Class
Joined
Jul 14, 2008
Messages
173
Hey everyone,
I joined last year, talking about my '85 Starcraft 21' center console and the rebuild that it needs. I fished it last year with few changes - waiting until this spring for a total rebuild. The weather has been warm enough the last few days to get to work. So far, I've removed the bench, console, wiring, and most of the floor) Still have the piece under the splashwell to get to. I plan to follow all of the steps so well-documented here in these pages by other starcraft owners (thanks for the info and inspiration) - clean the hull, gluvit, template the new floor from the old - epoxy, mat, etc....

One question I have is this: if I rivet the floor down and cover it with epoxy, mat, and whatever final finish I chose, the floor cannot be removed in the future without major surgery because all of the rivets will be hidden under the epoxy. Does this method concern anyone else for this reason? I know the first floor lasted 24 years - and the new one will be better than the factory floor when it was new. Still... makes me a little nervous.

Second question: From what I've seen here, the old foam is always removed - just as a matter of course. How can I tell if mine needs to be taken out?

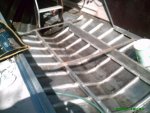
Third question - when I was pulling up the floor, there were some aluminum pieces between the floor and foam. You can see the outlines in the photo looking toward the back after some flooring came out. What are these?

Here are some pictures before taking the floor up:

looking toward the transom:

http://picasaweb.google.com/lh/photo/ouh0Hmuhon9Gv7BJMy8j0w?feat=directlink

toward the bow:

http://picasaweb.google.com/lh/photo/OhKVdu7e5Rp_HADo0KsV3A?feat=directlink

bow flooring removed:

http://picasaweb.google.com/lh/photo/J68xZeEgd1juq00CJ9V1eA?feat=directlink

the foam (and outlines of those aluminum pieces near the splashwell

http://picasaweb.google.com/lh/photo/M19xF29ttylulorNXTre1Q?feat=directlink


How much Gluvit should I get? From what I've read, a gallon may be too much? I'll have many many more updates and questions. Within the next few days I hope to get the boat completely cleaned out and the hull cleaned and ready for Gluvit.

Thanks for looking!
 

North Beach

Commander
Joined
Sep 29, 2008
Messages
2,022
Re: aaaand so it begins - starcraft rebuild

Hey Matt! Sorry for not responding sooner to this post but I've been a tad busy destroying the new paint job on my boat the last several days:D

Danged nice boat you're gonna have there. I think deep down everyone wishes they had a CC to play with! I even thought about converting mine at one point in time.

My spin on your questions would be as follows;

As far as permanently attaching your floor-that's a personal choice. I chose to go back permanently because my floor made it through the first 43 years pretty much OK. Granted, it spent the off hours in a covered carport and was well taken care of and that may be why it lasted so long. Everything was bone dry when I took it apart. Your choice.

The foam is also a personal issue. I don't like the poured in foam for the simple reason it will absorb moisture. But that's me. This question has spurred some fairly heated arguments in the recent past and I'm sure will continue to generate controversy. Take a few cores and see what you find. If you don't like the foam, remove it and replace it with some extruded (blue or pink) or put new poured in place in.

The aluminum peices you're asking about are there to support the end or head joints of the plywood decking. They are fastened to the runners that run the length of your boat, to the stringers on either side and then the plywood is fastened to them. You can see all of this in my resto thread.

Your boat hull is basically identical to mine. If you do one coat of gluvit to all the rivits and seams, you'll use at least a quart. I bought a gallon and it ended up being way too much.

Keep throwing those pictures up and asking questions. The only experience I have is what I've run into with this one boat, but there are folks here who have vast knowledge and they will help if you need it.
 

Bob_VT

Moderator & Unofficial iBoats Historian
Staff member
Joined
May 19, 2001
Messages
26,064
Re: aaaand so it begins - starcraft rebuild

If you are going to use the gluvit the foam has to be removed and I too do not like poured foam and would go with pieces.

If you fasten the deck with rivets you can glass over them..... if it must come up just drill off the rivet heads.

HA HA another starcraft....... the evil plan is coming together..... we starcraft people are taking over one boat at a time :D
 

CheapboatKev

Vice Admiral
Joined
Oct 4, 2008
Messages
5,813
Re: aaaand so it begins - starcraft rebuild

If you are going to use the gluvit the foam has to be removed and I too do not like poured foam and would go with pieces.

If you fasten the deck with rivets you can glass over them..... if it must come up just drill off the rivet heads.

HA HA another starcraft....... the evil plan is coming together..... we starcraft people are taking over one boat at a time :D

Bwaaaaahaaaaaahaaaaaaaahaaaaaa.........Bwaaaaahaahaaaahaaaaaaaa.....
Welcome to the secret evil Starcraft lair, hidden right here under the moderators noises...disguised as a resto forum...in plain sight!
 

matthewp

Petty Officer 2nd Class
Joined
Jul 14, 2008
Messages
173
Re: aaaand so it begins - starcraft rebuild

Thanks for the replies, comrads. NB, the aluminum pieces I'm talking about are about 14" square. There were three across the bottom of the sheet of ply just before the splashwell (you can see their outlines in the last photo - look for the clean, bright foam and you'll have it), and one under the console. Just sitting there between the ply and foam. I'll attach pics of them when I get home. I'm retaining the aluminum strips to tie the joints together and will reuse those. By the way, what did you wind up spending on the pink foam? Thanks for Gluvit info. I'll grab a quart and see where that gets me. I hope there's still some left at Boaters World. I'm going after work.

For the rivets, I'm planning on glassing up the floor and painting it with some non-skid surface - I'm still researching which material to use. So if I glass over the rivets, then paint over the glass, the rivets will be hidden, no? I suppose if I have to do this again (which I'm assuming I WONT, if I do it right), I can sand the joints until I've uncovered the rivets.

I love center console boats - THE best fishing platform for inshore boaters- and that's my whole reason for getting out there! :D I'm trying to keep it roomy, but I'm already "over designing" if you know what I mean. I have to keep reminding myself: Keep it simple.

That's it for now. Trash collection is tomorrow - so I'm hoping to dig that foam out and get it on the curb before then!
 

Tacklewasher

Lieutenant Commander
Joined
Sep 18, 2002
Messages
1,588
Re: aaaand so it begins - starcraft rebuild

painting it with some non-skid surface - I'm still researching which material to use

I like the simplicity of clean sand thrown on the first coat of paint and a second applied on top.

But I'm trying to decide between that and Duradeck. I need to wander over to the local warehouse (2 doors down) to see if they sell roll ends or the like.
 

Mark42

Fleet Admiral
Joined
Oct 8, 2003
Messages
9,334
Re: aaaand so it begins - starcraft rebuild

Hey Matthew, Nice project. Browsing the photos I came across this one, kind of reminds me of those "I Spy" photos where you try to find the listed objects hidden in a mess of stuff.

I spy a 3 way valve, some 10 ga wire, a male portable tank connection, a Moeller water separating filter assembly, a spare filter cartridge, various hoses and cables....

Lots of good stuff in there! Don't toss it!

P1010030.JPG
 

matthewp

Petty Officer 2nd Class
Joined
Jul 14, 2008
Messages
173
Re: aaaand so it begins - starcraft rebuild

Yeah, there are some goodies. I bought the filter last year - it's a Racor. The three way valve may or may not be used, depending on what my fuel tank situation winds up being - a new tank is in order, and it's not going in the splashwell. I figure moving some weight forward in the boat will help the ride. I put two new bilge pumps in last year: 500 gph main pump and 1500 gph (mounted higher up than the 500) for emergencies both on three-way switches- that's what white hoses are - those are going to stay, obviously. I'm very glad to be getting rid of that birds nest and junkyard under the splashwell. I'm starting from scratch with the wiring. Since I decided to run the boat last season, I did the best I could to make it serviceable.
 

sschefer

Rear Admiral
Joined
Nov 13, 2008
Messages
4,530
Re: aaaand so it begins - starcraft rebuild

Matthew, I left the foam out completely. The pour in foam is too expensive and the benifits just didn't add up. I thought a lot about slabs like seems to be the current trend but decided against it when I begin to read about level floating and how important it could be in saving your life.

Now, I'm leaning towards using swimming pool noodles and stuffing them up under the gunwalwes and anywhere above deck that I can hide them. The one thing I've already done was to install fore and aft automatic 1500gph bilge pumps. I'm still contemplating transom scuppers to get the water out fast in case of a swamping. I run hot and cold with that idea and I doubt that I'll do it.

To tell you the truth, I'm just not that concerned about trying to make it float when it's full of water. I'm more concerned about making float when it's not.
 

legoman67

Chief Petty Officer
Joined
Oct 16, 2008
Messages
636
Re: aaaand so it begins - starcraft rebuild

if you look closely you can even see a perfectly good looking battery in there!
 

North Beach

Commander
Joined
Sep 29, 2008
Messages
2,022
Re: aaaand so it begins - starcraft rebuild

Sorry Matt! I misunderstood what you were asking about. What was there on top of the deck? Kinda looks like someone was tryin to re-inforce the deck, maybe for some pedestals or something. I played around with doing that for my seats up front. Other than that, your guess is as good as mine.
 

matthewp

Petty Officer 2nd Class
Joined
Jul 14, 2008
Messages
173
Re: aaaand so it begins - starcraft rebuild

Hey Lego, you're right! Took me a few minutes, but I found it. Man, that was even harder than those Waldo books. :D

NB, those aluminum pieces were between the factory deck and the factory foam. Starcraft put 'em in there. I just can't figure out why.

Rain kept me out of the boat last night. I did score a quart of gluvit @ boaters world. Big news, though, is that I got my tax return yesterday. Now I can start buying materials with something other than grocery money.

(cue Mr. Roger's voice): "That's right, children. Can you say bach-e-lor? Very good. You see bachelors can get away with silly things like buying trailer jacks instead of Apple Jacks."
 

matthewp

Petty Officer 2nd Class
Joined
Jul 14, 2008
Messages
173
Re: aaaand so it begins - starcraft rebuild

Weekend Update:
I got some quality time in on Saturday. I took the rest of the plywood and foam out of the boat. The foam: I don't think I've ever felt as disgusting and filthy as when I finished with THAT little slice of heaven (and that's even counting the college years).

Question: Gee, do ya think I really need to take the foam out?

Answer: http://picasaweb.google.com/lh/photo/VwS1jskvkk9S9V9YqFRkTA?feat=directlink

I came across some not-so-great discoveries. One is that the aluminum stringers have some rot. I don't know how this happened, but...

http://picasaweb.google.com/lh/photo/cPDBUiEgE0dXIaiHiVoOVQ?feat=directlink

When you guys were stripping your boats, did your stringers come out? For me, they literally popped out while I was digging the foam out. They're not in the greatest of shape. I perish the thought of needing to replace them. Has anyone replaced theirs?

Another discovery: Some weird goop that randomly appeared here and there. My first thought was it may have something to do with the batteries, as there were batteries directly above both places where this strange substance was found. You're looking at one stringer that I pulled away from the foam and layed down.

http://picasaweb.google.com/lh/photo/YOjGdNWrjj-oPGDKaR72WQ?feat=directlink

Here's a shot of a big chunk coming out. Most of the foam was rock hard on the bottom and HEAVY with water. Methinks the boat will tow better, run faster, and burn less gas with that weight out of the boat. I'd hazard a guess of at least 150 to 175 lbs of the stuff out of the boat (the water-logged plywood: another 100 or more). The knife was for digging the foam out, really. I wasn't contemplating "sharing" it with the previous owners of my boat, officer, I swear.

http://picasaweb.google.com/mpprovost/Boat?feat=directlink#5318977380361117586

Next up is making the hull squeaky shiney clean and prep for Gluvit. We're getting rain off and on this week, so I'm beginning to design/build the console and bench/leaning post inside the house. I spent most of this winter dragging the bottom of craigslist looking for used consoles and leaning posts - nothing worth the effort. While I'd love to just buy something pretty to screw down, I can't justify the dough. Soooo, I'm building them. More on that later.
 

CheapboatKev

Vice Admiral
Joined
Oct 4, 2008
Messages
5,813
Re: aaaand so it begins - starcraft rebuild

You said...

I came across some not-so-great discoveries. One is that the aluminum stringers have some rot. I don't know how this happened, but...

Well..I would guess that your foam (also known as sponge,lol) held so much water over time it simply was more than yours could stand and they rotted..
I thought MY Starcraft had issues...but whew...I feel for ya Matthew!
Heres a pic of what mine looked like as purchased...
 

Attachments

  • 111034.jpg
    111034.jpg
    70.6 KB · Views: 1

Bob_VT

Moderator & Unofficial iBoats Historian
Staff member
Joined
May 19, 2001
Messages
26,064
Re: aaaand so it begins - starcraft rebuild

If you think.... that battery acid has contaminated anything .....wash it down with baking soda and water to neutralize anything that may be lurking.

Once you get past the nasty stuff and get it cleaned the pace will pick up nicely.

Make sure you mix the gluvit a long time and use a small brush. Hit the rivets (AFTER YOU ARE SURE they are tight) and the seams.

Gluvit is creepy.... it really does creep so you should consider that when you use it...... it creeps down hill ;)
 

matthewp

Petty Officer 2nd Class
Joined
Jul 14, 2008
Messages
173
Re: aaaand so it begins - starcraft rebuild

Thanks for the input guys. I do plan to enlist a buddy to help tighten up any loose rivets I find before the gluvit application. The way it's looking - it will be at least a week before getting down to that. The forecast looks pretty wet.

I hope soon, though, to have something clean to show you guys. Pretty soon, I'll be finished with ripping things out, and focus on putting things IN. My current plan with the stringers is to get 'em cleaned up and reinforce the weak areas with aluminum and rivets and reuse them.
 

North Beach

Commander
Joined
Sep 29, 2008
Messages
2,022
Re: aaaand so it begins - starcraft rebuild

Matt, sorry to see you found that mess. Man, I've decided I hate that poured in foam. Please do yourself a favor and go back with the blue or pink extruded!

Hey you know any local roofing and sheet metal company could fabricate new stringers for you. They could brake them in 8 foot lengths and you could rivit them together to get the lengths you need. I don't see why they would need to be one continuous piece. as long as everything ties in in the end, you should be OK.
 

sschefer

Rear Admiral
Joined
Nov 13, 2008
Messages
4,530
Re: aaaand so it begins - starcraft rebuild

Hey you know any local roofing and sheet metal company could fabricate new stringers for you. They could brake them in 8 foot lengths and you could rivit them together to get the lengths you need. I don't see why they would need to be one continuous piece.

My local sheet metal shop got me some aluminum channel that was 2x8x2 x 16' one time. Don't know where they got it. You'ld have to cut out for the ribs but a sabre saw would do that easily.
 

matthewp

Petty Officer 2nd Class
Joined
Jul 14, 2008
Messages
173
Re: aaaand so it begins - starcraft rebuild

good ideas, guys. I've got a buddy in the trades with a 'git-er-dun' attitude. It's in his interest to pitch in - I put him into some good blitzes last year - so he's motivated. I'm going to run this by him.
 

North Beach

Commander
Joined
Sep 29, 2008
Messages
2,022
Re: aaaand so it begins - starcraft rebuild

Matt, to bad you're not closer. I have a sheet metal brake here:D
 
Top