Boat restoration 1989 Charger 1850

kcassells

Fleet Admiral
Joined
Oct 16, 2012
Messages
8,738
Oh yea....you will want to save your livewell for any kind of storage. save it. Cut around it @2-3" and it goes back in and now has a flange.
Dude...you have a project. drink a beer, relax, it's not going anywhere so put it back righ and safe. :watermelon:
 

ChargerMan1

Petty Officer 3rd Class
Joined
Jul 12, 2020
Messages
76
I cut the bottom pan out. After the deck is in, I used the resin and made fillets to raise the whole section so the windows align like they are supposed to

#301 on my resto project

My guess if you do it this way then you can get the whole bow easily? Compared to trying to do it around the middle part of the bow? And I have a board that runs along the bottom from the front of engine block to the bow. So this would make it super simple. So you have done this a while ago. How is it holding up today? The bow part you cut
 

Chris51280

Ensign
Joined
Jan 24, 2018
Messages
932
My guess if you do it this way then you can get the whole bow easily? Compared to trying to do it around the middle part of the bow? And I have a board that runs along the bottom from the front of engine block to the bow. So this would make it super simple. So you have done this a while ago. How is it holding up today? The bow part you cut

Its holding up just fine. It also has the advantage by not trying to get the floor level with the bottom of the "hallway" of the bow section. Once you cover it up with carpet if you want, you won't even see it. If you leave it and paint or gelcoat, then some sanding is involved. So, either you work around the obstacles before or have the work later where you won't be twisted into a pretzel trying to get it in there and work around this bow section. Choice is yours.
 

ChargerMan1

Petty Officer 3rd Class
Joined
Jul 12, 2020
Messages
76
Its holding up just fine. It also has the advantage by not trying to get the floor level with the bottom of the "hallway" of the bow section. Once you cover it up with carpet if you want, you won't even see it. If you leave it and paint or gelcoat, then some sanding is involved. So, either you work around the obstacles before or have the work later where you won't be twisted into a pretzel trying to get it in there and work around this bow section. Choice is yours.

Ok, guess who made it to the bow! But as you can see on the pics I am not even sure where to go here. I mean is this enough and if not what did you use to get the rest?
 

Attachments

  • 20200716_154342_resize_85.jpg
    20200716_154342_resize_85.jpg
    1.2 MB · Views: 0
  • 20200716_154345_resize_88.jpg
    20200716_154345_resize_88.jpg
    1.2 MB · Views: 0
Last edited:

Chris51280

Ensign
Joined
Jan 24, 2018
Messages
932
I cut out the bottom about 1/2" to 3/4" from the floor upper face. I got enough room to reach everything to get the stringers in. Then i started with the bow section of the floor. After the floor is in, thats when I supported the front sides and aligned the windows so they look symmetrical. Thats when I used PB and filled in the gap. Used fairing compound to smooth things over. Its up to you if you want to carpet or paint the floor then
 

Chris51280

Ensign
Joined
Jan 24, 2018
Messages
932
Ok, guess who made it to the bow! But as you can see on the pics I am not even sure where to go here. I mean is this enough and if not what did you use to get the rest?

its hard to tell, but it looks to be ok to get to the stringers on the inside
 

Chris51280

Ensign
Joined
Jan 24, 2018
Messages
932
there is a set srew on the bottom angled in. I think its 1/8 or 3/16 allen wrench. take the middle knob out. just plastic snap to pull. take the phillips screw out and unhook the 4 color wires. then pull the handle. then you can see the screws behind the cover
 

kirkll

Cadet
Joined
Jun 9, 2020
Messages
27
I'm not real experienced at restoring old glass boats, but i just replaced the shift control just like yours on my 1990 Blue Water, and your shift control handle only screws to that panel, It does not screw into the hull or blocking holding the panel in place. you will have to remove the whole panel, and disassemble the handle to remove it from the panel & disconnect the shift/throttle cables from the back side.

Look for hidden screws in the seam of the upholstery to get the panel loose. I had two hidden screws myself. Kirk
 

ChargerMan1

Petty Officer 3rd Class
Joined
Jul 12, 2020
Messages
76
I'm not real experienced at restoring old glass boats, but i just replaced the shift control just like yours on my 1990 Blue Water, and your shift control handle only screws to that panel, It does not screw into the hull or blocking holding the panel in place. you will have to remove the whole panel, and disassemble the handle to remove it from the panel & disconnect the shift/throttle cables from the back side.

Look for hidden screws in the seam of the upholstery to get the panel loose. I had two hidden screws myself. Kirk

Jeez are you kidding me lol
 

ChargerMan1

Petty Officer 3rd Class
Joined
Jul 12, 2020
Messages
76
Engine out! That was fun in 105 degree weather
 

Attachments

  • 20200718_142316_resize_89.jpg
    20200718_142316_resize_89.jpg
    1.2 MB · Views: 0
  • 20200718_142311_resize_17.jpg
    20200718_142311_resize_17.jpg
    1.5 MB · Views: 0

ChargerMan1

Petty Officer 3rd Class
Joined
Jul 12, 2020
Messages
76
This probably is a dumb question, but I am new at this so... should I take measurements of my engine mount? So that it will be easier to remount it when I'm done cleaning the boat out? Pulling the engine out was pretty simple, but it seems that it could be a pain to reinstall. So I'm guessing if I take those measurements and rebuild it the same way hopefully I will cut down on error. I noticed that the mounts were 4x4s right next to each other. Ill see more when i tear into them, but that's what it looks like.
 

Original Thor

Seaman
Joined
Jun 11, 2020
Messages
61
When I took my boat apart i took measurements of everything I could. Mine is a outboard but so little different but the stern of the boat actually moved about a half a inch out so had to use a strap and pull it in while I tabbed it in and put PB along the bottom. Once it set up it held in place.
 

ChargerMan1

Petty Officer 3rd Class
Joined
Jul 12, 2020
Messages
76
So, it looks like when they originally built this they used 4x4's. Is this the same way that I rebuild it once I get everything grinded and sanded down? Or is there a better way to do it?
 

Attachments

  • 20200722_083013_resize_90.jpg
    20200722_083013_resize_90.jpg
    1.5 MB · Views: 0

AShipShow

Lieutenant Commander
Joined
Jul 8, 2016
Messages
1,803
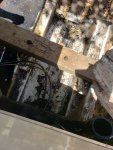
Typically following what the manufacturer did is a safe bet, however, theres always room for improvement since they did what they could to meet the bare minimum requirements to keep costs down... 4x4s will work just fine... I decided to make my new engine mounts from plywood and through bolt them instead of lag screws... Definitely more work to glass in, but less likely to rot since any water can drain through the holes instead of sit there.

Same goes with floors, stringers, bulkheads, transoms, etc... put back what was there at a minimum, but don't be afraid to use something different or better... We'll tell you if its a good idea or not...
Typically exterior grade plywood is what most of us use for stringers, bulkheads, transoms, and floors cuz its readily available and significantly cheaper than "marine-grade" plywood, and basically the same stuff...

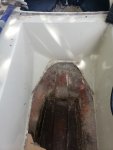
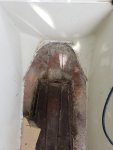
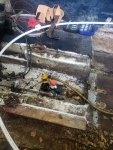
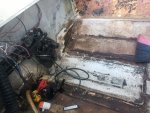
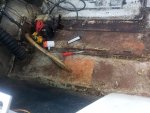
For now, worry about removing the rot and grinding down to clean glass...

Hopefully you're taking measurements of everything, more than you think you need, cuz you'll forget 3 months from now when you're putting stuff back together.

Good luck, stay cool, drink water (or coors light, same thing), and keep at it
 

ChargerMan1

Petty Officer 3rd Class
Joined
Jul 12, 2020
Messages
76
Ok update. Got the whole back part out for the most part anyway. I have found a few things while I was doing it. There is a hole in the hull. The middle what part seems to be one whole composite piece that apparently needs to be ripped up...yay. the transom is solid at the top and middle. I was talking to my neighbor whom builds boats. Mostly sailboats. He said my transom is fine, but if I am worried about it I could reinforce it by putting 3/4 marine grade plywood over it. Probably use PL adhesive, glass it, and then he said to run bolts all the way through it to make sure I get complete squeeze out. I found that the wood that was next to the 4x4s were two heavy 2x6s. So could use something else that's lighter which would be good for the boat I'm guessing.
here is a video update of everything. If you want to see it.
Thanks again everyone for the pointers and help.
https://www.youtube.com/watch?v=FMKv...&feature=share
 

Attachments

  • 20200722_162613_resize_22.jpg
    20200722_162613_resize_22.jpg
    1.5 MB · Views: 0
  • 20200722_162610_resize_79.jpg
    20200722_162610_resize_79.jpg
    1.4 MB · Views: 0

kcassells

Fleet Admiral
Joined
Oct 16, 2012
Messages
8,738
Sounds like alot of smack ast suggestions from your boatbuilder buds. Replace the thing and forget about it.
 
Top