WellcraftSportsman23
Cadet
- Joined
- Jun 24, 2009
- Messages
- 28
Before I start, the boat is a 1985 Wellcraft that is getting heavy in the water. I know the right fix is a new transom and assembly but I am not spending $7 - 10 K on a boat that is worth $3000 tops. Here is my question:
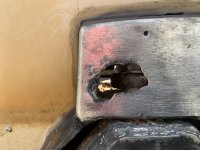
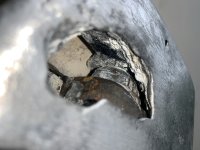
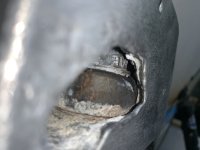
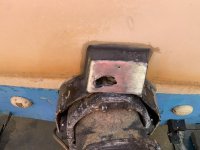
So I noticed a hole in my Bravo one Transom Assembly as I was getting her ready to go in. When I bought the boat, the previous owner disconnected the Mercathode system and it created a nasty hole. I change the Zincs every year, however never noticed the disconnected system.
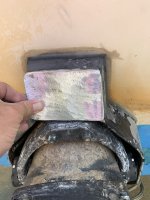
I did some research and saw what JR Marine did with creating a window for the steering arm replacement. I have cleaned the aluminum up and had a cover cut. I was thinking of using 4200 to adhere it, so should I tap screws into the 4 corners? I would have to use stainless steel ones but I am afraid with the dissimilar metals. Any advice is appreciated.
So I noticed a hole in my Bravo one Transom Assembly as I was getting her ready to go in. When I bought the boat, the previous owner disconnected the Mercathode system and it created a nasty hole. I change the Zincs every year, however never noticed the disconnected system.
I did some research and saw what JR Marine did with creating a window for the steering arm replacement. I have cleaned the aluminum up and had a cover cut. I was thinking of using 4200 to adhere it, so should I tap screws into the 4 corners? I would have to use stainless steel ones but I am afraid with the dissimilar metals. Any advice is appreciated.